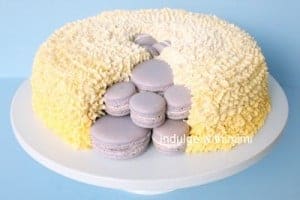
I like bringing cakes to festivities because it always seem to bring people together in a blissful way - there's the presentation of the cake to your hostess or guest of honour, showing it off on the cake table, gathering around for photos and finally cutting the cake. Now can you tell me what other food can let you do all that?
The inspiration from this cake came from all those outrageously sweet (literally) cakes with candy pouring out of it. I really like the drama and action of such a design but unfortunately, it's been done so many times that it has become kind of a basic cake. I really wanted to design a cake with that "Wow" factor but it had to be something original.
I decided to incorporate the idea of a "surprise" with this cake using my favourite weapon of choice - macarons! Below are the notes on each element:
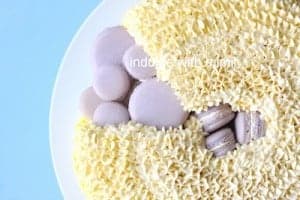
Since macarons are not as free flowing as a handful of smarties, I determined it was best to build the macarons right into the cake and make it look like it was part of it. For the cake base, I baked a chiffon cake in a fluted cake pan since it had a natural cavity in the centre for placing the macarons.
Next, I cut a piece of the cake out and inserted one big and one small macaron inside while aligning it with the outer edge to make it look like one seamless circle. Cut a small piece of the cake first and if it doesn't fit, try cutting a little bit more at a time. Be careful not to cut up too much at once since you want the macarons to fit snugly against the cake.
Break up the piece of cake that you cut out. Use the crumbs to fill in the gaps between the macaron and the cake so that it will be smoother and easier to ice later.
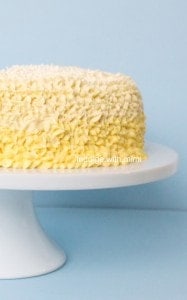
I used an Italian buttercream to frost this cake with an open star tip. The idea was to make the macarons look like they are peeking out of the cake so I piped frosting all around the macarons and cake to conceal any unfinished edges. The star tip lends itself nicely as it creates a very "fluffy" looking cake and it contrasts so well against the edgier lines of the macarons.
Chiffon cakes are very airy and soft so they are usually frosted with a lighter frosting like whipped cream so as not to weigh down too heavily on the cake. Whipped cream in this cake won't work because you're also working with macarons. The moisture content in whipped cream is too high so it will eat away at your macaron shells within a few hours. Just use a buttercream and relax a bit with the frosting. You don't need to frost it too far in advance since you don't want the oils from the buttercream to leave blotches on your macarons. I frosted this cake about 8 hours in advance and there were no signs of oil blotches when it was time to cut the cake.
To give the cake an even airier appearance, I used a yellow ombre effect with piping the top lightest and progressively darker as I worked my way down.
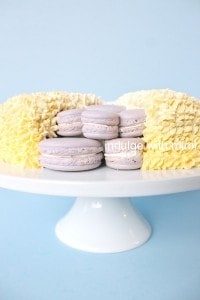
Since the cake was for a party, I wanted everyone to be able to enjoy it so I played it a little safe with the flavours. . The cake body is vanilla and the filling is a chocolate ganache. Because chiffon cakes lack butter, it is not as rich so it tastes best with more flavourful fillings, hence, chocolate ganache! Where I had a little bit of fun was with the macarons. They're light purple so can you guess the flavour? - LAVENDER!
UPDATED ON NOV. 19th, 2015
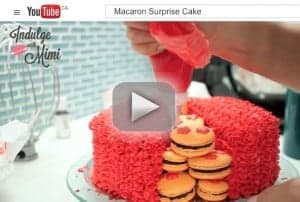
Here's another version I made and here is the video tutorial:
Here are the step by step instructions and a recipe for the chiffon cake if you don't yet have a favorite chiffon cake recipe.
❤ Step By Step
♥ prepare macarons (recipe here) of various sizes so they you will be sure to find a good match to fill in the cavity and gaps in the cake
♥ prepare chiffon cake (recipe below)
♥ divide the cake into two layers
♥ fill with chocolate ganache
♥ crumb coat it with buttercream
♥ place in the fridge for 15 to 30 min. to harden up
♥ cut a piece of the chiffon cake out, crumble into small pieces
♥ place the macarons inside the cake making sure to align it along the outer edge carefully to make it look like a seamless circle
♥ fill the remaining gaps between the cake with macarons
♥ use the small pieces of cake to fill in gaps so it evens out the lines and make it easier to frost later
♥ make buttercream, color it a light shade of yellow
♥ pipe the buttercream with an open star tip starting from the top, once you have filled half the top, return buttercream in the pastry bag back in to the bowl
♥ add more yellow colouring to the buttercream, mix well
♥ pipe the remainder of the cream in the same way, adding more colouring when you see fit
♥ take your time piping along all the edges and fill in gaps between the cake and macarons. This will give it the effect of macarons "spilling" out of the cake
♥ enjoy!
❤ Vanilla Chiffon Cake Recipe
Cake Batter
- 75 gm cake flour
- ½ teaspoon baking powder
- ⅛ teaspoon salt
- 5 egg yolks
- 35 gm caster sugar (fine granulated sugar)
- 35 gm vegetable oil
- 45 ml milk
- 1 ½ teaspoon vanilla extract
Meringue
- 6 egg whites
- 50 gm caster sugar
- ½ teaspoon cream of tartar
Chocolate Ganache Filling
- 70 gm semi-sweet chocolate
- 70 gm heavy cream
♥ Set the egg whites on the counter to bring to room temperature
Egg whites whip up to a higher volume at room temperature
♥ Separate the egg whites into a very clean and dry non-plastic bowl
Ensure that there are no traces of egg yolks, shells or water in the bowl as these will hamper the making of your meringue later. If you are using a plastic bowl, wipe it down with some vinegar, this will remove any oil residue.
♥ Mix the dry ingredients together: cake flour (80 gm), baking powder (½ tsp), salt (⅛ tsp)
♥ In a large mixing bowl, beat the egg yolks (5 yolks) and caster sugar (35 gm) until it turns into a pale yellow mixture.
♥ Add the vegetable oil (35 gm), vanilla extract (1 ½ tsp.) until well combined
♥ Sift the dry ingredients (cake flour, baking powder, salt) into the wet ingredients (yolks, sugar, oil, extract) alternating with the milk (45 ml) and gently incorporate it with a spatula until just combined. Set it aside.
As soon as you can't see the last ingredient you added, you can stop. Be careful not to over-mix as this will cause the gluten in the flour to form elastic gluten strands which leads to a dense and chewy cake.
♥ Preheat oven to 170C (338F)
♥ In a clean bowl, use the egg whites (6 whites) to make a meringue with the granulated sugar (35 gm).
♥ Beat the egg whites with a handheld mixer until foamy, then add cream of tartar.
Acidic agents like tartar, vinegar and lemon all help stabilize a meringue so if you can't find cream of tartar, you an substitute it with half a teaspoon of lemon juice or vinegar.
♥ Once the egg whites leaves "trails", add the granulated sugar ⅓ at a time
Leaving trails mean that you can literally see the indentation of the whisk's tracks in the egg whites. Add the sugar in thirds, taking care to incoroporate the sugar throughout the mixture.
♥ Keep beating until stiff peaks
Stiff peaks refers to how the egg whites appear when you pull the whisk out of it. It should be so firm that it literally stand up vertically and point upwards without falling back into itself. Also, test it by flipping your bowl COMPLETELY upside down. The whites should not slip or fall, instead it stays firm inside the bowl. Test this mixture by flipping it upside down COMPLETELY. It should not slip or fall and will remain intact inside the bowl.
♥ Gently fold meringue into the batter until fully incorporated.
Don't overdo since you don't want to deflate all the air in the meringue. We are relying on the air bubbles in the meringue to help rise this cake. The mixture should look fully incorporated with no large clumps of white meringue left.
♥ Pour the mixture into one spot in the cake pan from a low height.
You do not need to try and smooth out the top with a spatula. Rap the mold onto the counter a few times to get the air bubbles out. This will prevent it from cracking during baking.
♥ Place into the oven for 35 to 40 minutes.
Test the cake with a needle. If it comes out clean, it’s cooked. Remove from the oven and invert the mould immediately.
♥ Let the cake cool completely, around 30-45 min.
Don't let it sit too long, it will build up too much moisture and stick to the pan.
♥ Use a sharp knife to run around the edges of the mould (don't forget to dislodge the center too) and take out the cake carefully.
♥ Divide the cake into two layers.
♥ Heat up the cream in a small sauce pan, once it comes to a boil, pour over chopped chocolate and stir until fully incorporated and all the chocolate has melted, fill the cake.
♥ Voila! Frost and design the cake to your heart's content.
Updated on October 25th, 2015
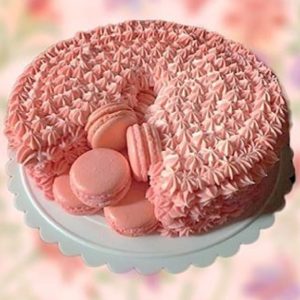
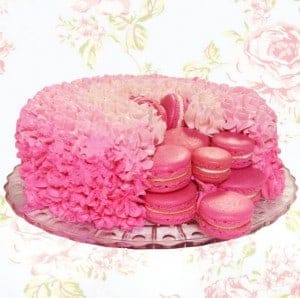
Very excited to show you these two other cake twins made by the following readers user this recipe:
[srp post_limit='5' post_random='yes' category_include= 24 widget_title = 'Other #MacaronArt You Might Like']

Yvonne says
Hi Mimi,
I'm using 6" non stick pan. Do I need to line the sides?
Thanks in advance
Mimi says
Chiffon cakes usually don't require lining of pan so that the cake can "climb" up the sides of the pan. If your pan is non-stick, you should be okay without lining it.
xoxo,
Mimi
Kay says
Hi! Just wondering how long can the macaron sit out on the cake? Would it turn soft or become melted?
Mimi says
Since I used a meringue buttercream, it can last for quite a long time without getting soggy (so several days). It would be the same as if you had added the buttercream onto the inside of the macaron as a filling. The only thing that would not be so ideal would be any oil splotches that might develop from over exposure so try to assemble the cake and macarons the night before only.
XOXO, Mimi
Lisa | THINK LIKE A BOSS LADY says
I loved seeing this on your Instagram feed.
The macarons are such a fun surprise and give it great texture. Just have to worry about people fighting over them! ;D
Lisa | THINK LIKE A BOSS LADY