
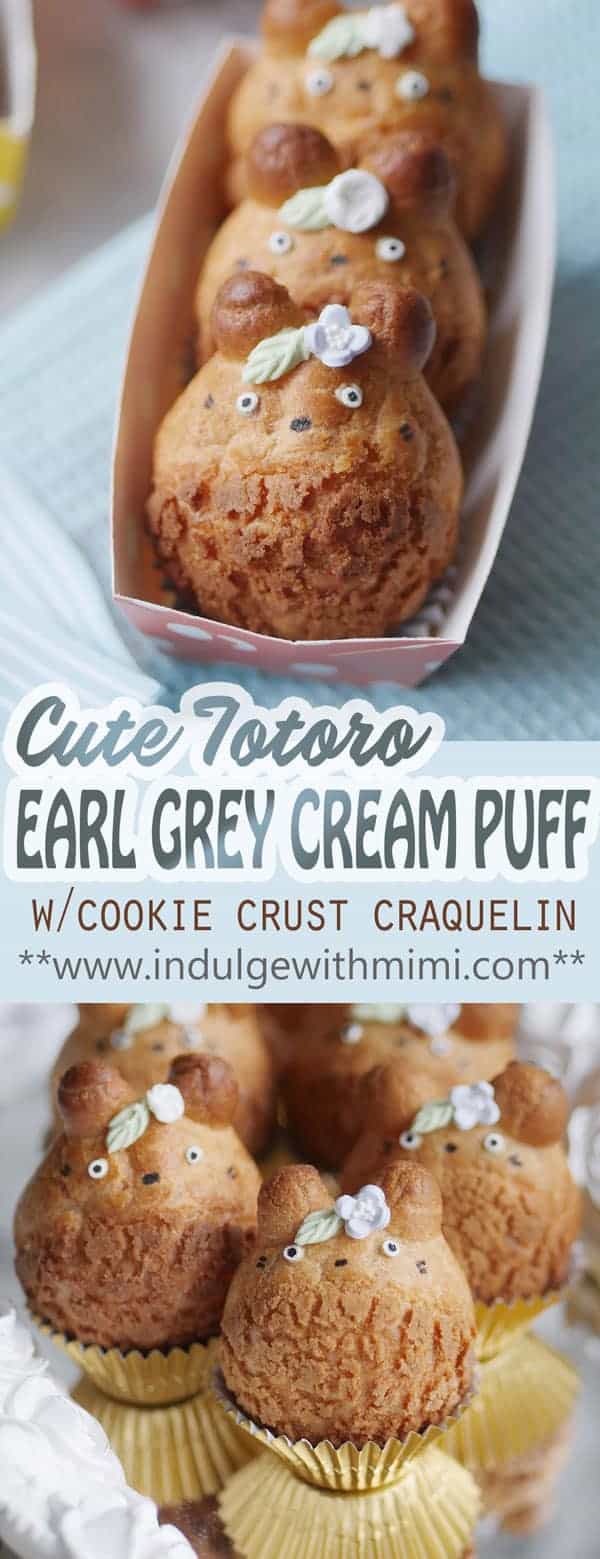
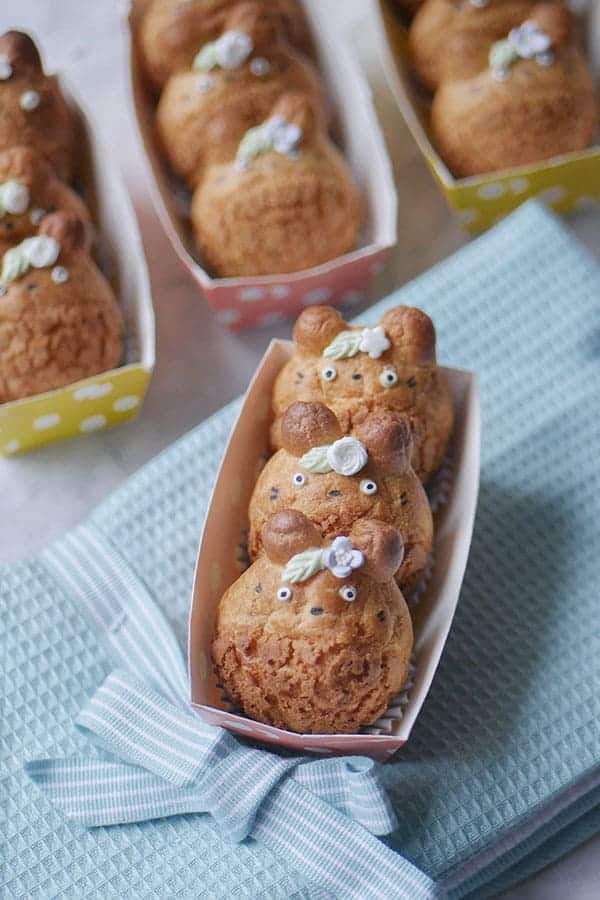
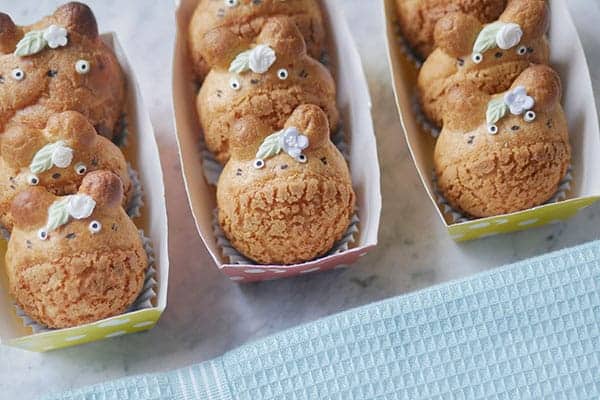
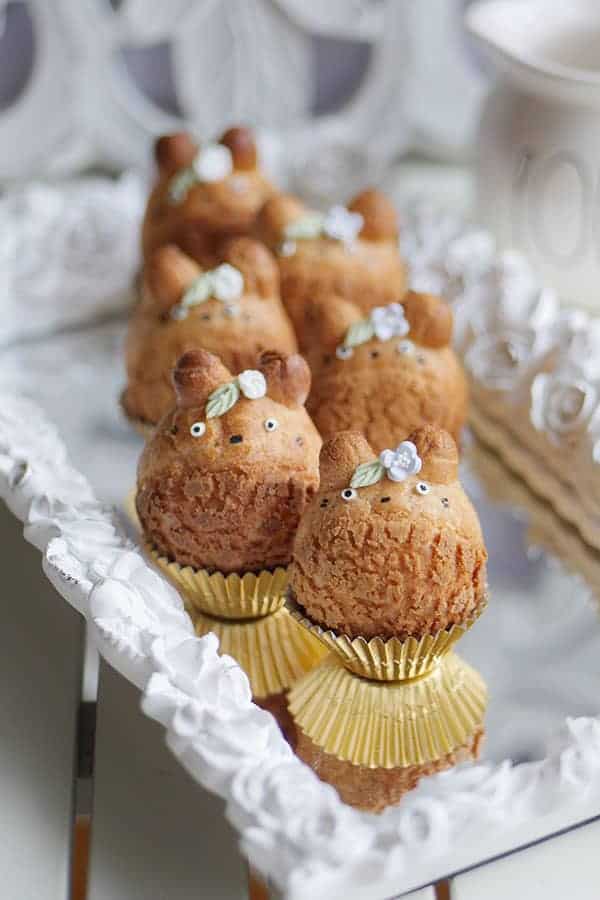
Super cute Totoro cream puffs filled with a creamy Earl Grey tea cream and topped with a crispy cookie crust. A delicious treat for birthday parties, baby showers, or gift giving.
A Choux Pastry Recipe for Character Cream Puffs
A few weeks ago I took an eclair class taught by a European pastry chef. It was very informative and I learned so much on the proper way to make a good eclair. Plus it's always a good experience to be in a professional kitchen working with commercial grade kitchen equipment, especially the oven.
After the class, I started experimenting right away with making cream puffs in my home kitchen because I had just the cute character in mind that I wanted to make with the choux pastry recipe we were taught. I thought the beloved Japanese anime character, Totoro, would be a perfect character to make into cream puffs because it had an adorably big belly which was naturally round and it would allow craquelin to be place on there to define the belly area.
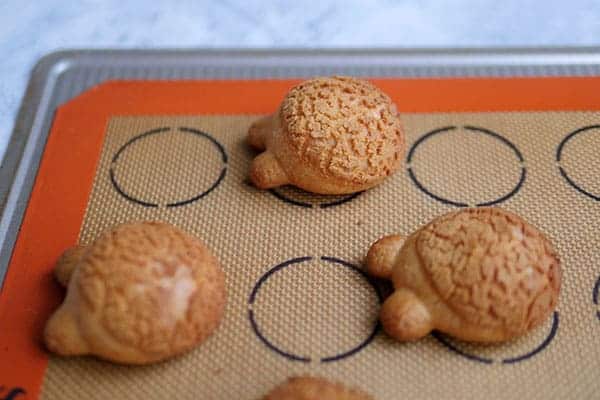
I made several attempts at baking Totoro with the class recipe but each time it would not look anything like him. The cream puff was exploding into different shapes and was not smooth and uniformed like the shape I had envisioned in my mind when I first piped it. The instructor had warned us about this as his recipe leaned towards the traditional composition for choux pastry. He explained that the "modern day" eclairs/cream puffs sold in gourmet patisseries now had a more consistent look to them at the expense of less rise. That made sense. My first few batches of Totoros looked great when piped but after baking, they were unruly and puffed up into every which way it wanted.
I ended up creating a new recipe which would be conducive for baking these cute Totoro characters consistently. It's the recipe which I am sharing below. Before starting, you might also want to read some of the tips on how to bake a nice cream puff.
Why Did My Cream Puff Collapse?
I found that cream puffs were much easier to bake than macarons in that there wasn't a lot of places where something could go wrong. The worst thing that could happen to a cream puff aesthetically would be a collapsed shell, leaving it flat, lifeless and hard to fill since the inside is doughy and not hollow. To prevent this, there are a few crucial steps to pay attention to:
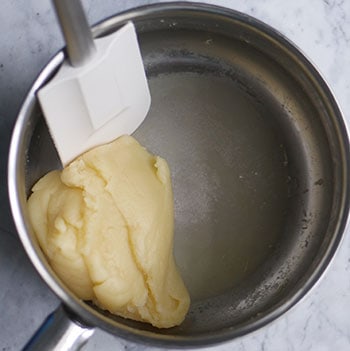
- Make sure that the dough is thoroughly dried out while mixing in the pan. Only stop mixing the dough when a light film starts coating the bottom of the pan. Take a look at the photo provided below to get a visual cue.
- When baking, pate a choux requires a high heat in the very beginning to help it rise (preferably, 400F+ for most home ovens). Only after it has risen and achieved a golden colour, can the temperature be lowered. To lower the temperature of the oven, the oven door can be opened ajar and the temperature readjusted on the oven controls. Depending on how quickly your own oven reacts to changes to temperature readjustments, you may want to consider opening the door slightly to prevent the cream puffs from over-baking. Just make sure that it has fully risen and turned golden before doing this. Otherwise, the puff can deflate.
- Once the temperature is lowered, make sure to bake it long enough to ensure the puff is fully set and dried out. This could be anywhere between 18-20 minutes. Just look for visual cues like a golden colour on all sides.
I Want to Bring These to a Party, Can I Make Cream Puffs in Advance?
Although cream puffs are best eaten on the day it's baked, you can still make some elements needed for this recipe in advance. This will cut down the amount of work you will need to do in advance of a party or other special event. Tip #2 was told to me courtesy of our instructor who related that this was one way they were able to always have pâte à choux on hand when he worked as a pastry chef in the hotel industry. Here are some elements of choux pastry which you can make ahead of time and how to do it:
- The choux pastry dough can be made 24 hours (remember it contains raw eggs) in advance of piping, just place it in a piping bag inside the fridge until it's ready to be piped.
- Better yet, piped shells can be left on the tray and placed in the freezer until it becomes firm, transfer it into a Ziplock bag until it's ready to be baked.
- Shells that are baked and unfilled can be frozen for up to one month in a Ziplock bag. They can be re-crisped by baking in the oven for 8-10 minutes on low heat, around 300F.
- The Earl Grey Diplomat cream can be made 24 hours in advance. Please note, this will also cut down the shelf life of the cream.
- Royal icing sugar decorations made with meringue powder can be made in advance and be kept almost indefinitely in an airtight container in a cool, dry and dark place. Make sure to leave them to air-dry completely for one week before packing them up.
Totoro cream puffs are actually not too hard to bake and they are a real crowd-pleaser. I found that they made excellent gifts when wrapped in a small loaf pan and you only need 3 of them to make a big impact. It's a fantastic edible gift for the holiday season coming up. Give it a try and let me know how it goes!
XOXO,
Mimi
Recipe
Cute Totoro Cream Puffs with Earl Grey Cream

A super cute cream puff in the shape of beloved Japanese anime character, Totoro. Filled with a creamy Earl Grey tea cream and topped with a crispy cookie crust.
Ingredients
Cookie Crust Ingredients
- 42 grams unsalted butter at room temperature
- 50 grams brown sugar (demerara)
- 50 grams cake flour *
Cream Puff Ingredients
- 140 ml water
- 65 grams unsalted butter
- 1 tablespoon granulated sugar
- ½ teaspoon salt
- 80 grams bread flour *
- 1 whole egg
- 2 egg whites
- ¾ teaspoon vanilla extract
Earl Grey Diplomat Cream - Part 1 Whipped Cream
- 150 ml heavy cream*
- 2 Earl Grey tea bags
Earl Grey Diplomat Cream - Part 2 Pastry Cream
- 105 ml heavy cream*
- 25 grams granulated sugar
- 1 egg yolk
- 10 grams corn starch
- 10 grams unsalted butter
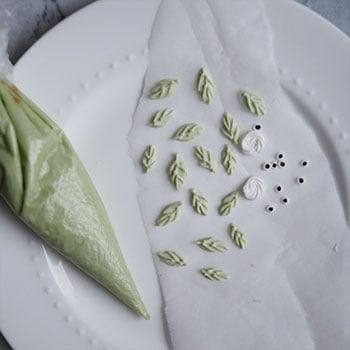
Decorations
- Round white confetti sprinkles
- Black edible pen
- Royal icing
- Sugar leaves
- Sugar flowers
Instructions
Cookie Crust Instructions
- Set butter out at room temperature to soften.
- In a stand mixer fitted with the paddle attachment, cream together sugar and room temperature butter.
- Sift in cake flour and continue beating to fully incorporate.
- Once fully incorporated, form dough into a round and flat shape and wrap with plastic wrap. Place in refrigerator.
- Chill for 30 min. so it can be easier to roll out.
- Dust rolling surface (preferably a portable one that can be put into the fridge) with cake flour, roll out dough to a 3mm thickness. Cover lightly with plastic wrap. Place back in fridge until ready to use.
Cream Puff Instructions
- In a medium sized pot, bring water, butter, sugar and salt to a boil on medium heat. Ensure butter is melted before liquid comes to a full boil to prevent loss of liquid.
- Once it comes to a rolling boil, quickly add flour into the liquid and blend it vigorously with a spatula.
- Continue blending to let the steam out of the dough. Once a light film thoroughly coats the pan, stop blending. The dough will look like smooth mashed potatoes but more pliable and springy. It should not have any lumps inside.

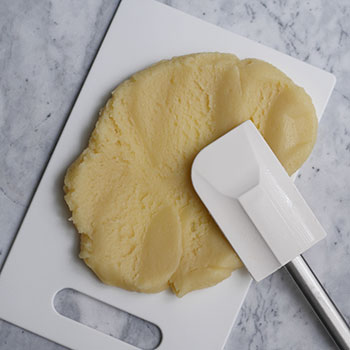
- Remove from heat. Break open the dough mass and spread it out on a flat surface to let the steam out. Flip over to cool the other side too.

- Pre-heat oven 425F. Every oven is different, adjust your own accordingly.*
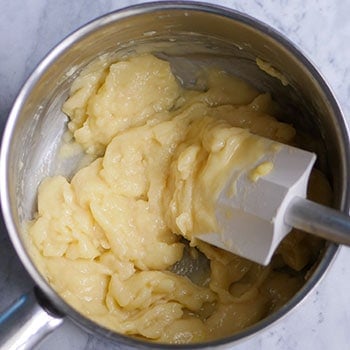
- Once the dough has cooled, place it back into the pot. Add one egg/egg whites at a time to the dough and incorporate well with a spatula. It won't incorporate at first but keep blending. It will all come together.
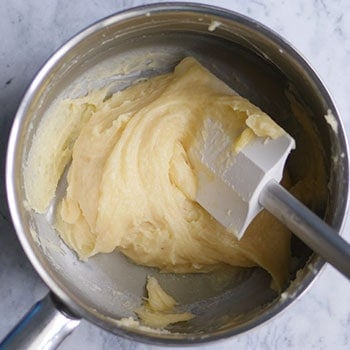
- Stop blending when it's fully incorporated and the dough turns from glossy to matte.
- Add the vanilla extract and blend until incorporated.
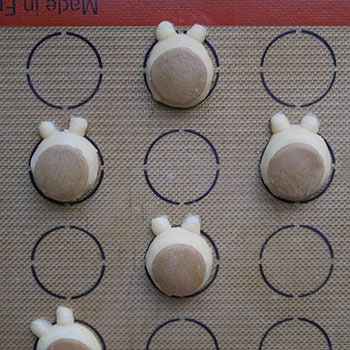
- Transfer to two piping bags, one cut with a 1.5" opening (for piping the body) and the other fitted with round piping tip #10 (for the ears). The majority of the batter should be transferred into the one fitted with the bigger tip.
- On parchment paper or silicone mats, using the bigger tip, pipe a 2" round blob for Totoro's body.
- Using the smaller tip, pipe two smaller blobs for his ears.
- Wet fingers with water and smooth out the ridges of the piped dough to prevent ridging or odd shapes once baked.
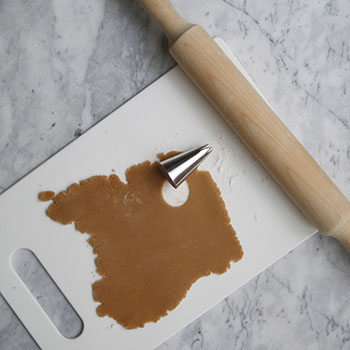
- Take cookie crust out of the fridge, cut out circles with a 1.5" round cookie cutter.
- Add cookie crust onto the belly area for Totoro's stomach.
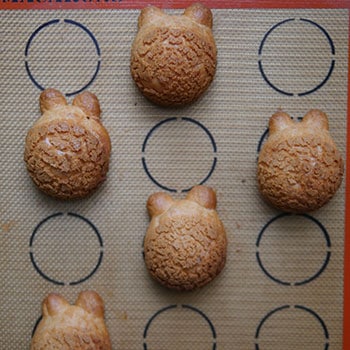
- Bake at 425F for 13-15 minutes. The cream puff will have risen at this point and starting to turn a light golden color.
- Open oven door a bit and turn down oven to 330 F and bake for 18-20 minutes more until all the sides are a deep golden color that's even on all sides.
- Take out of oven and let cool on a cooling rack.
- Once completely cooled, drill a hole with a skewer large enough to fit a #5 round piping tip into the cream puff from the bottom end of Totoro's body.
Earl Grey Diplomat Cream Instructions (Part 1 Whipped Cream)
- In a small sauce pan, heat the cream and tea bags on medium heat. Once the cream begins to steam and a few bubbles appear, turn off the heat. It does not need to come to a boil.
- Let the tea steep for 5 minutes.
- Remove tea from cream, cover with plastic wrap and place in the fridge to chill completely before whipping.
- Place beaters and mixing bowl in the freezer to chill.
Earl Grey Diplomat Cream Instructions (Part 2 Pastry Cream)
- In a small bowl, take ⅓ of the cream and combine with sugar, egg yolk and corn starch.
- In a medium pot, bring the rest of the cream to a boil on medium heat.
- Pour some of the hot cream onto the egg yolk/corn starch mixture while whisking vigorously. This will temper the eggs.
- Pour this mixture back into the pot and return to cook on medium heat. Stir constantly until mixture has thickened and starts to bubble. Take off heat.
- Add butter and blend to incorporate.
- Let pastry cream cool and then place in the fridge covered with plastic wrap directly onto the cream.
Earl Grey Diplomat Cream Instructions (Part 3)
- Take chilled Earl Grey cream out of the fridge, and the beaters and mixing bowl out of the freezer.
- Whip cream on low speed until the cream has increased in volume.
- Increase speed to medium and stop beating once stiff peaks is reached.
- Take the pastry cream (part 2) out of the fridge and fold it into the Earl Grey whipped cream (part 1).
- Transfer the diplomat cream into a piping bag fitted with a #5 round piping tip.
Assembly:
- Pipe the diplomat cream into the Totoros from the hole drilled in the bottom of the cream puff. Spin the puff around as you pipe for an even distribution of cream. The cream puff will start to become heavier. Stop when the cream starts to come back out of the hole.
- Draw in nose and whiskers with edible pen.
- Draw pupils into round white confetti sprinkles for the eyes.
- Glue on eyes with some edible glue or royal icing. Edible Glue can be found in this tutorial here.
- Glue on any desired decorations like sprinkles, sugar or fondant flours and leaves. Instructions for the flowers can be found here: Royal Sugar Roses
Notes
*Cake flour can be substituted with AP flour.
*Bread flour can be substituted with AP flour but bread flour is preferable due to it's higher protein content.
*Heavy cream can be substituted with 33% whipping cream.
*This recipe requires that the oven temperature be high (preferably 400F+) in the beginning of the baking process and then lowered to slowly dry out the cream puff without burning it. This can be achieved by opening the door of the oven and/or lowering the baking temperature. Opening the door will be the quickest way if you are concerned that your cream puffs are already becoming over-baked.
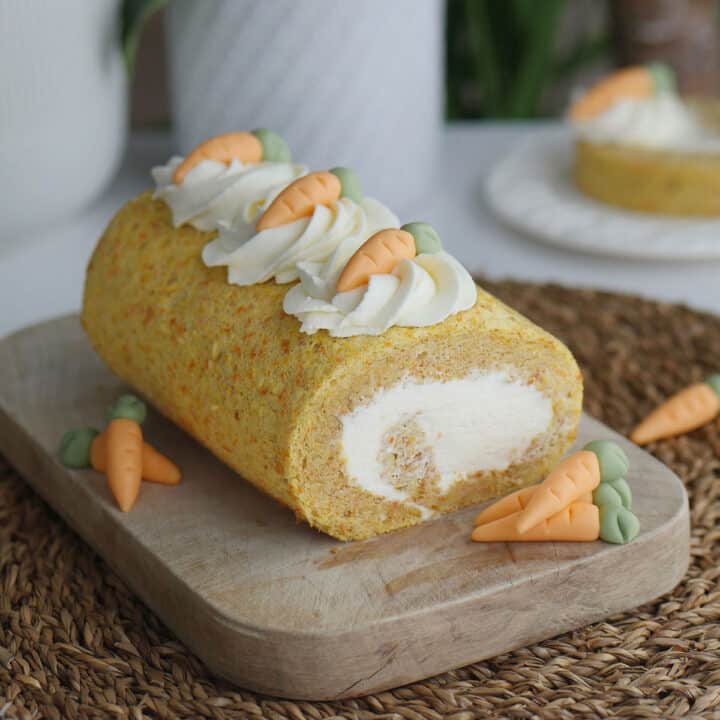
Read how to incorporate Totoro cream puffs into an enchanted forest yule log cake:


Leave a Reply