
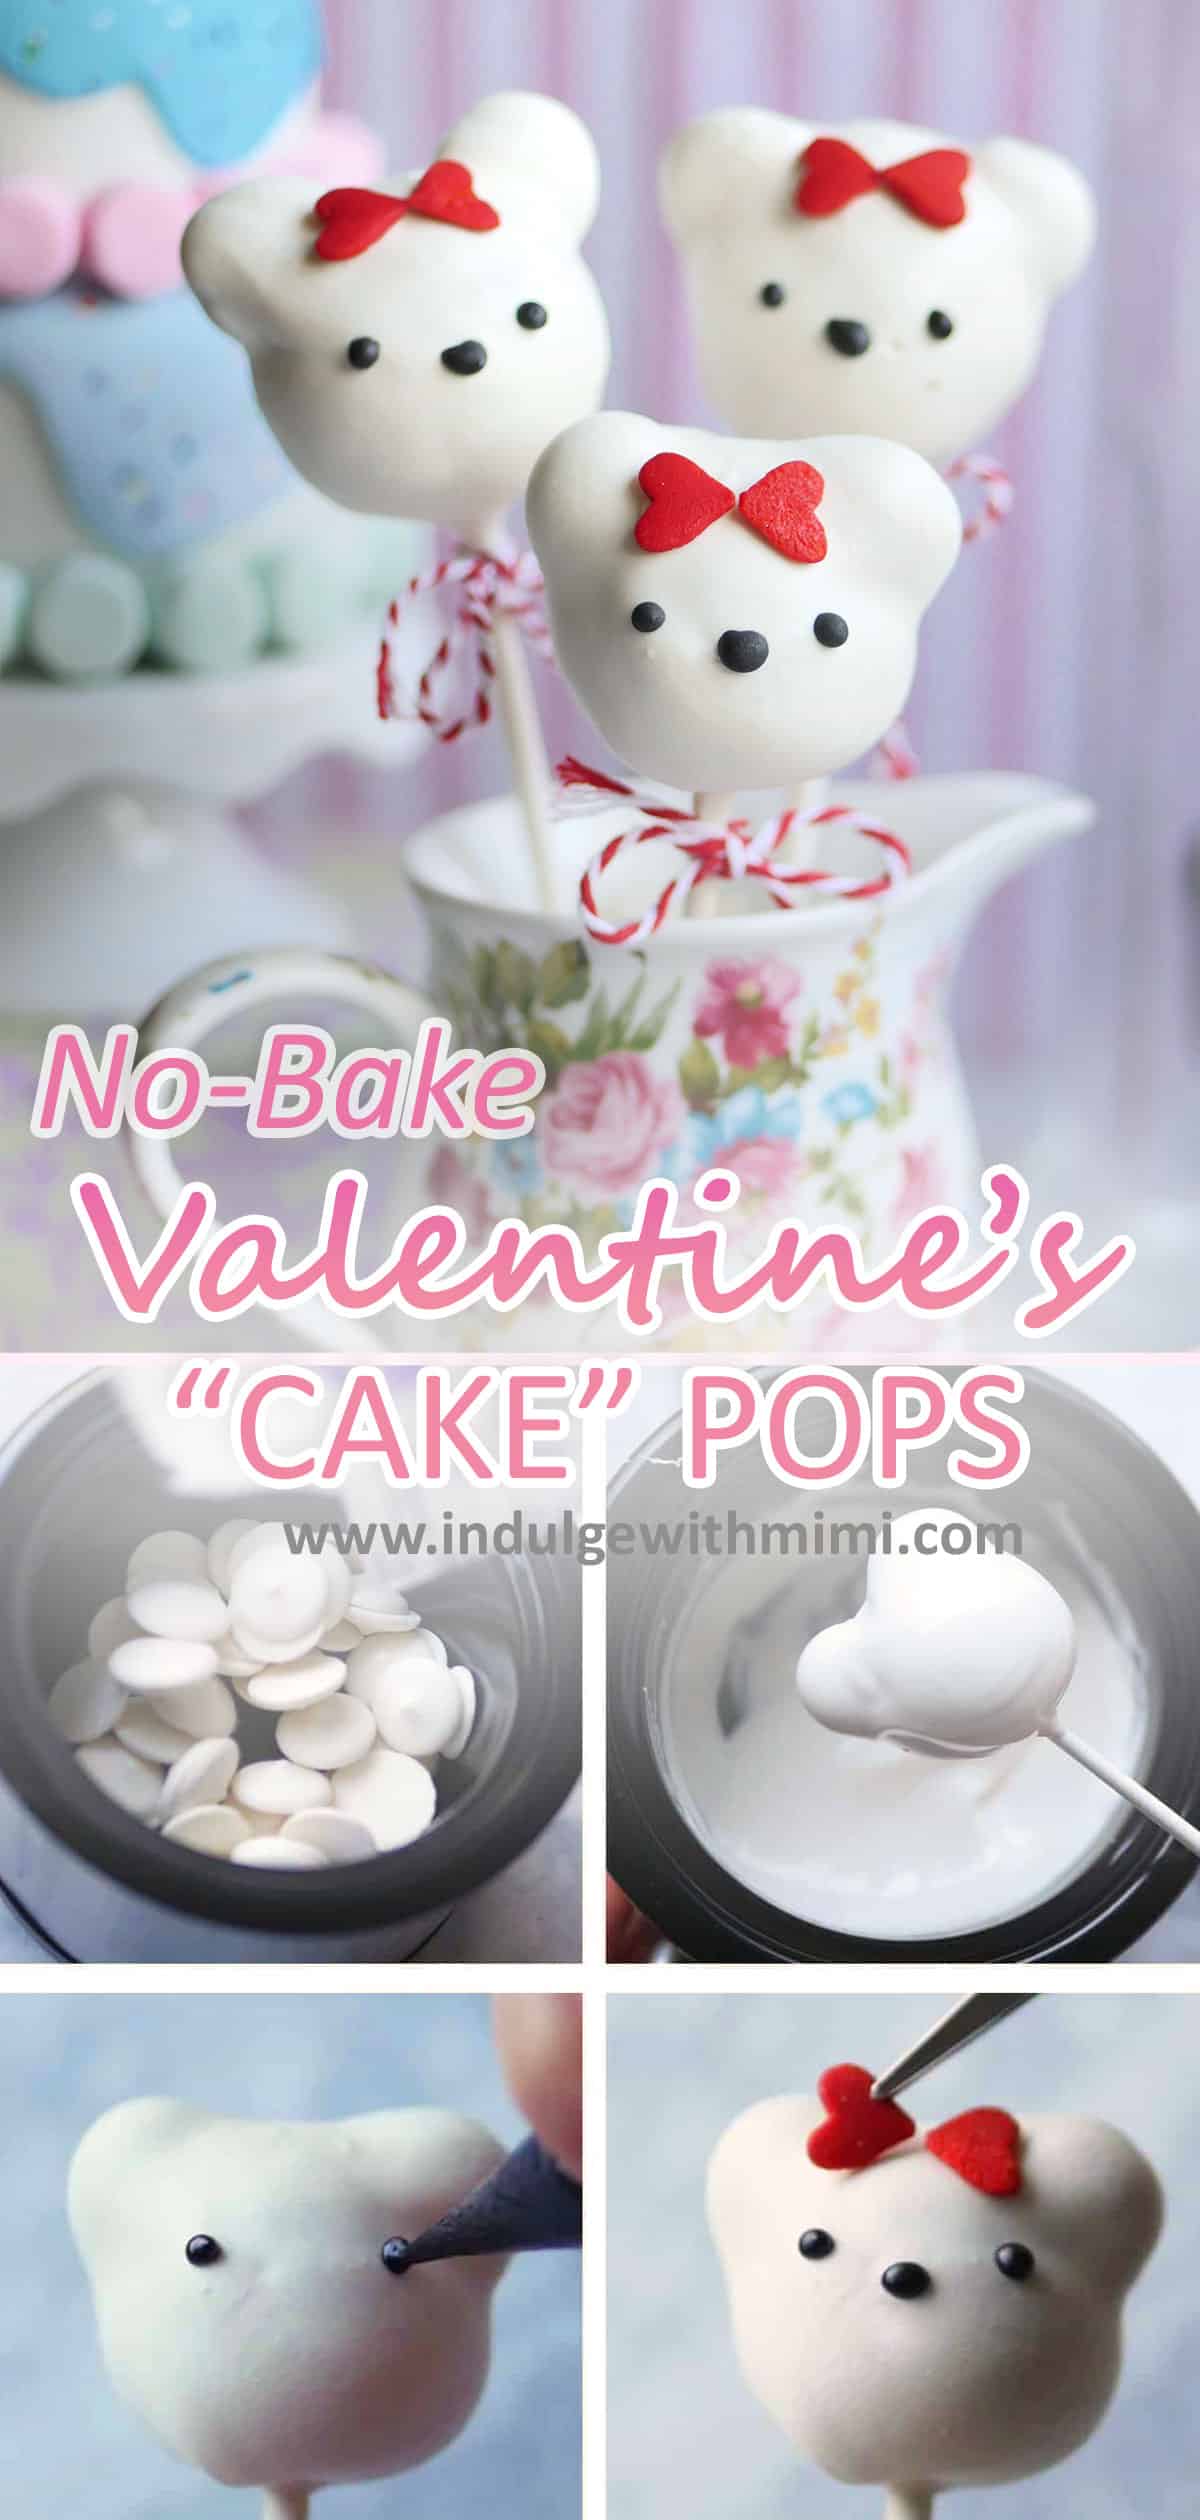
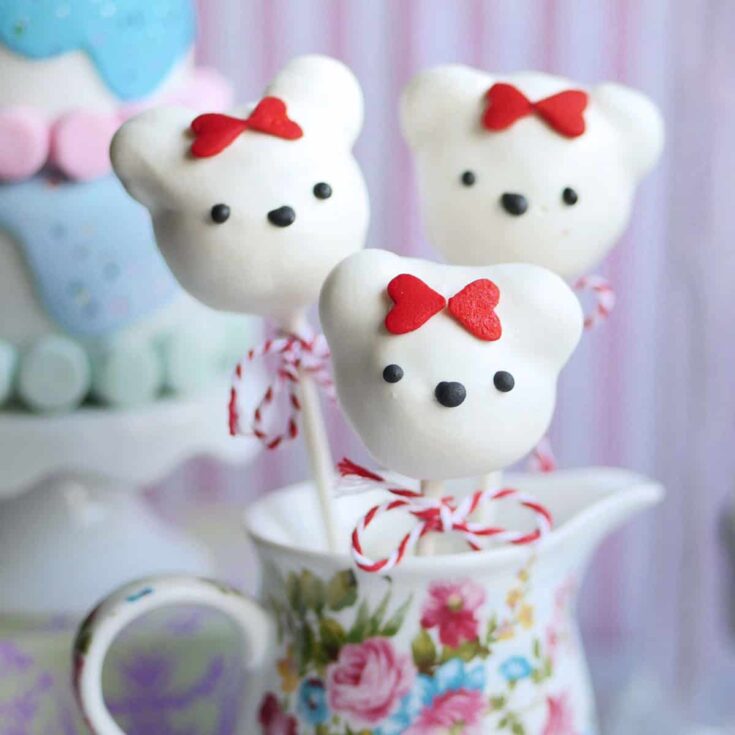
A super cute bear cake pop that requires no baking! Quick, fun and absolutely adorable! Perfect for birthday parties and Valentines Day.
Jump to:
Donut Throw Those Away
Every weekend my hubby likes to buy himself a box of Timbits from Tim Hortons. For those who are not familiar with Timbits, they are basically the trademarked version of donut holes by the iconic Canadian coffee chain, Tim Hortons. They come in a box of 10 filled with different flavours of your choice. Although delicious (as I'm told by hubby), without fail, he always leaves 3-4 leftover in the fridge. After many months of watching these leftovers go to waste in the compost, I decided there must be something we could do with them. Although eating them would be the path of least resistance, I never do. I try to limit my carb and sugar intake throughout the week and my quota is usually all used up by the time I finish taste-testing my macarons and desserts. However, a couple of weeks ago, a thought came into my head. Maybe I could use these to make a quick and easy Valentine's Day project - no bake "Cake" pops.
How to Make "Cake" Pops Without Baking
By substituting the cake ball with these donut holes, you can quickly finish these cute "cake" pops quickly with less stress and mess. You save time by skipping the baking and forming of the cake balls with frosting. Without using cake balls, you'll also eliminate the risk of oil seepage from weak points, and the cake balls expanding, causing cracks.
The end result is so adorable that no one will know how easy it was. The real bonus is that it actually tastes so good. I don't have any special affinity towards candy melts but somehow it works really well as a sweet coating on top of an "old fashioned" donut hole. Ok, so I have a small confession to make, I actually didn't know what an "old-fashioned" donut was until hubby explained it to me. (That's how much I eat donuts, which is never.) I requested that he buy me some donut holes on his usual Timmy's run but they had to be simple and plain. Apparently, that was the exact description of an Old-Fashioned donut. Their simple composition makes them the perfect pairing with a sweet coating of candy melts.
Tips for this Project
- The bear's ears are made of candy. You can use chocolate like M&M's but the best candy is a soft caramel one like Milk Duds. You can mold them into an arch which helps them stay flushed against the head after assembly.
- Use plain donut holes with no glaze or sugar on top. The surface of your donut should be smooth to allow for better dipping.
- The lollipop stick will not stick as easily to a donut than with frosted cake crumble so a little bit of edible glue is needed inside the donut. You can also use the melted candy coating as well.
- The freezer is your friend. Use it to set the donut in between steps. It will also prevent the ears from falling off during the hot dipping process. Unlike regular cake pops, I found there wasn't much expansion (that causes cracking) when exposed to temperature differences so they can be dipped straight out of the freezer.
- Longer 6-inch lollipop sticks were used in this project. It allows the candy pop to sit nicely in a tall cup and simply looks sleeker.
- If you don't have a styrofoam cake pop stand for drying your cake pops, you can place some grains in a cup instead.
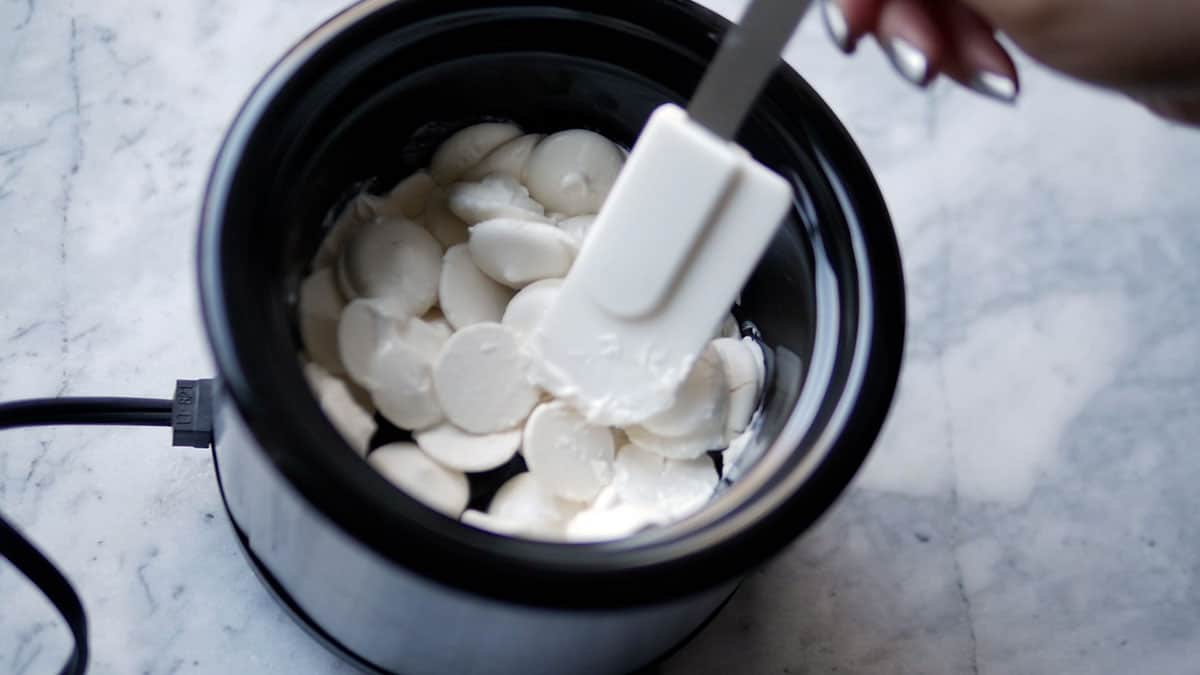
How to Melt Candy Melts Perfectly Every Time
It is difficult to control the heat when melting using the microwave, and overheating will cause the candy melts to seize up. To prevent wastage, try to use a small slow cooker/warmer or the method below:
- Put the candy melts in a small but deep heat-proof bowl.
- Wearing an oven mitt, hold it over boiling water and stir gently until it melts.
- Take off heat before completely melted so that it doesn't over heat. Stir until completely melted and it will be ready for use. A cooler candy melt is easier to use than a piping hot one.
- If it starts hardening up, put it over the boiling hot water again and stir until it becomes usable again.
Tips for Using Candy Melts
- Always use utensils and bowls that are completely dry. Water will seize up your candy.
- It's easier to melt more candy melts at once than less.
- Do not let candy melts overheat as this may cause it to become clumpy and ultimately seize.
- If candy melts seize, you can add a bit of shortening to thin it out and get it going again. There is also a product made specifically to thin out candy melts called EZ Thin Dipping Aid. Link can be found below in Shopping List.
- Use enough candy melts to dip the bear into the candy melt quickly with one take. If you twirl it around too much, the ears might fall off.
- Use a deep bowl with a smaller diameter so you won't need to use as much candy to coat your bear.
- Do not use the gel colors you use for macarons to color candy melts. Oil based candy color must be used to prevent the candy from seizing.
- This goes for flavourings too. Make sure any flavourings added into the candy melts are oil-based.
Step By Step
Start melting candy melts by placing in a warmer/mini slow cooker. If you don't have one, use the other method as outlined above in "How to Melt Candy Melts Perfectly Everytime". If using that method, melt the candy melts AFTER you have fully assembled the bear donut onto the stick and put them into the freezer to set.
Add ears onto the donut with white edible glue.
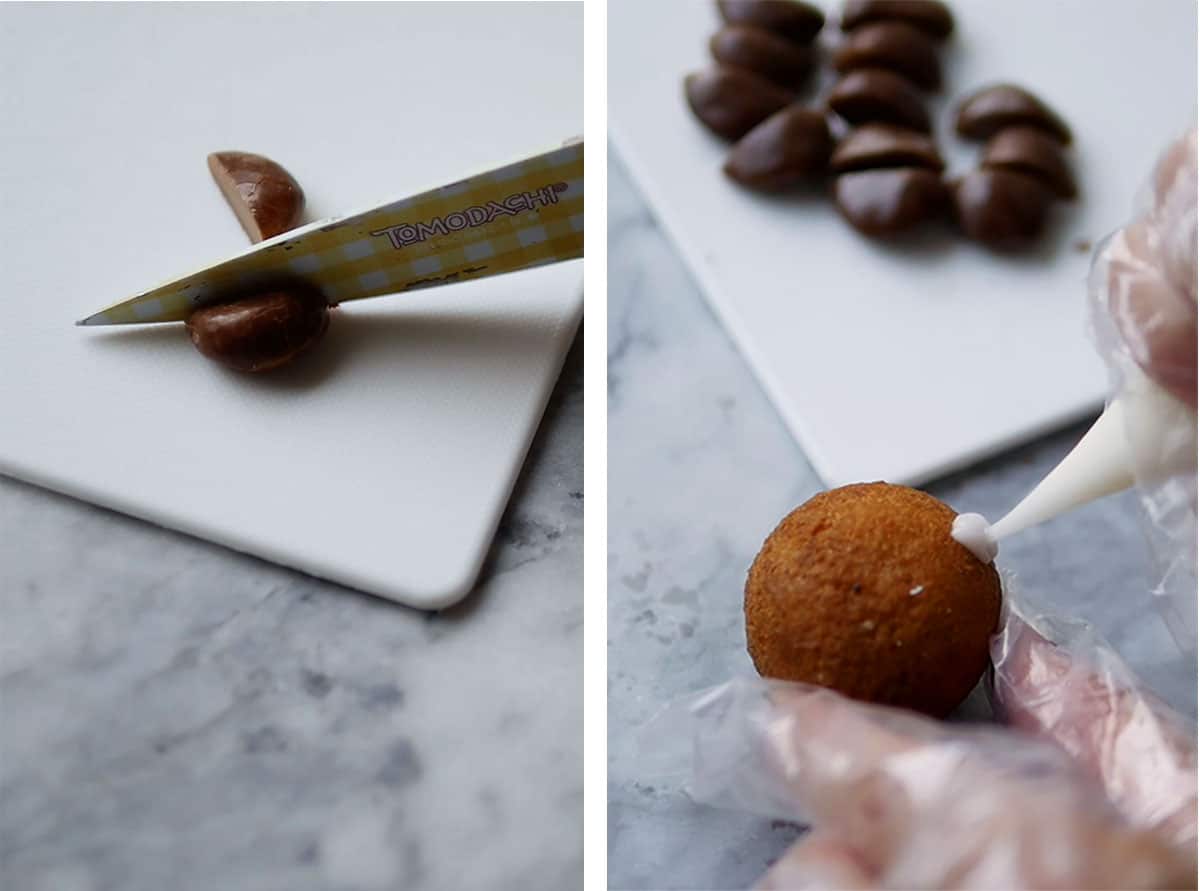
Cut modable candy in half for the bear's ears. Sculpt candy into a rounded arch to help it stay flushed against the curve of the donut. Place in the freezer for 5 minutes to set. Tip: When working with the donuts later, take only a few out at a time to prevent them from falling apart at room temperature.
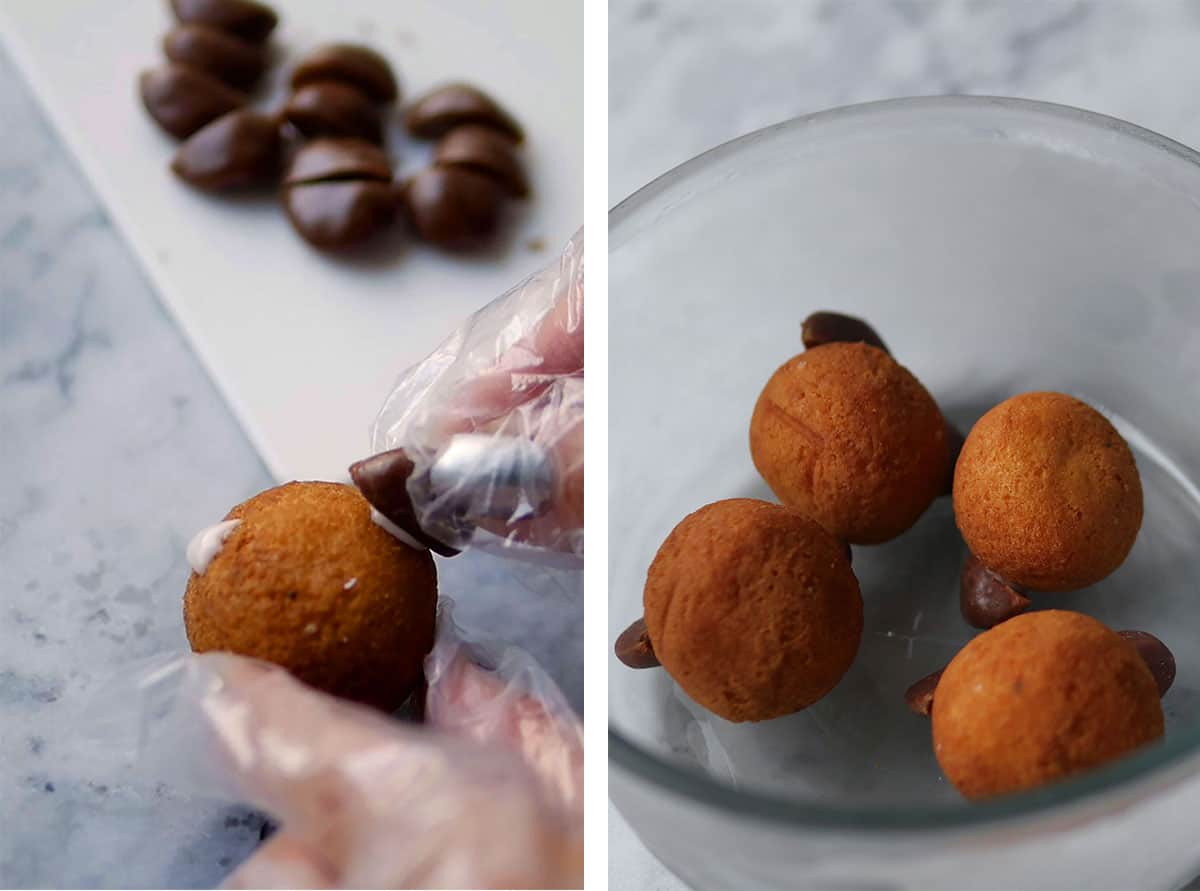
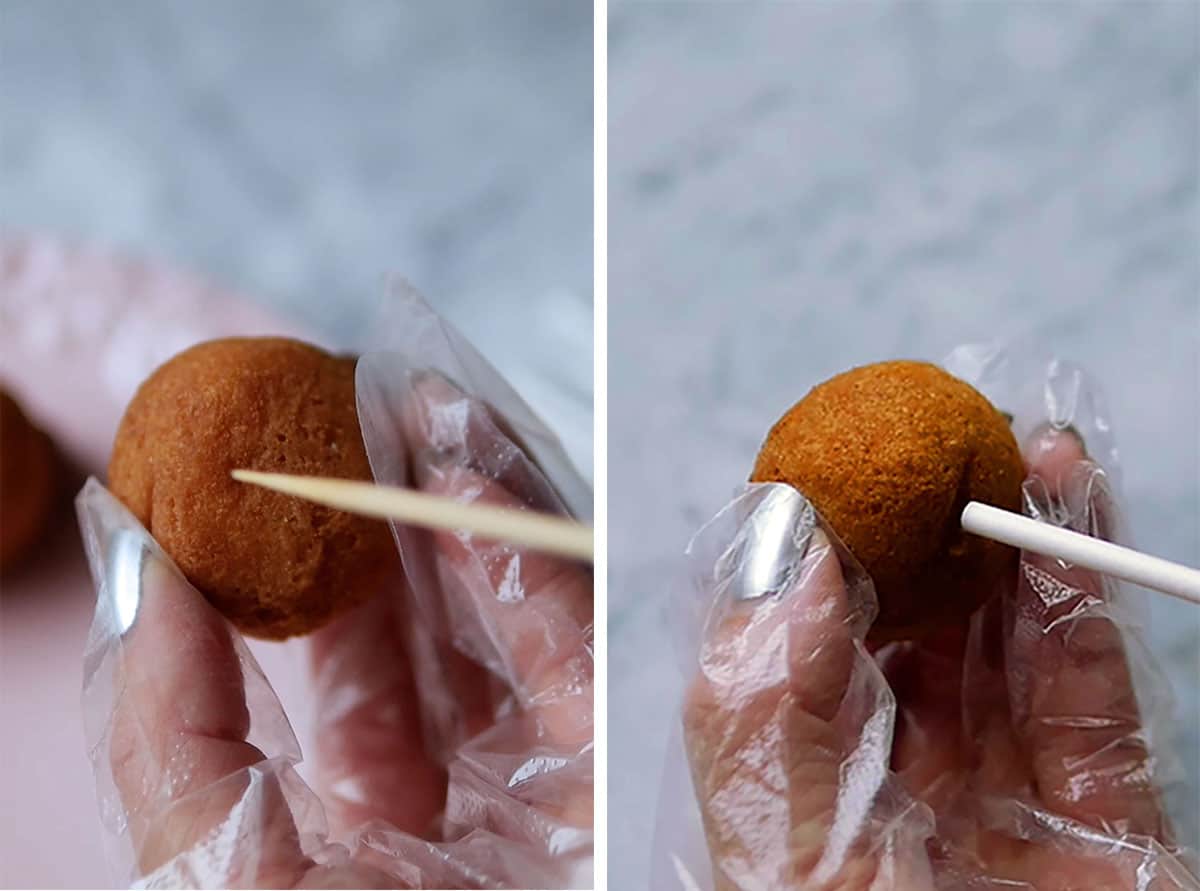
Using a skewer, push halfway into the donut from the bottom. Tip: mark an approximate distance on the skewer with your fingers and do not push the skewer in further than that point Pipe some white edible glue into the hole. In the same hole, gently insert a lollipop stick halfway into the donut.
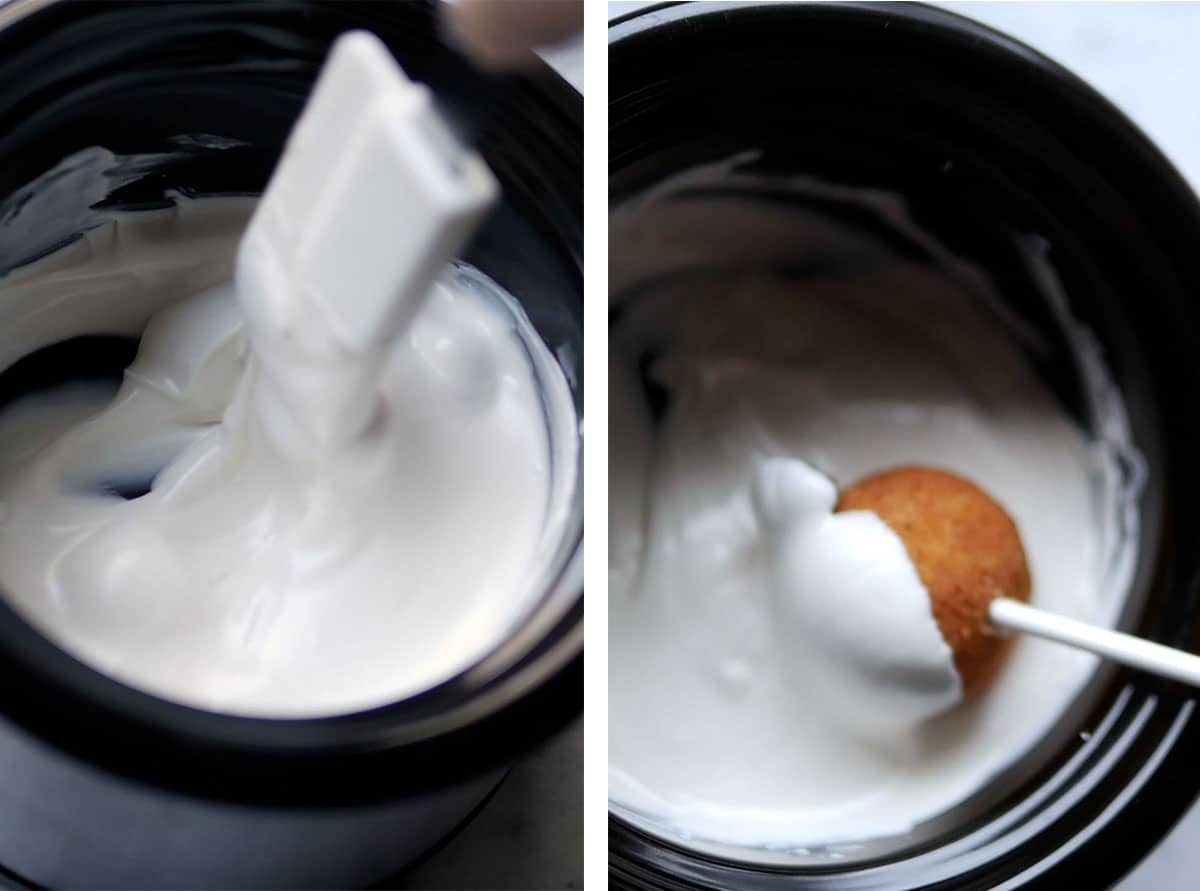
Place into the freezer to set. Work on the rest of the bears. Candy melts should now be melted and ready for use. Take the frozen bear heads out one at a time. Dip the bear heads into the candy melt and quickly bring it back up. Be decisive. Try not to dip it too many times as the ears might start to come off. You can twirl it a bit to get the excess candy melt off. Let it dry on a styrofoam cake pop stand. Work on the rest of the bears.
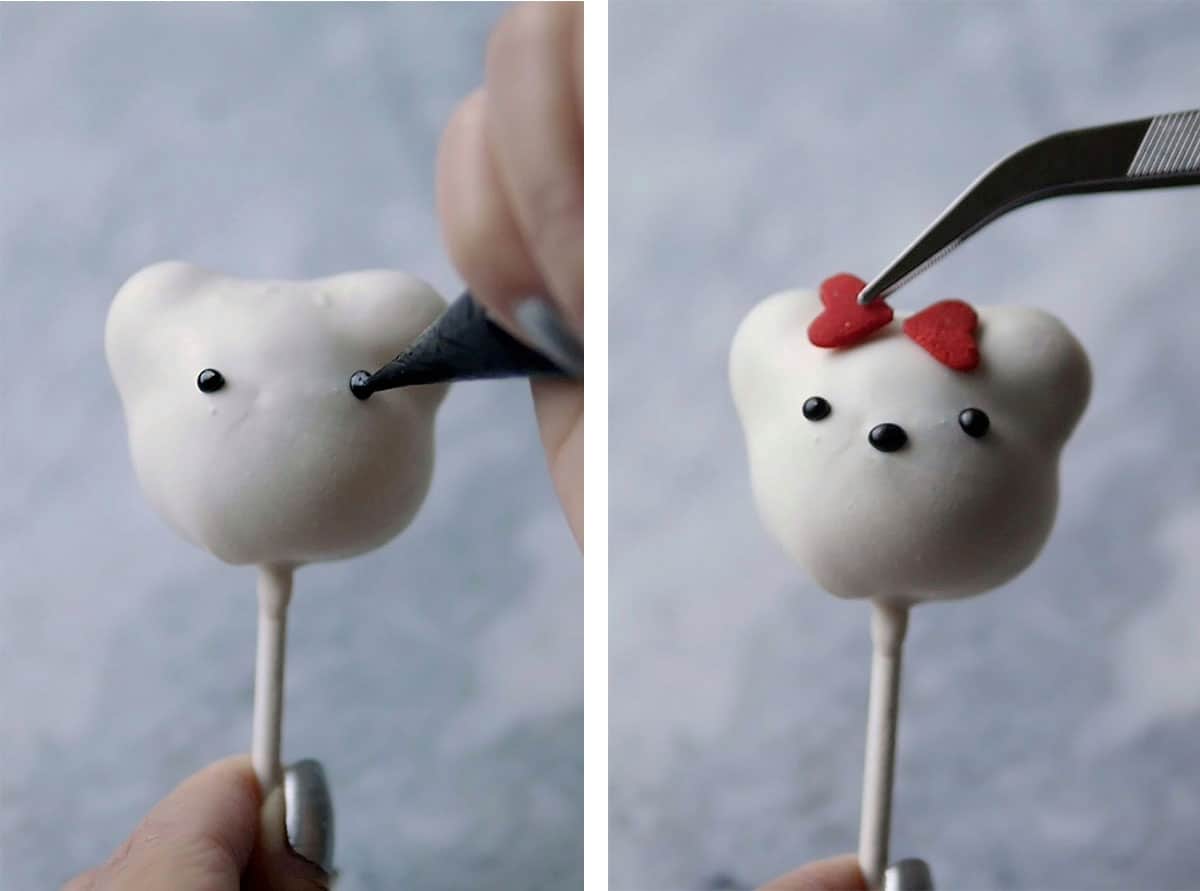
Once the candy melts on the bears have dried, dab a bit of the edible glue onto the top of the bear's head. Place heart sprinkles on each side to resemble a bow. Draw in the nose and eyes with the black glue/icing. Wait until icing and candy melts dry completely before packaging. Approximately, 2-3 hours.

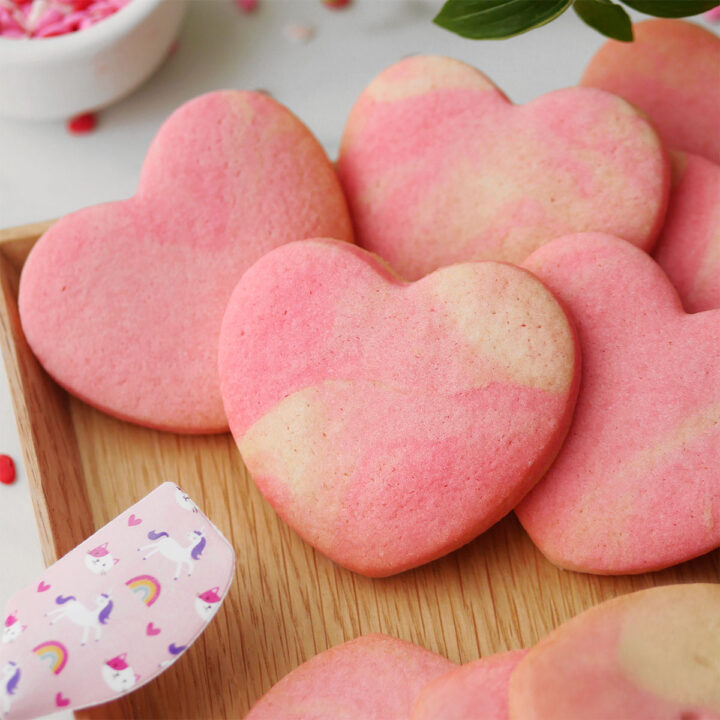
I hope you enjoyed this tutorial. If you are looking for another easy recipe for Valentine's Day, try this simple marbled heart cookie recipe, it requires no decorating at all but looks incredible! Happy V-day!
XOXO, Mimi
Recipe
Valentine's Bear "Cake" Pop Made with Donut Holes
A super cute bear cake pop that requires no baking! Quick, fun and absolutely adorable!
Ingredients
Ingredients & Supplies for Edible Glue/Icing
- 40 grams icing sugar
- 1 tsp. meringue powder
- water in a spray bottle
- 2 small piping bags
- Black gel color
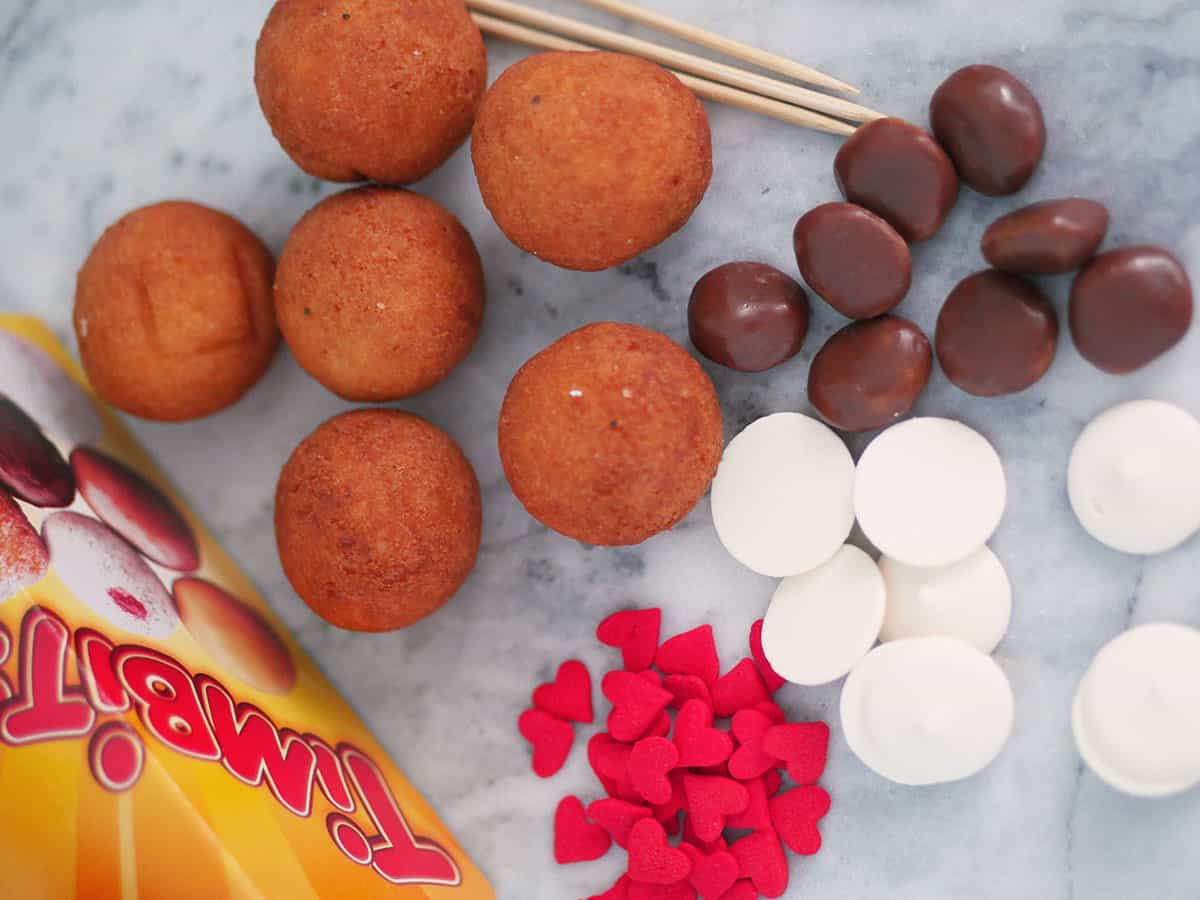
Ingredients & Supplies for Bear "Cake" Pop
- 12 oz. candy melts (1 bag)
- 10 plain donut holes
- 20 large heart sprinkles
- 10 round moldable soft candy (ex. Milk Duds)
- 10 6" lollipop sticks
- Sharp skewer
- Warmer or small deep heat-proof cup & pot combo
- Spatula
- Styrofoam cake pop holder
Instructions
Edible Glue for Gluing Ears and Securing Lollipop
- Combine the dry ingredients in a glass bowl.
- Spray the water onto the dry ingredients a little at a time and then blend everything together until you reach a thick consistency.
- If it’s too runny, add more sugar. If it's too thick, add more water, one spray at a time.
- Put ½ of it in a small piping bag. Add black gel colour to the remainder, mix well and place in the other piping bag.
Bear "Cake" Pop
- Start melting candy melts by placing in a warmer/mini slow cooker. If you don't have one, use the other method as outlined above in "How to Melt Candy Melts Perfectly Everytime". If using that method, melt the candy melts AFTER you have fully assembled the bear donut onto the stick and put them into the freezer to set.
- Cut modable candy in half for the bear's ears. Sculpt candy into a rounded arch to help it stay flushed against the curve of the donut.
- Add ears onto the donut with white edible glue.
- Place in the freezer for 5 minutes to set. Tip: When working with the donuts later, take only a few out at a time to prevent them from falling apart at room temperature.
- Using a skewer, push halfway into the donut from the bottom. Tip: mark an approximate distance on the skewer with your fingers and do not push the skewer in further than that point
- Pipe some white edible glue into the hole.
- In the same hole, gently insert a lollipop stick halfway into the donut.
- Place into the freezer to set. Work on the rest of the bears.
- Candy melts should now be melted and ready for use. Take the frozen bear heads out one at a time.
- Dip the bear heads into the candy melt and quickly bring it back up. Be decisive. Try not to dip it too many times as the ears might start to come off. You can twirl it a bit to get the excess candy melt off.
- Let it dry on a styrofoam cake pop stand. Work on the rest of the bears.
- Once the candy melts on the bears have dried, dab a bit of the edible glue onto the top of the bear's head. Place heart sprinkles on each side to resemble a bow.
- Draw in the nose and eyes with the black glue/icing. Wait until icing and candy melts dry completely before packaging. Approximately, 2-3 hours.
Notes
Donut pops can be kept at room temperature for 2 days. They can also be placed in the fridge in an air tight container without packaging. To prevent condensation, bring them out of the fridge and package after it comes back to room temperature.
Nutrition Information
Yield
10Serving Size
1 gramsAmount Per Serving Calories 279Total Fat 6gSaturated Fat 2gTrans Fat 0gUnsaturated Fat 4gCholesterol 7mgSodium 67mgCarbohydrates 56gFiber 0gSugar 37gProtein 1g
This information is provided as a courtesy and is an estimate only. This information comes from online calculators. Although indulgewithmimi.com attempts to provide accurate nutritional information, these figures are only estimates.
Leave a Reply