
First, I should disclose that there's no such thing as a perfect macaron since we all know that nothing is truly perfect in life 🙂 But many of my readers have asked me what their macarons should be like after baking. I know some also do not live near a bakery where they can buy and taste macarons so their first macarons are they ones they made by themselves! An impressive feat I must say. With that in mind, I created this guide to list some ideal attributes to look for in the search for "ideal or perfect macarons". I put that in quotes because they don't have to look perfect to be good. Don't forget macarons are for eating!
XOXO,
Mimi
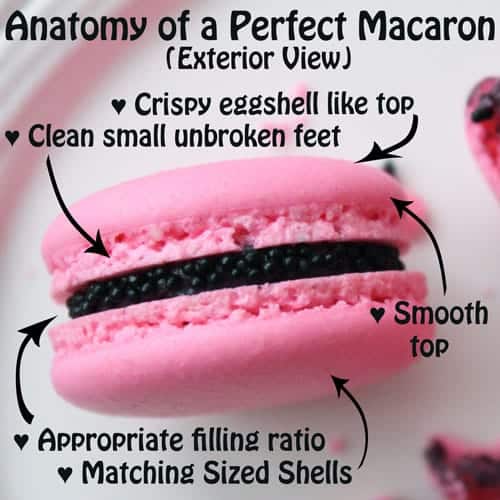
Feet:
Perhaps the most talked about and coveted aspect in the art of macaron making. You'll realize that once you've acheived macarons with feet, you don't want just any kind of feet because each type actually reflects what kind of macaron you will have and shows the kind of mistakes you've made. Small unbroken feet are usually a good indication that the macaron is not hollow. Big bubbly feet usually indicates that the insides have been pushed out into the feet causing a hollow macaron.
Examples of "Good Feet":
✓ Ruffled Feet (slight horizontal rise)

✓ Small Delicate Air Pockets in Feet (clean vertical rise)

✘ Examples of "Bad Feet": (messy broken air pockets/detached feet, excessive horizontal rise (tall feet)/ overly developed feet, no feet)
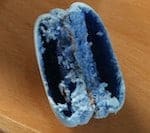
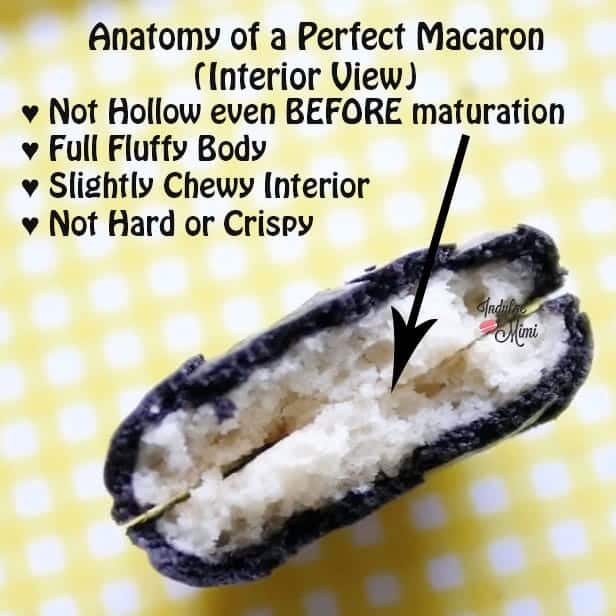
NO HOLLOWS & Texture:
The texture of the macaron should not be super crunchy or crispy like a biscotti. Shells can turn hard from over baking so learn when to stop baking and mature your shells with a higher moisture filling if needed. Stale macarons can also turn hard so make sure to place them in an air tight container in the fridge as they are best eaten within 5-7 days.
Another coveted attribute for any macaron is the absence of hollows. When handled, hollow macarons can be easily broken because there's a big gaping hole inside the shell. As soon as you press into it with your hands, it can easily get crushed. You do not need to fill the macaron shell and bite into it to see that it is fully set with no hollows. This should already be apparent once it cools down and you break it open to see that the shell is not hollow and the insides have not collapsed. Macaron bodies should be fully set with a nice fluffy interior and a crispy egg-shell like exterior. It's the presence of these two contrasting textures which makes this cookie so special. Pressing the bottom of the macarons shell, thereby pushing the insides up to the top, is not the proper way of achieving no hollows. Aim for reducing hollows by baking at the correct temperature (not too low), proper meringue whipping and using the correct folding techniques.

Rise:
The shells should have a healthy rise, not too puffy yet not too flat. A bloated shell that is disproportionate to the whole macaron is often hollow. Fix this by working on your folding technique and making sure that your temperature is just right.
On the flip side, a pancake like macaron is usually a sign that you've over mixed your batter. These aren't too attractive so learn to judge the consistency and know when to stop folding. Remember, the batter should flow slowly like lava and fall a few times on itself like a ribbon.
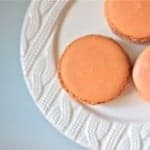
Shape:
This is obvious. Macaron shells should be round. There are several reasons for oddly shaped shells including: over mixed batter, wrong piping techniques and use of parchment paper, either through improper use or just plain bad quality. Invest in a Silpat pan, it will work wonders to keep your shapes round.
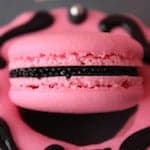
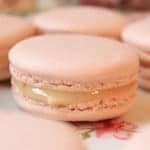
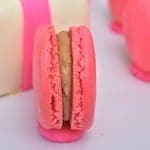
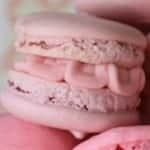
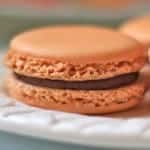
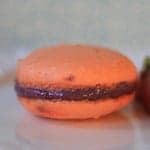
Filling:
The filling should not overwhelm the overall construction of the macaron by being over stuffed or under stuffed. Pipe the filling until it reaches close to the edge of the shell but leave some room for it to expand once you assemble the macaron. The filling should not run past the the outer rim of the shell. Too much filling and it will be hard to eat it without the filling squishing out, making for one messy messy treat.
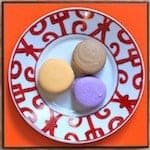
Color:
The tops of the shell should be smooth, not too lumpy and devoid of points or "nipples". Sift your almond flour well to help with attaining super smooth shells. Remove nipples by rapping the tray firmly against the counter after piping.
The colour of the shells should be uniformed and not spotty or browned. To avoid spotty coloring, make sure you're introducing the gel colour into your mixture with enough time left to mix it thoroughly. As for shell browning, make sure you are using your oven correctly. Move your macarons further away from the heat source, lower the temperature or place an empty pan below or above your macarons according to your own situation. Click here to read how to use your oven properly for baking macarons.
[pt_view id="f56aea0p7b"]
anna says
Hi your tips where very helpful I'v been trying to make a decent macron for about 4 months now but they always either end up good with feet but hollow or no feet and perfect consistency I have tried folding more folding less letting it rest more and less I'v tried multiple recipes and made sure to go step by step. any suggestions?
Mimi says
Hi Anna,
Have you considered your meringue? Overwhipping it can cause it to look like a normal looking macaron on the outside with hollows inside. Take a look at these posts, I think it will help: hollow macarons & how to whip perfect meringue for macarons.
XOXO,
Mimi
Kim says
my macaron shells are very oddly shaped. what should I do to fix it? and also what kind of parchment paper or silicone mat is good for making circular macaron shells?
Mimi says
Hi Kim,
I have a tutorial on how to bake smooth and round macarons, please take a look. I prefer SILPAT silicone mats because they keep the shape of the macaron round and tidy. It might be your paper/mat but your technique might also need some practice. Take a look at the tutorial and let me know if you nee further help.
XOXO,
Mimi
Yuvi says
Hii my macarons turn soggy immediately after I fill them and they crush to pieces.. pls suggest what seems to be going wrong and what can I do to prevent this?
Thanks in advance
Hyedi says
I feel like baking mats hold moisture, when baking macarons..I go with strictly parchment.
sahar says
hi mimi
i`m so glad for knowing you.
i have problem with my macarons after bake them thats problem is when i put filling between to shells of macaron and put them in the refrigerator they stay frim and when put them in the environment they became soft and chewable and when comeback to the refrigerator again they become firm and unchewable again . i`don`t know hwo i can solve this problem. i think maybe you can help me to solve this problem .
beforhand i`m thankfull for your guidance.EmojiEmoji
Mimi says
Hi Sahar,
A good way to combat this problem is brushing some milk or syrup to the bottom of the dry macarons, let it absorb and then pipe the filling. Please let me know how it goes 🙂
XOXO,
Mimi
Cynda says
Took my first stab at macarons, followed your recipe (all tips and tricks) and they came out looking perfect! Smooth shell, perfect feet, no cracks or hollow shells, but they were a little chewy. What should I adjust? Thank you- following your steps allowed me to have my first batch looking beautiful, no fails!!
Mimi says
I'm glad to hear that. If you brush a bit of syrup or milk on the bottom of the shells and then fill it, it will help to mature it more readily and not be so chewy. XOXO Mimi