• Skip to primary navigation
  • Skip to main content
  • Skip to primary sidebar

Indulge With Mimi

  • ♥ Home
    • Conversion Charts
    • Privacy
  • ♥ Macarons
    • Best French Macaron Recipe
    • Macaron Troubleshooting Guide
    • Macaron Tutorial Video
    • Macaron Art
    • Macaron Baking How To's
    • Macaron Recipes
    • Macaron Templates
    • Subscriber's Only Area
    • Macaron Knowledge & Books
    • Mimi's Macaron Friends
    • Reader's Questions
  • ♥ Sweets
  • ♥ Recipes
  • ♥ Life
    • Afternoon Tea
    • Travel
    • Party Ideas, Home Decor, Design
    • Easy Meal Recipes
    • Social
    • Fertility, Pregnancy, Family
  • ♥ SHOP
menu icon
go to homepage
subscribe
search icon
Homepage link
  • Home
  • Macarons
    • Best Macaron Recipe
    • Macaron Troubleshooting
    • Macaron Techniques
    • Macaron Recipes
    • Macaron Art
    • Macaron Knowledge
    • Subscriber Area
  • Sweets
    • Fluffy Cake Rolls
    • Cakes
    • Frosting
    • No-Bake Desserts
    • Cookies
    • Cupcakes
  • Recipes
  • Shop
  • Contact
    • Facebook
    • Instagram
    • Pinterest
    • Twitter
    • YouTube
  • ×
    Home » Recipes

    Blog

    Our Ladies Floral Themed Private Dinner by Vancouver's Dinner in the Sky Chef

    Aug 27, 2017 · Leave a Comment

    Here is Part 1 of 3 events that I will share with Deborah Moore tomorrow on AM1470.

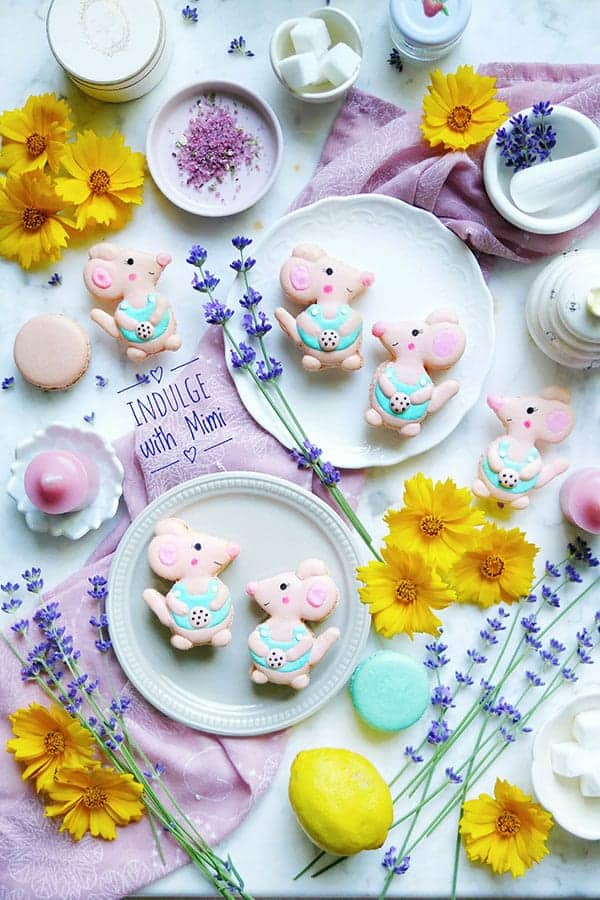
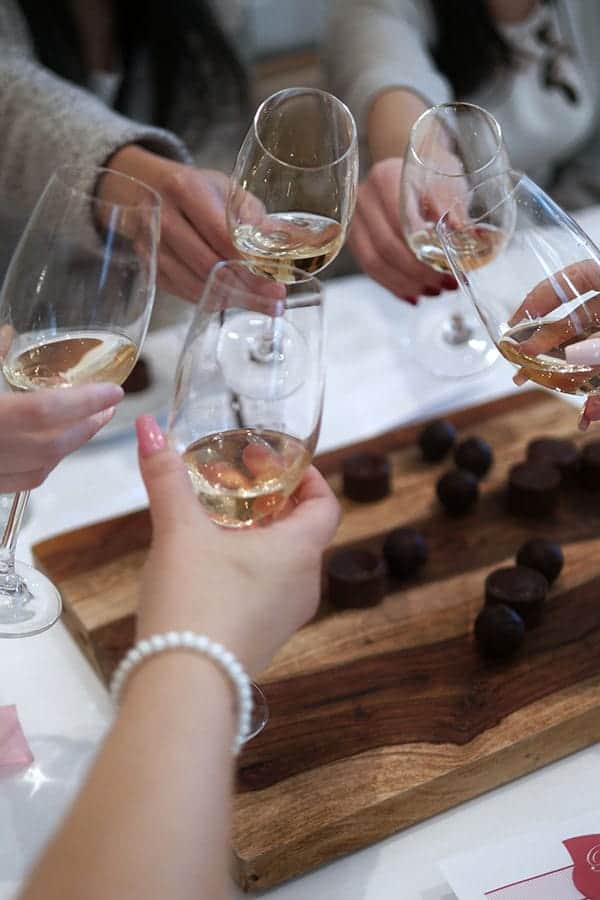
    I'm always up for a good time in the company of other women who enjoy a nice meal and pretty party decors so this past weekend's ladies night was a real delight. A fellow blogger, Maggie, YouTuber, Cici, her two friends and I had a lovely private dinner prepared by Vancouver's original Dinner in the Sky chef, Travis Petersen. The night was made all the more special by the group effort bringing the beautiful dinner to fruition. Maggie organized, Cici hosted and decorated, Kelly contributed an exquisite floral arrangement for the table and I made macarons, of course 🙂

    Here's a little glimpse into our night:

    The Decor

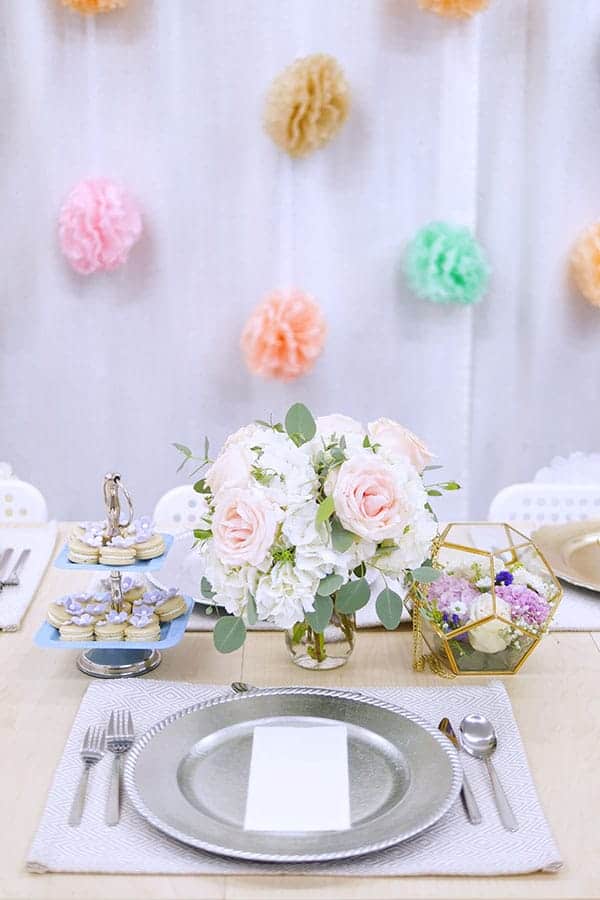
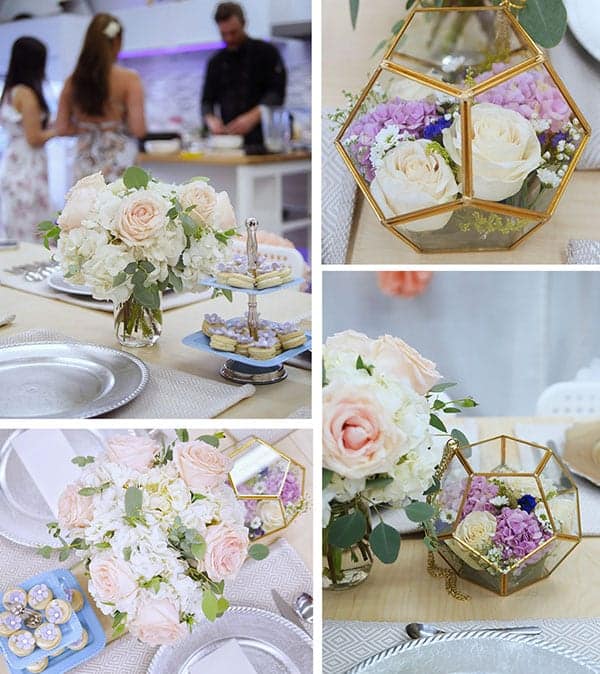
    Many private chefs hold private "underground" dinners in their own homes nowadays but part of this special experience was having our chef, Travis Petersen, come to us which allowed us to decorate the space in any way we desired. Cici, our gracious host, did all the decorating. She made a colorful feature wall with hanging pom poms in pretty pastel colors which ended up looking marvelous in photos. She also prepared a pretty table setting complete with a pastel colored floral arrangement, photogenic tableware and plate chargers. Kelly also contributed by bringing a beautiful arrangement of roses and hydrangeas encased in a modern gold trimmed terranium.

    The Drinks

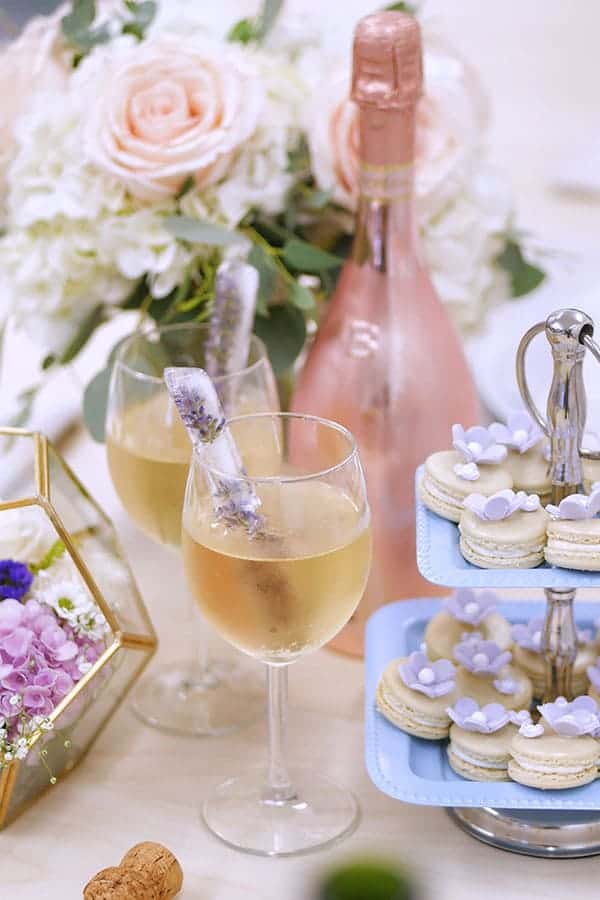
    Prior to the party, Cici showed me her idea of putting edible flowers into ice cubes for our drinks. She asked me where she could find them and I was at a loss even though I had always intended to use real flowers in my macarons one day. The next best thing I could think of was my mom's organic garden. She had organic lavender which I thought just might work. So I dropped them off with Cici prior to the party and she put them into ice cubes. I just didn't know they were long ice cubes. WOW! The long ice cubes ended up working perfectly because lavender is a vertical growing flower, and the long cubes looked wonderful peaking out of the wine glass. (BTW, I discovered you can find organic edible flowers at Whole Foods! It's in the refrigerated herbs section.)
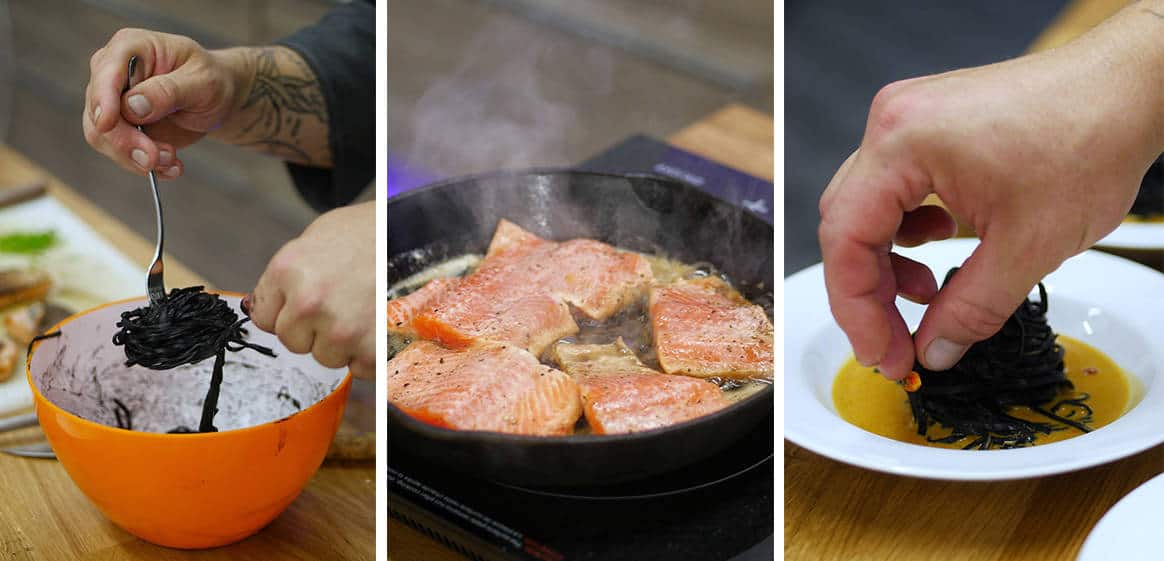
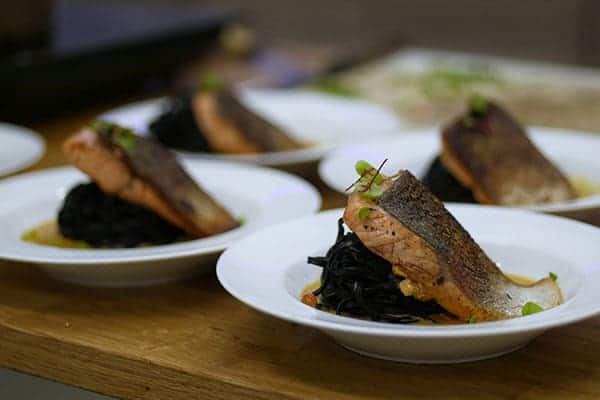
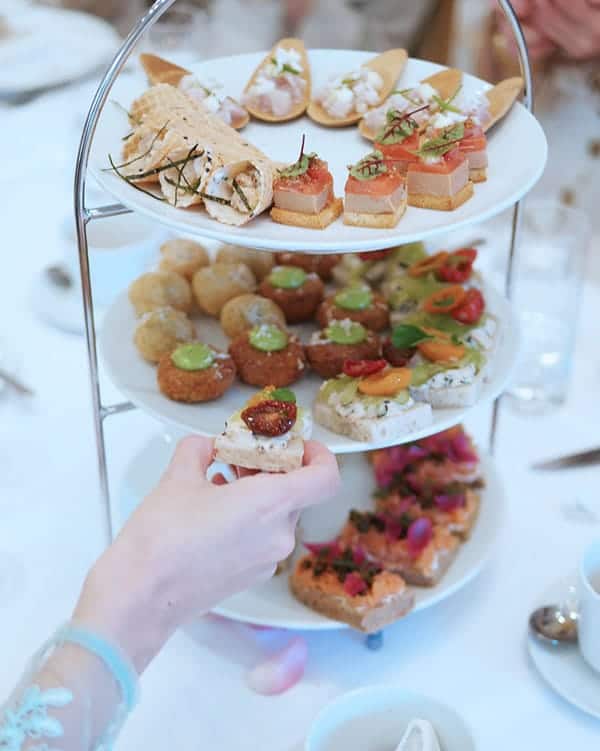
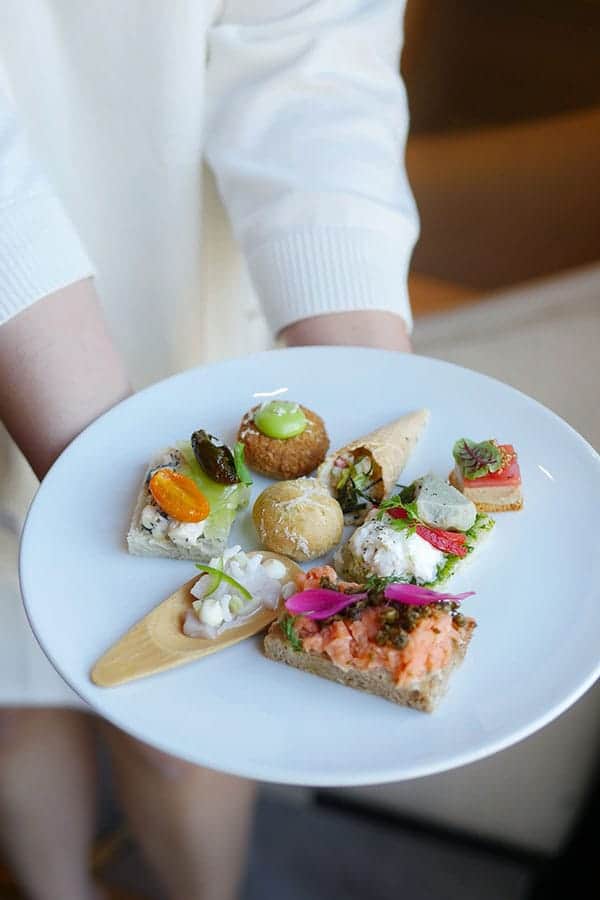
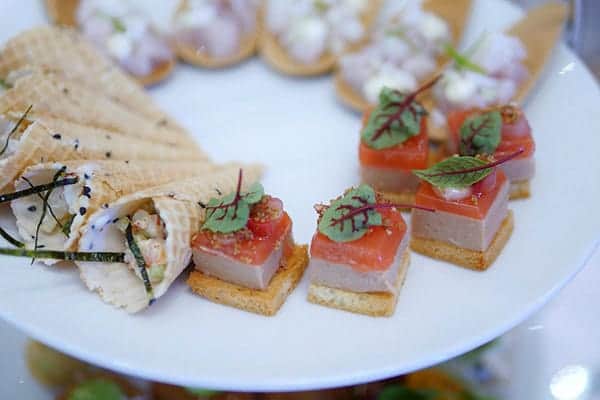
    The Food

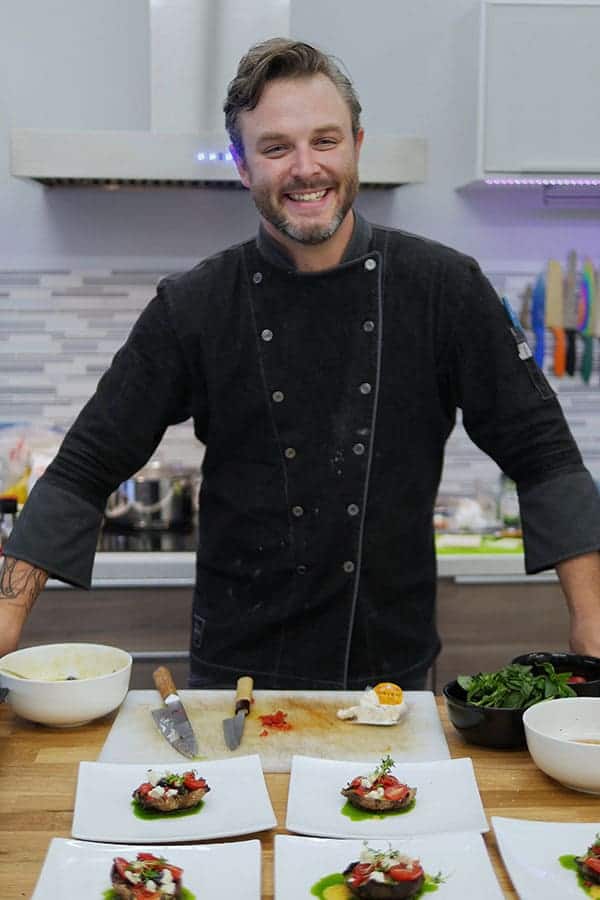
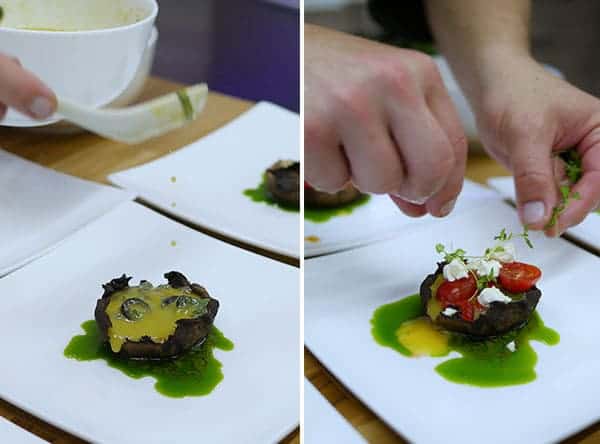
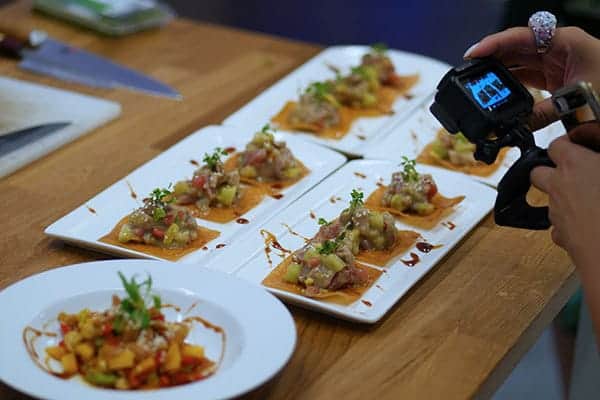
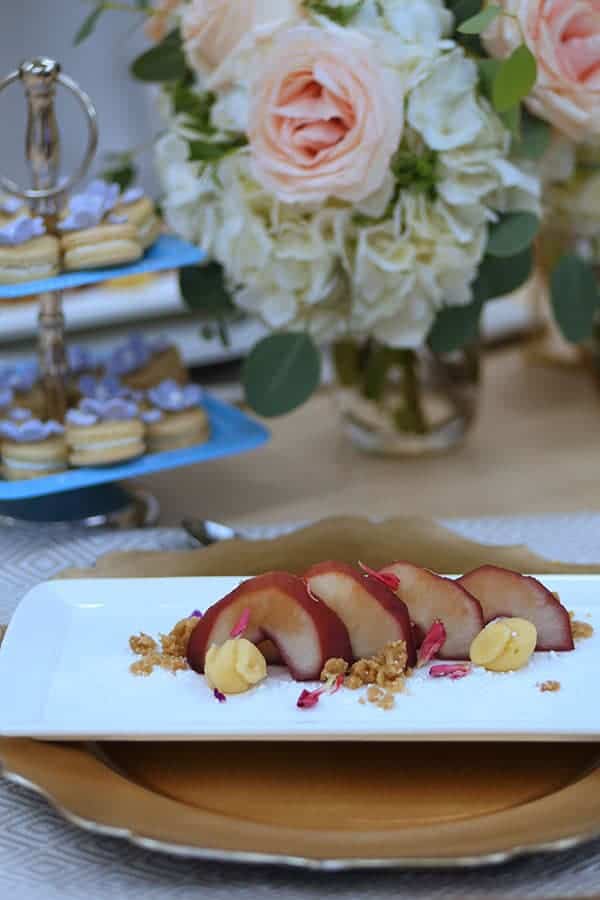
    Chef Petersen prepared a scrumptious 4 course meal that one would find in any fine dining restaurant. We had Grilled Portobello mushroom nicoise and ahi tuna ceviche crispy sesame wonton crackers with asian mango and avocado salad to start. The main was an absolutely delicious Crispy skin salmon with squid ink noodles on a roasted red pepper and saffron veloute. Lastly, we ended the meal with a port poached pear with vanilla pastry cream, edible flower and cake crumble.

    And not only does he cook, he also does the dishes too. So you can sit back and relax with a glass of wine and enjoy the night without worrying about the work that awaits you once your guests leave.

    Private Chef, Travis Petersen. A local boy, he has made a name for himself as the original Dinner in the Sky YVR Chef and as a competitor in season 3 of Master Chef Canada.
    Grilled Portobello Mushroom Nicoise - grilled portobello mushroom topped with olives, roasted red pepper, grape tomato, fresh basil, goat cheese and a nicoise dressing (red wine vinegar, olive oil, capers, anchovies, garlic, chilli flakes)
    Ahi Tuna Ceviche Crispy Sesame Wonton Crackers with Asian Mango and Avocado Salad.
    Crispy skin salmon with squid ink noodles on a roasted red pepper and saffron veloute.
    The salmon was slightly raw in the center so it was juicy and tender. The saffron veloute was full of flavours from long cooking process. He had this sauce simmering for over an hour.
    Port poached pear with vanilla pastry cream, edible flower and cake crumble.

    The Photos

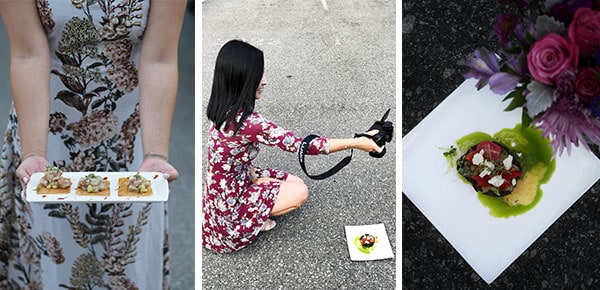
    When you eat with food bloggers nowadays, it's almost a rule to make natural light readily available either through a window or open door for the purpose of food photography. Here we are outside on the pavement making use of the little bit of sunlight left before dinner.
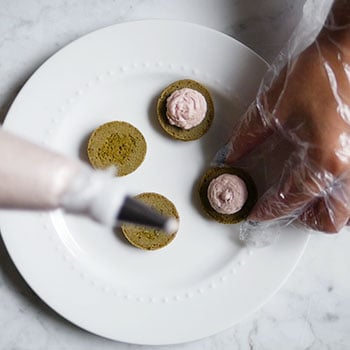
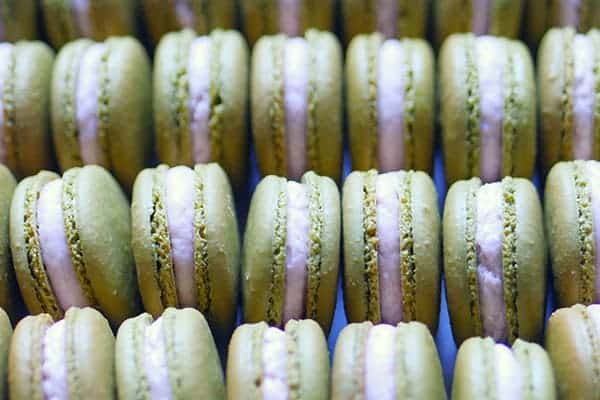
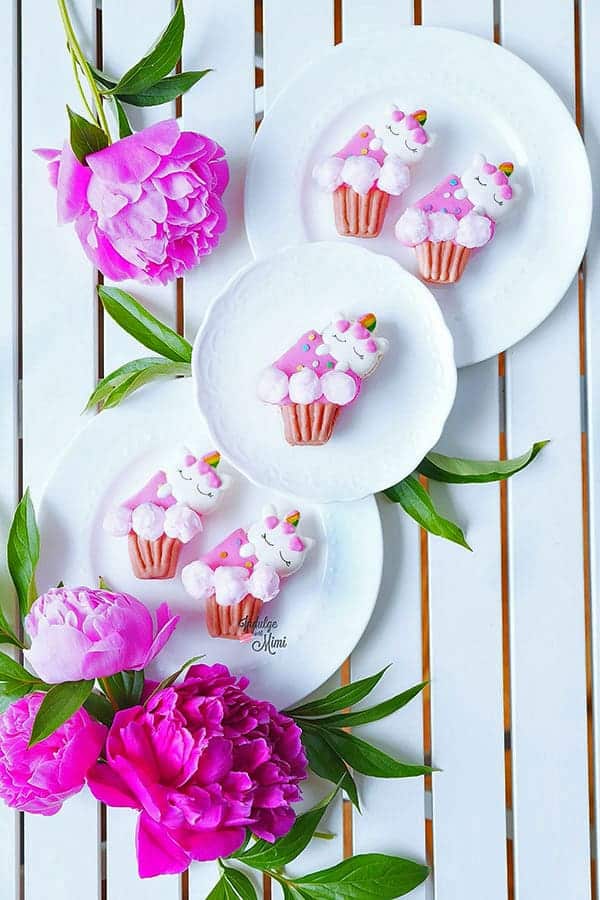
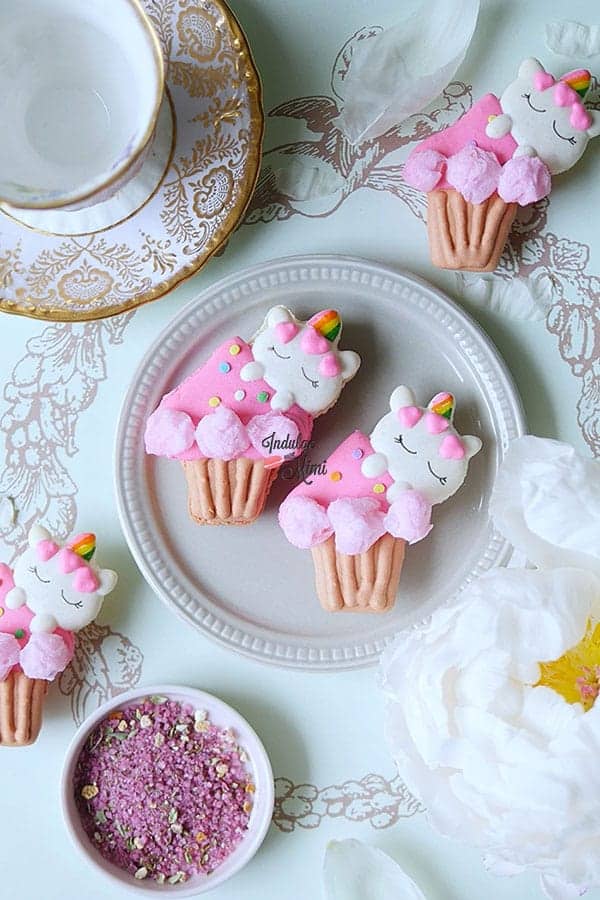
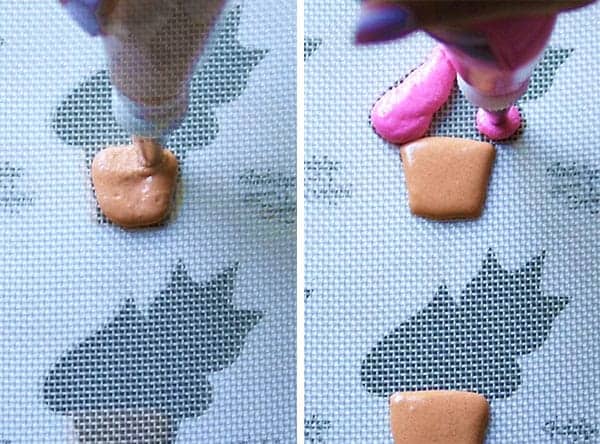
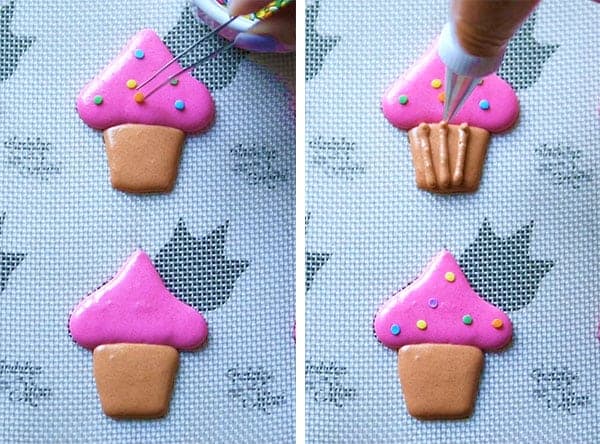
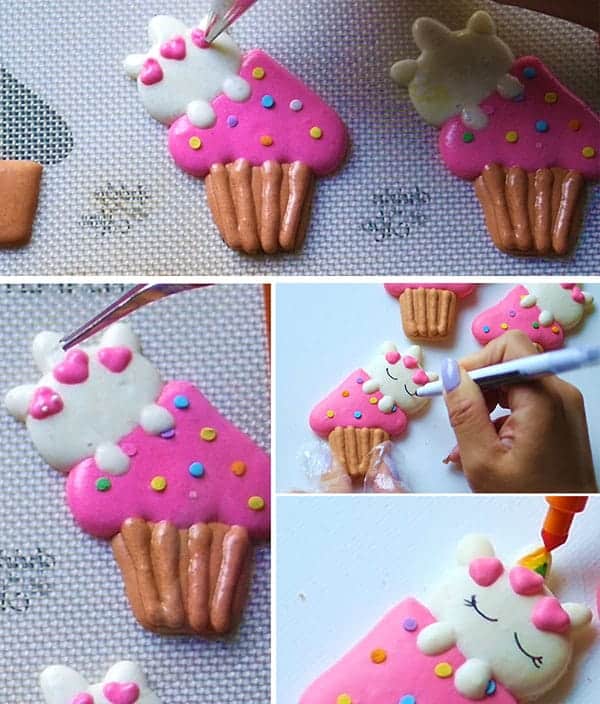
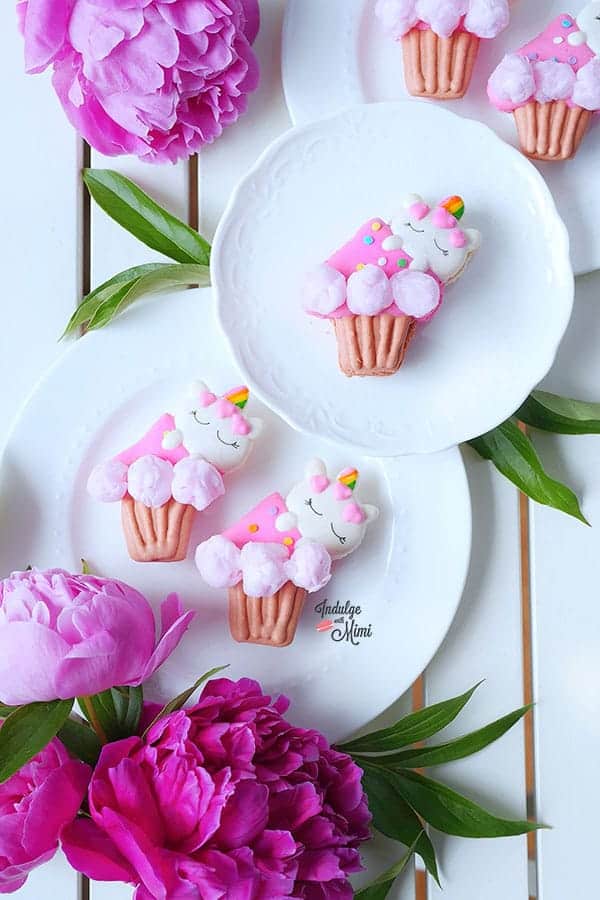
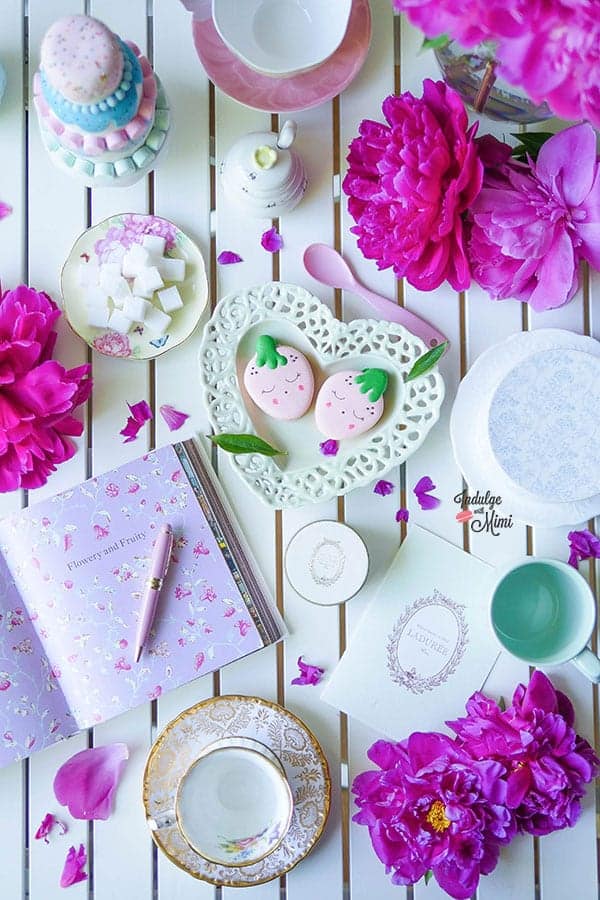
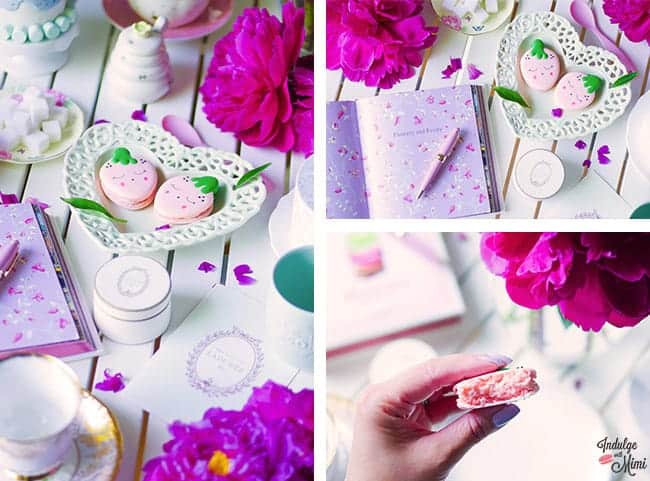
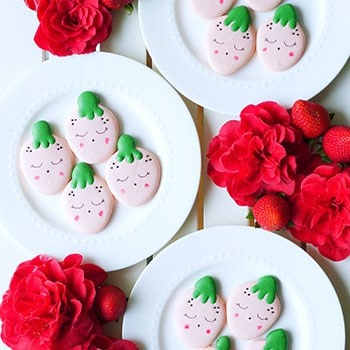
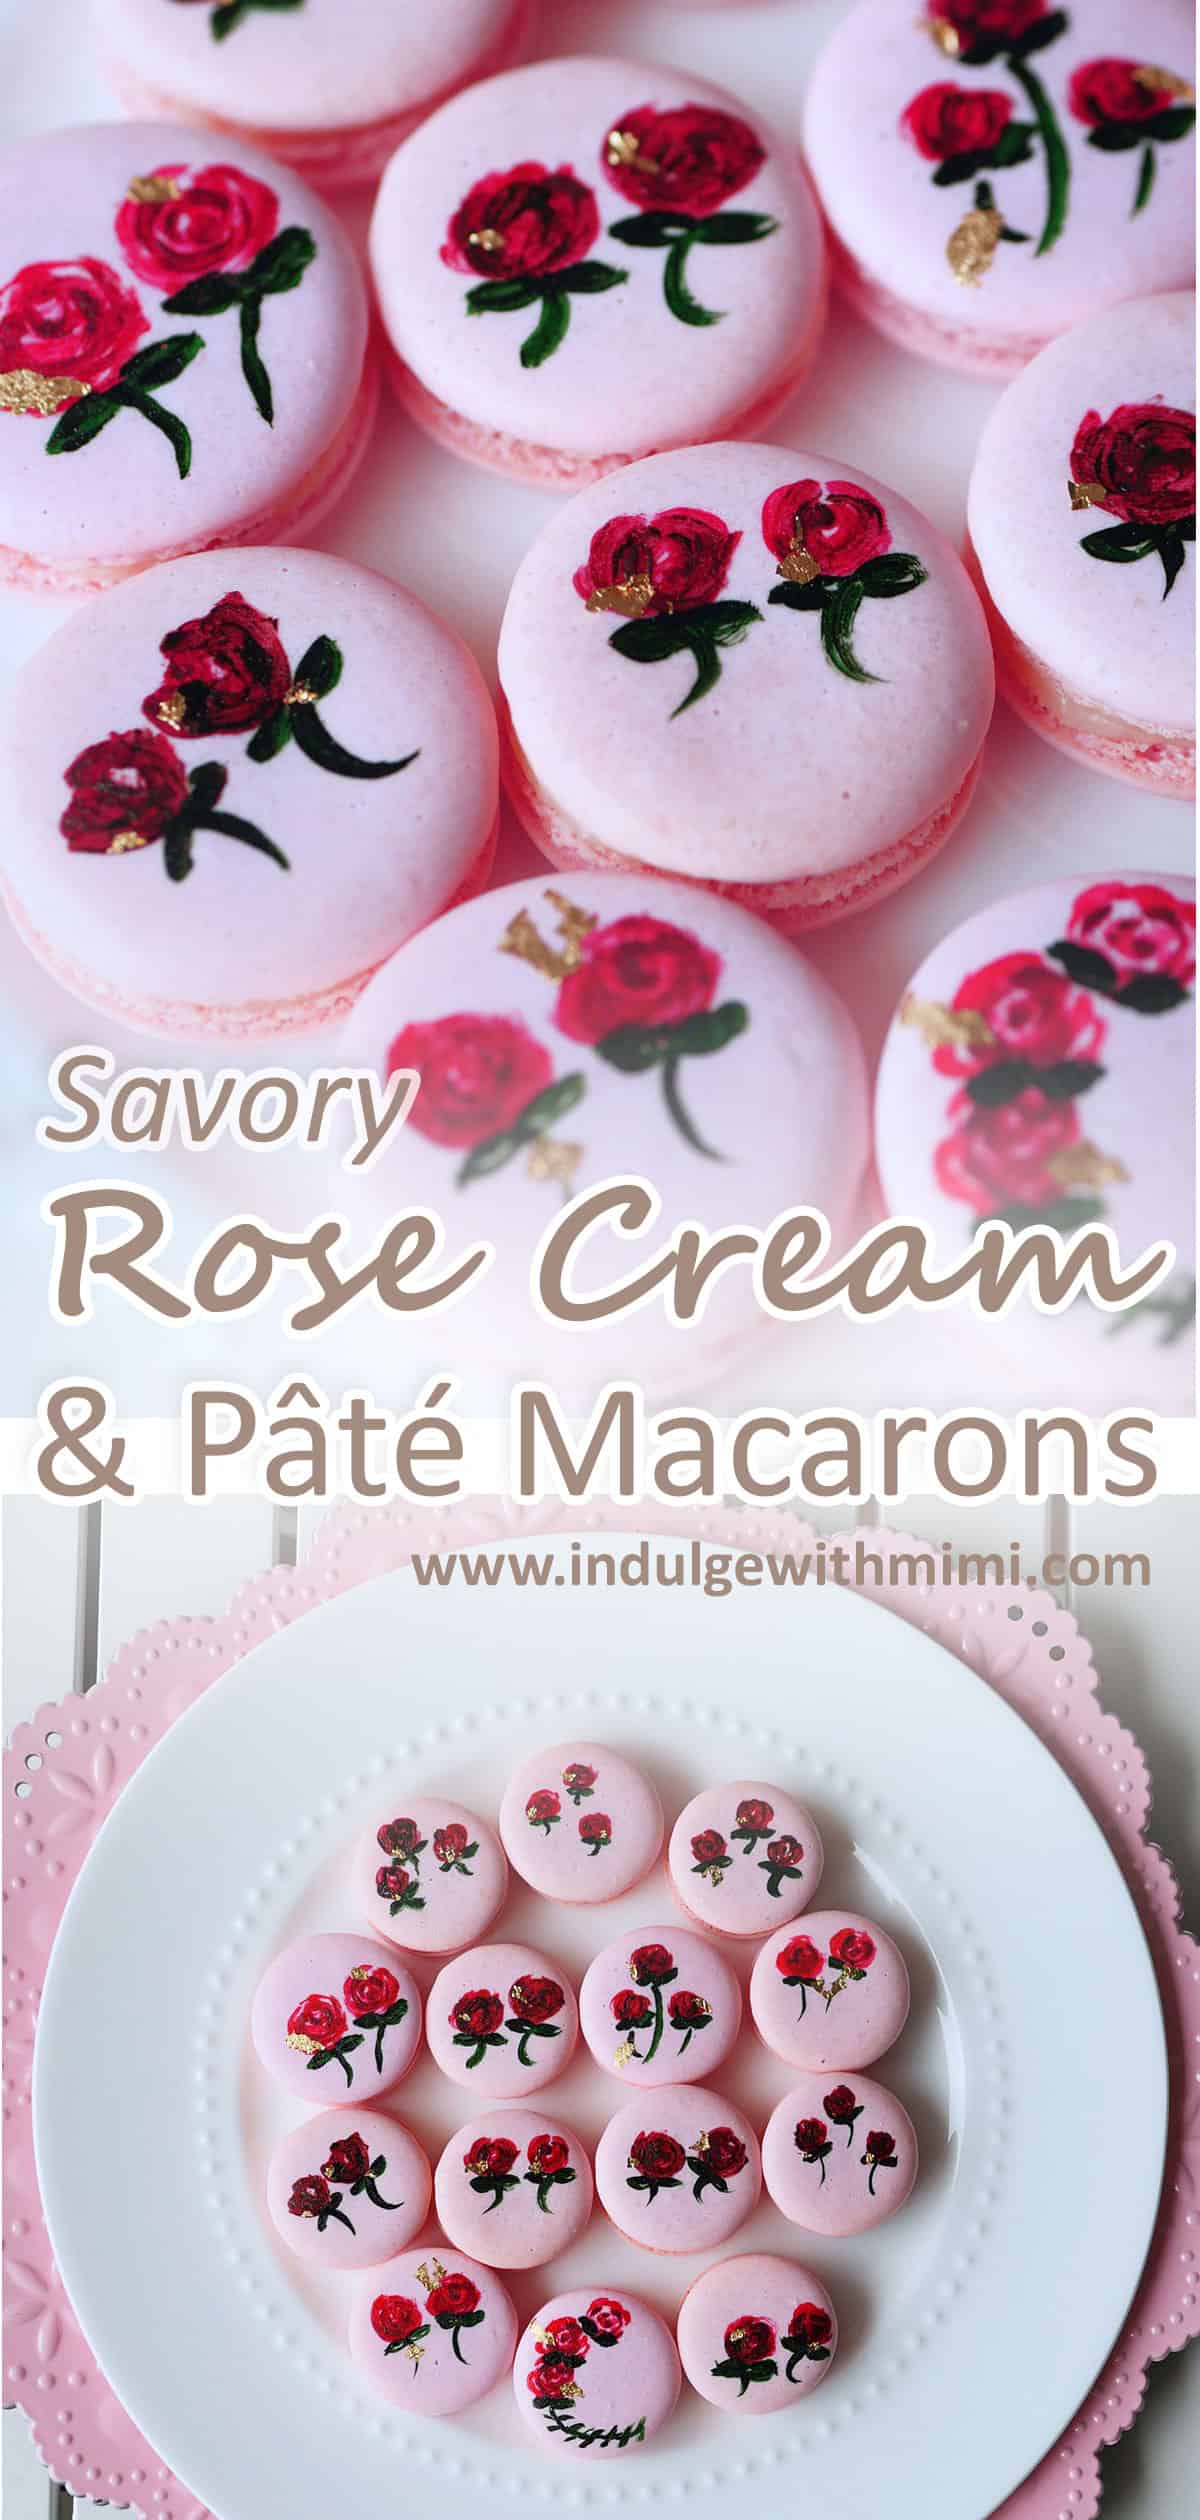
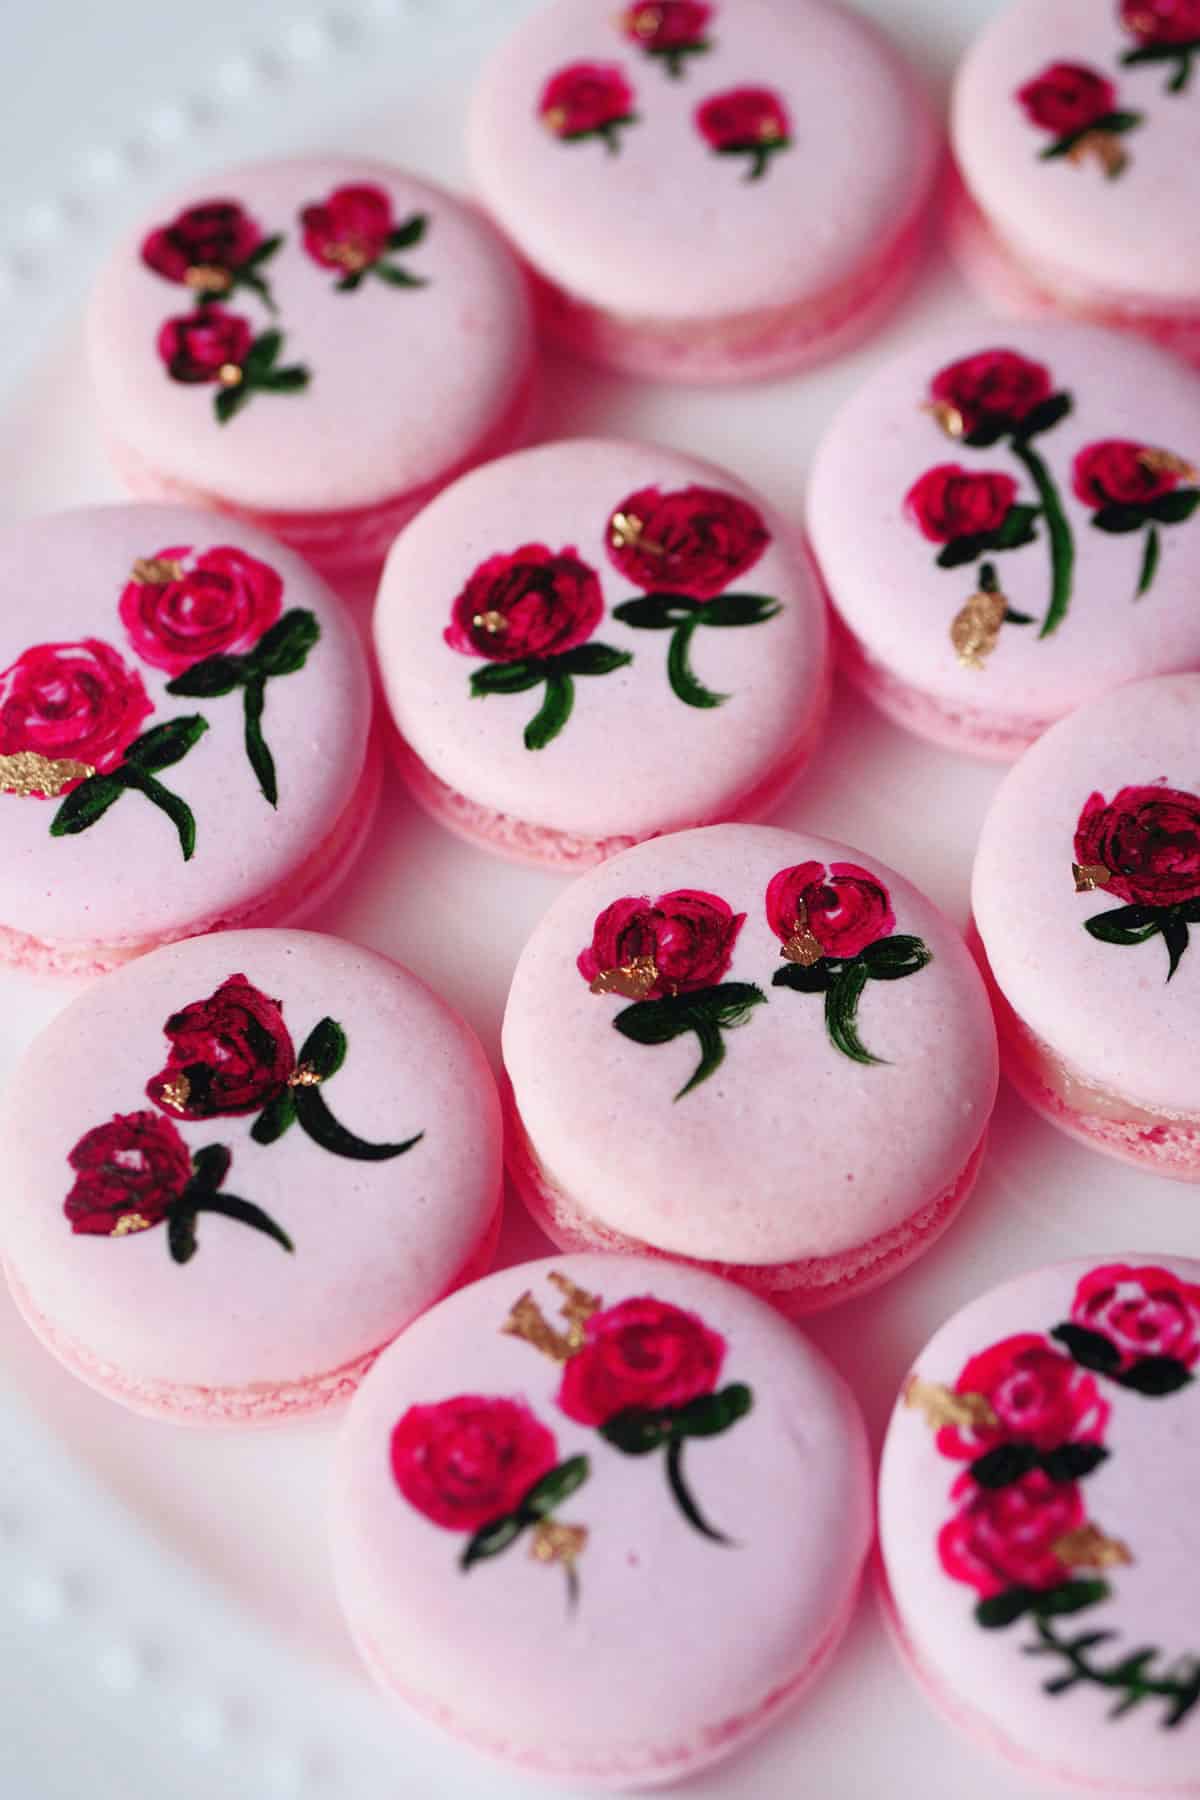
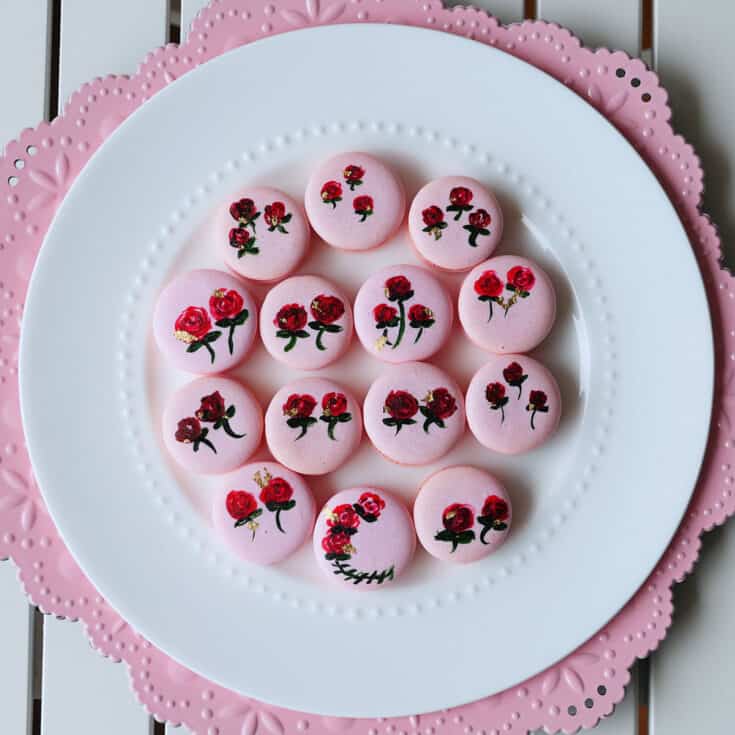
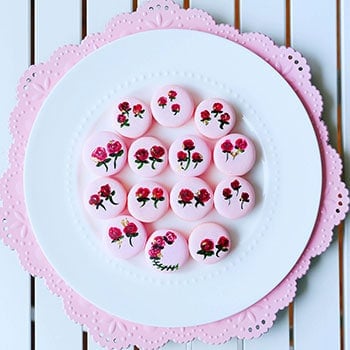
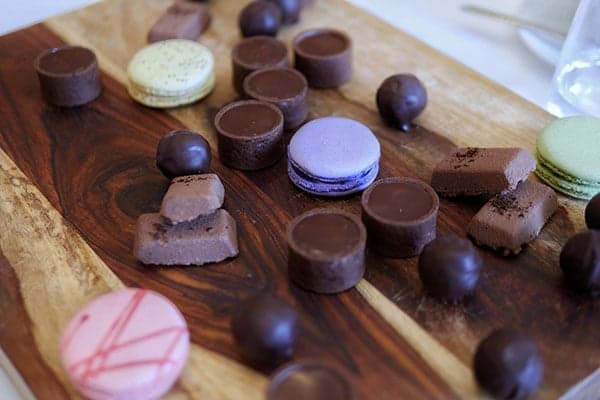
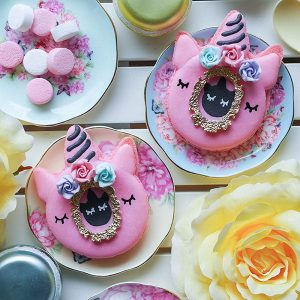
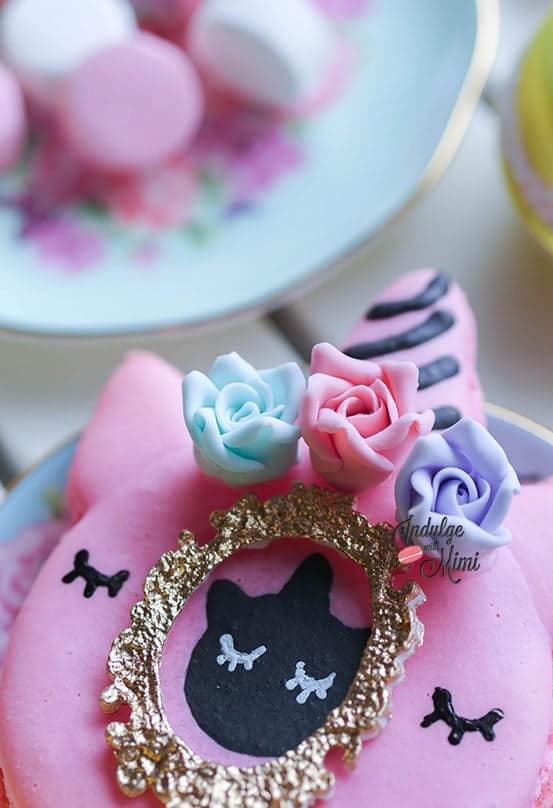
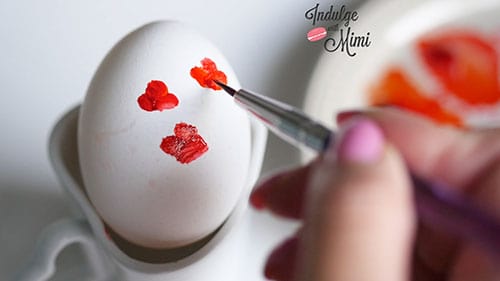
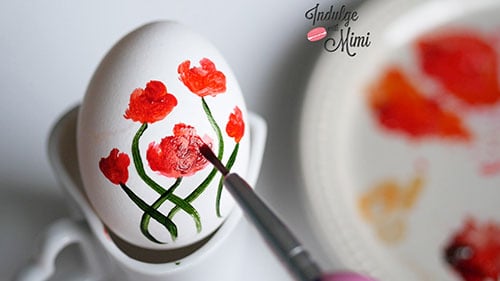
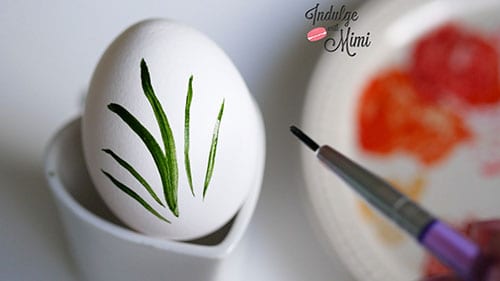
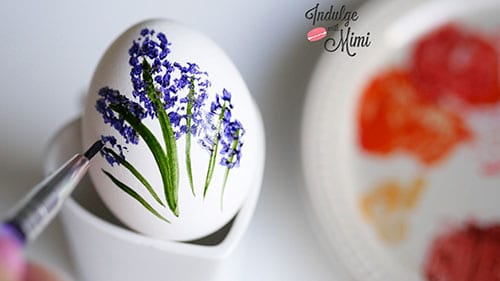
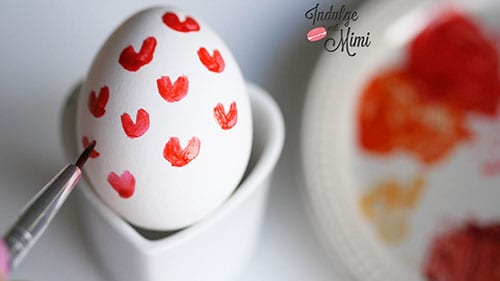
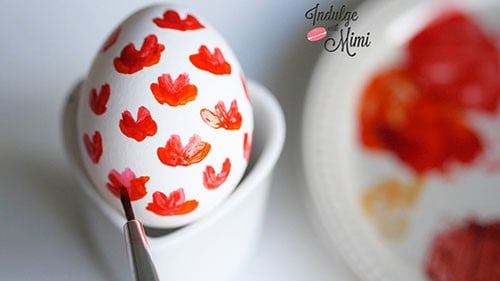
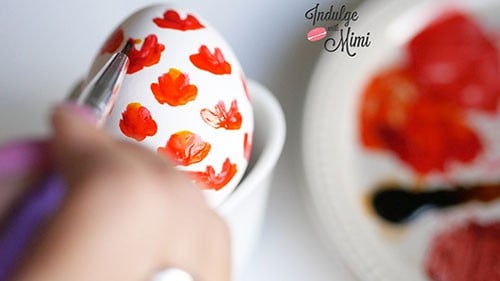
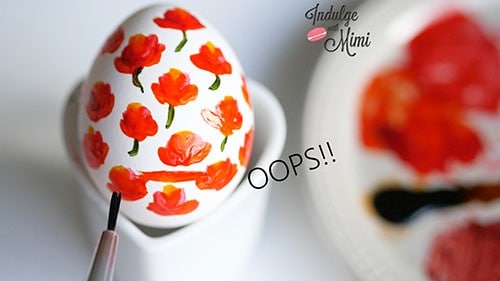
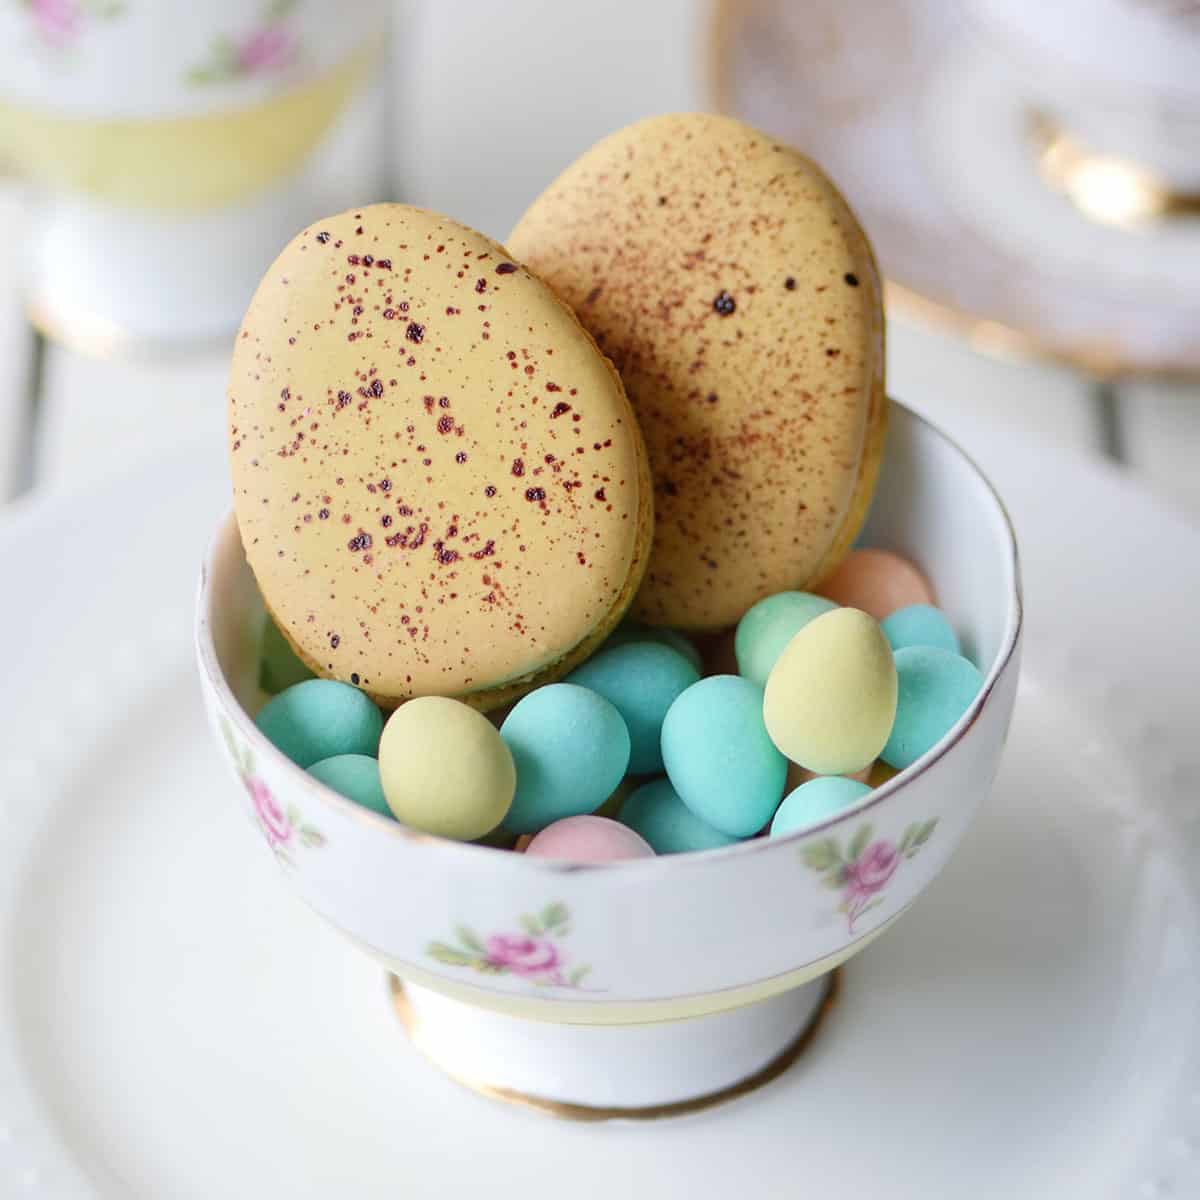
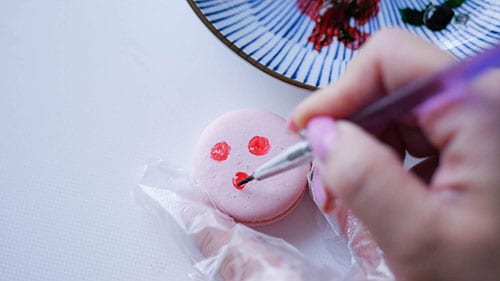
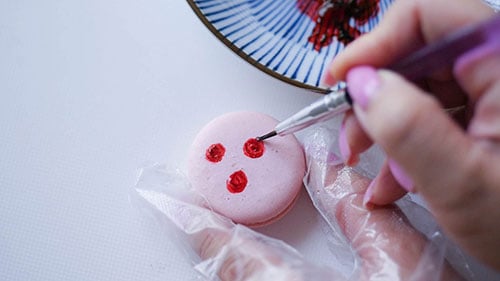
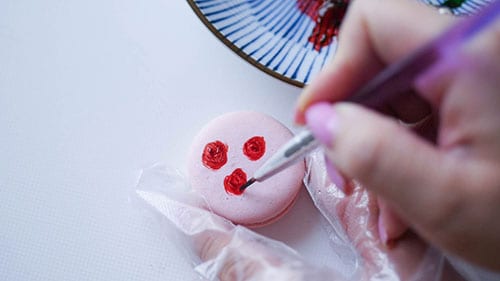
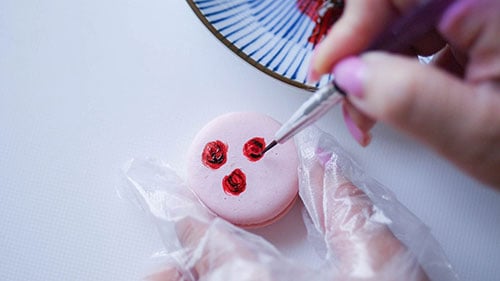
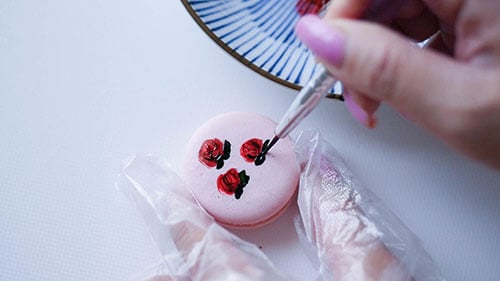
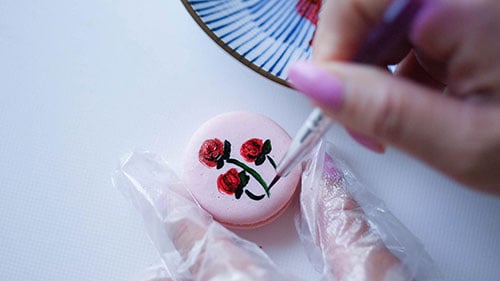
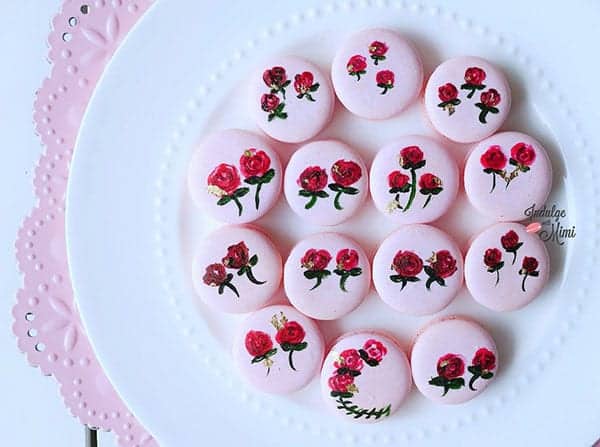
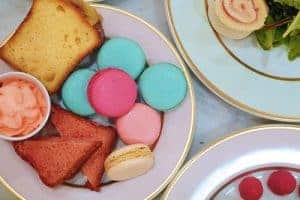
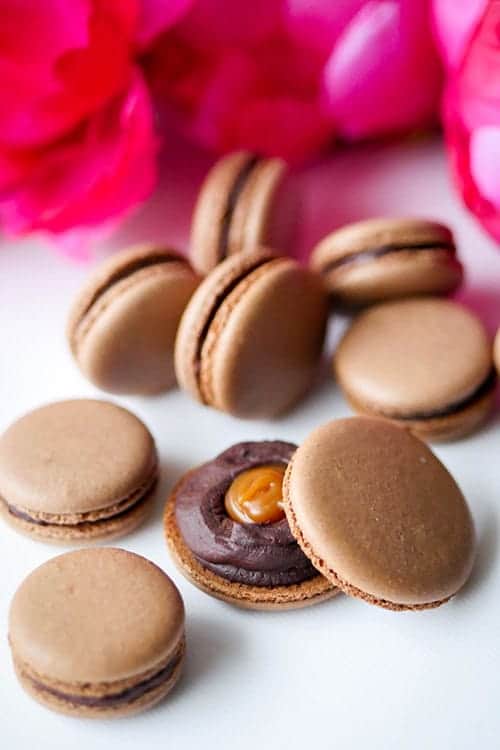
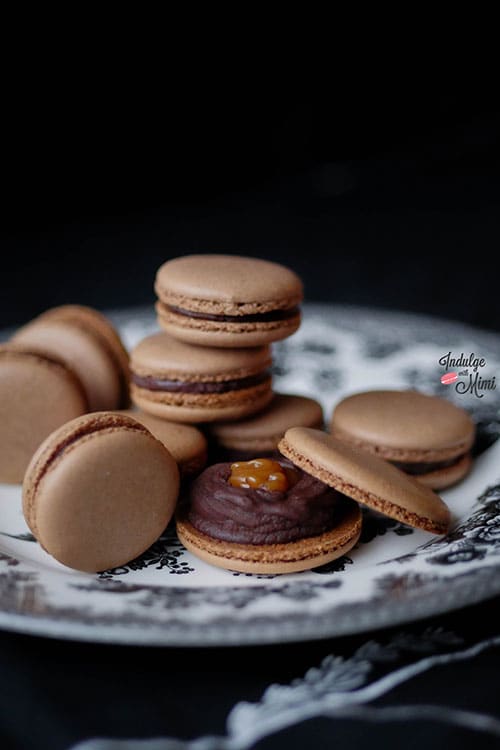
    The Macarons

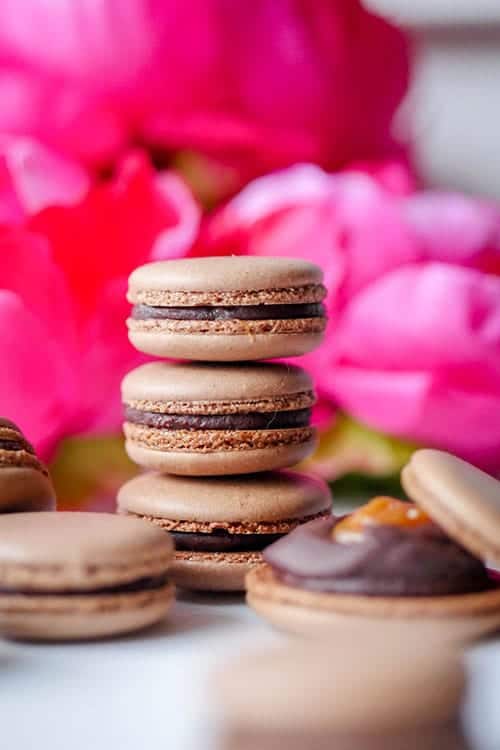
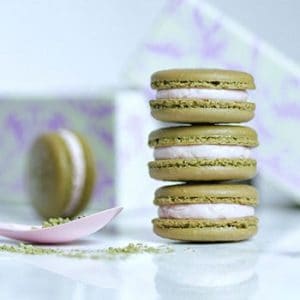
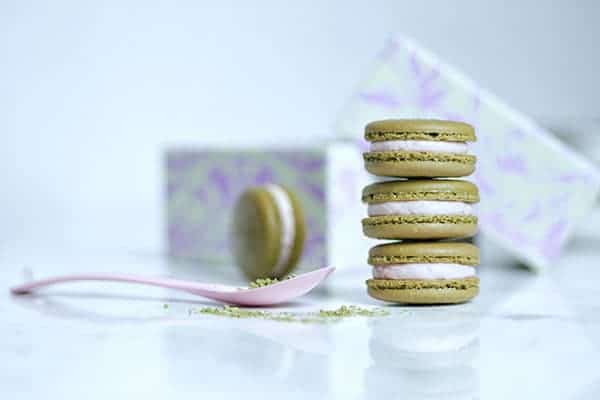
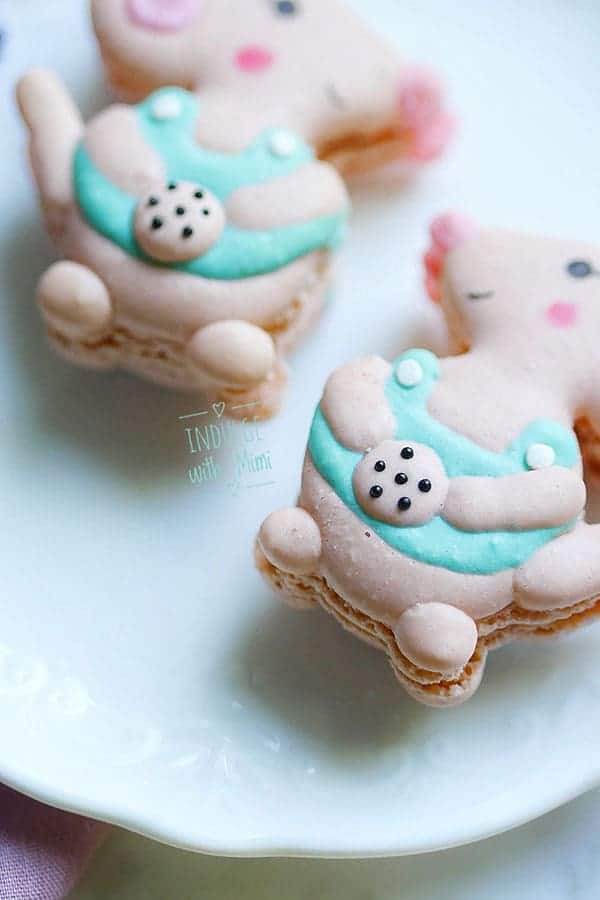
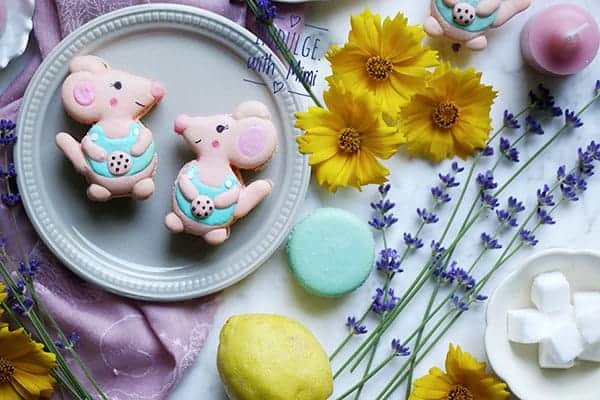
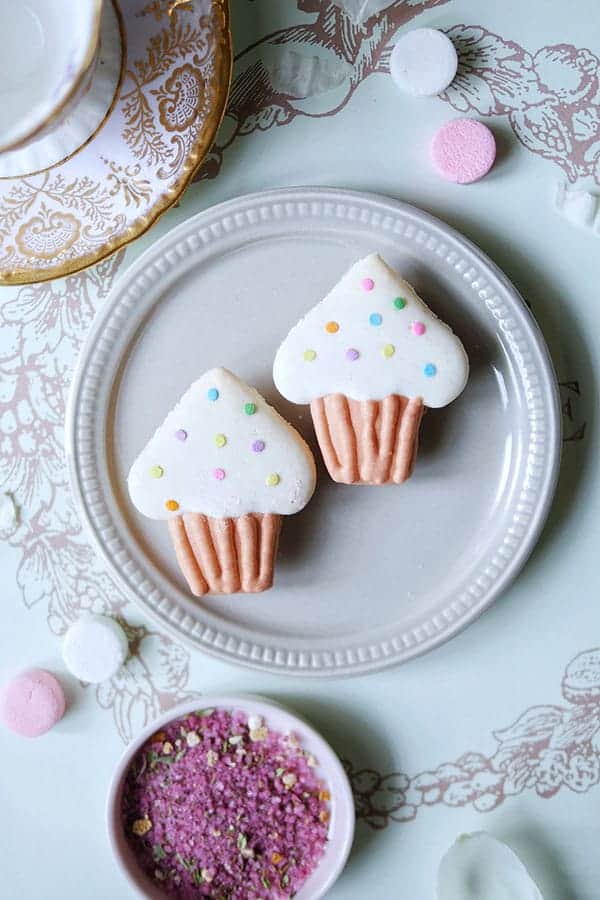
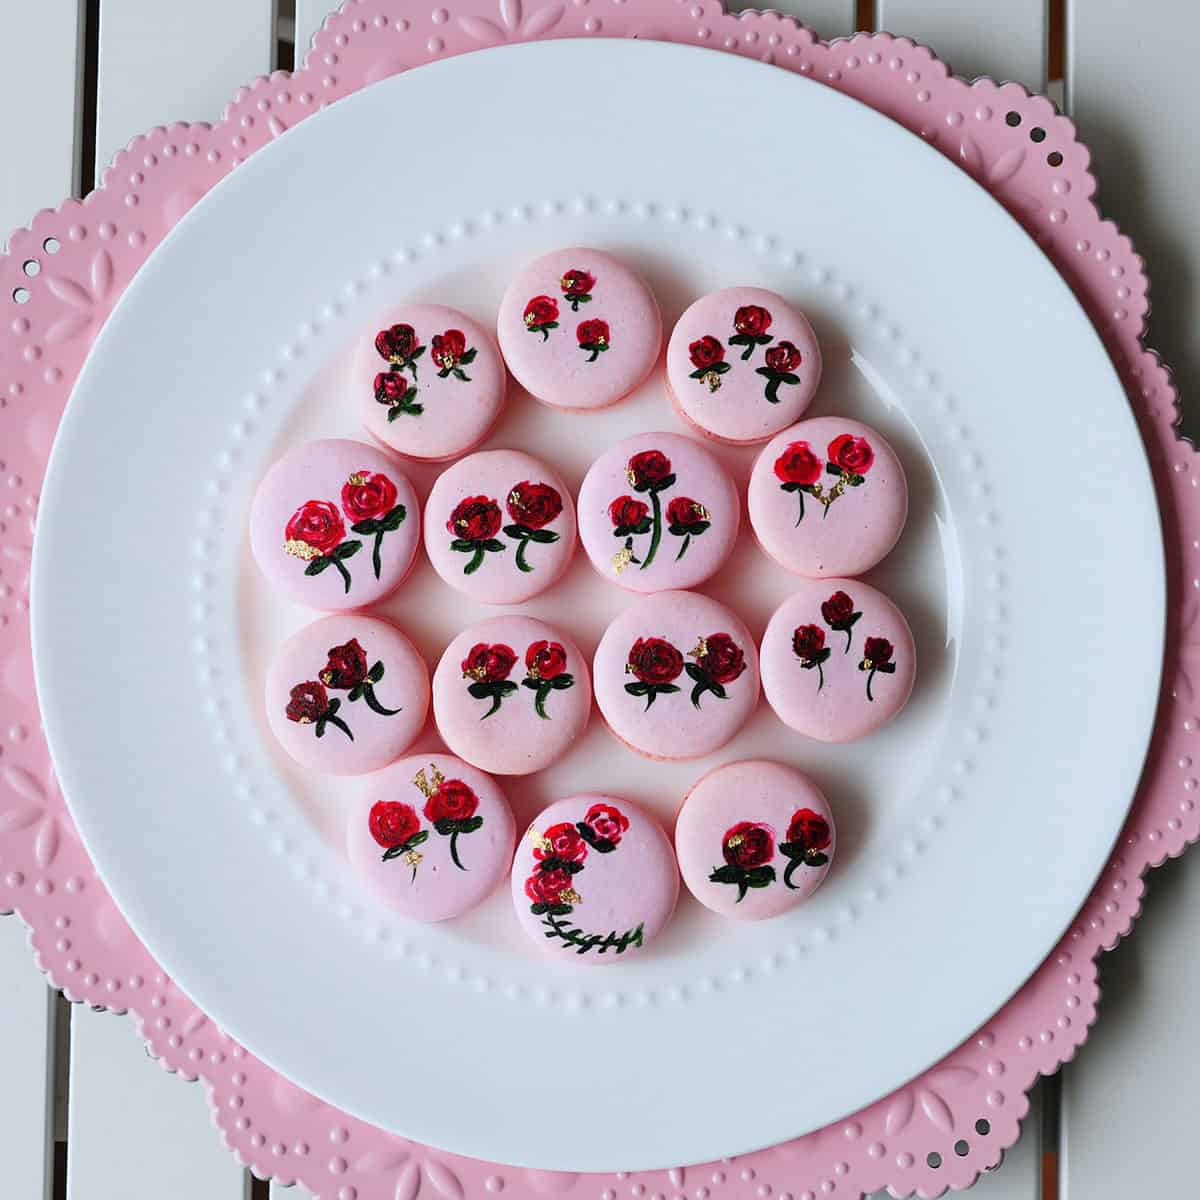
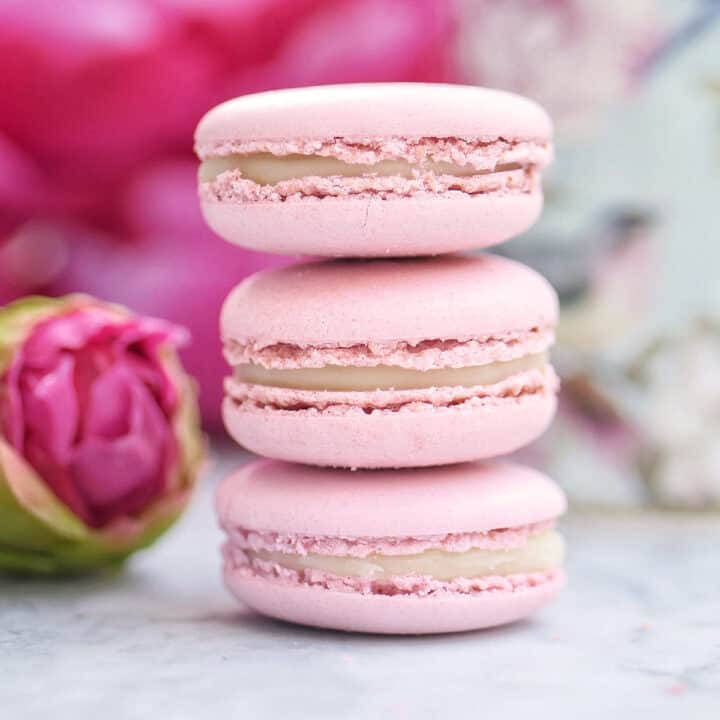
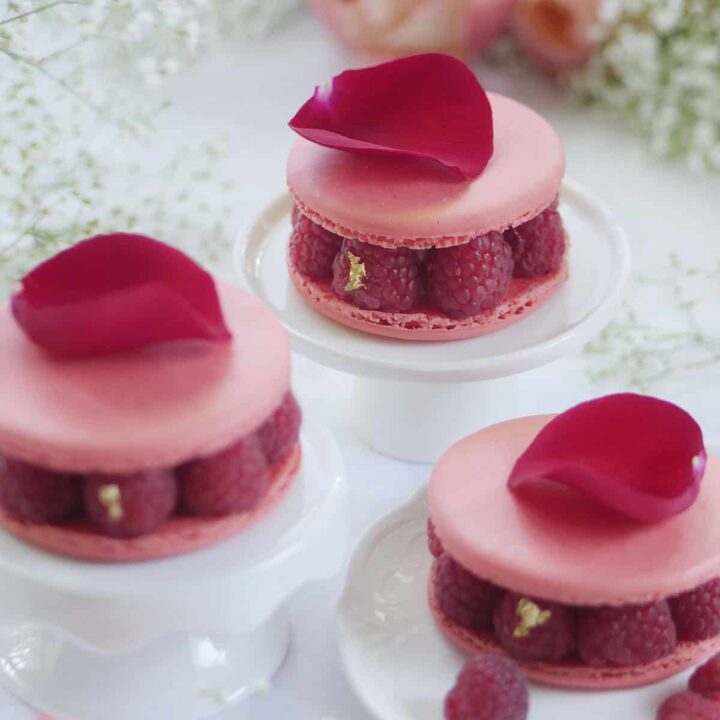
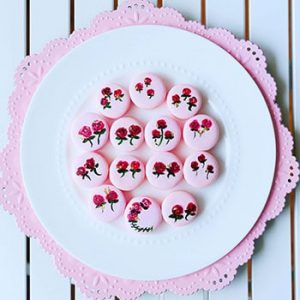
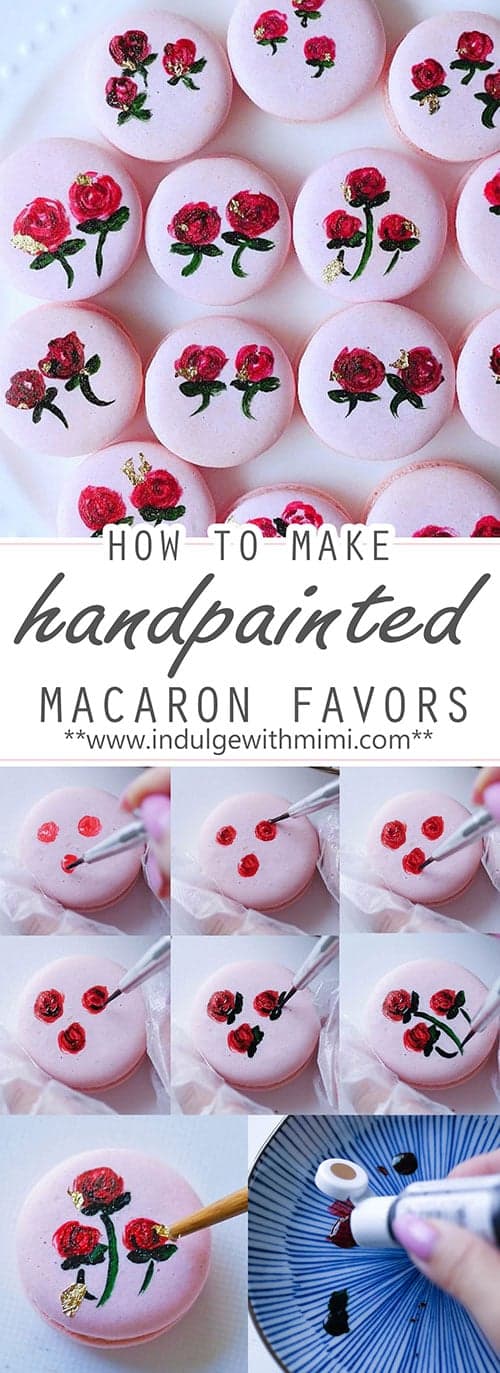
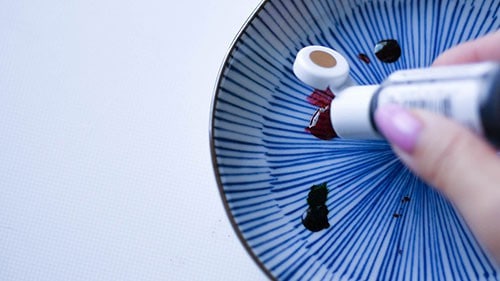
    And finally, I think we can all agree that a floral themed party absolutely requires floral themed macarons right? Here is my little contribution to the party - lavender lemon macarons. The shell color was kept mostly in its original almond colour with a tiny bit of Americolor gold. Once they were assembled, I brushed a tiny bit of gold dust onto the surface to create a pretty shimmer effect.

    As for the filling, I piped a ring of lavender buttercream on the outside and placed a dallop of lemon buttercream on the inside. It's one of my favorite flavor combos! After having one, I was pleasantly surprised when Chef Petersen asked me for more of these 🙂

    There's been a lot of request for this recipe so I'll get it up for you as soon as I can. It's been a beautiful, busy and crazy summer. There has been so many wonderful experiences that I am trying to live-in-the-moment for so please bear with me and I hope you are all enjoying your summer too!

    Thanks for reading!

    XOXO,

    Mimi

    [srp post_limit='5' post_random='yes' category_include= 131 widget_title = 'Other Vancouver Life Moments']

    Matcha Green Tea Macarons with Strawberry Buttercream - Naturally Coloured and Flavoured

    Aug 3, 2017 · 22 Comments

    Matcha macarons filled with strawberry cream that is naturally colored and flavored. The shells are extra flavorful with green tea powder.

    Stack of naturally colored green tea macarons filled with strawberry filling.

    This recipe was influenced by a dinner party experience I had in which one of the guests was concerned about food that contained food colouring. Before eating each dessert item, he asked diligently if it contained any food colouring. Unfortunately, I had indeed used some food colouring in the macaron shells so he couldn't have any due to his concern in regards to it. It really got me thinking. Yes, brightly colored baked goods are so cute and too darn photogenic for their own good but not everyone may feel comfortable ingesting it. So I created this new recipe which is naturally flavoured and colored. Today I present to you this Matcha Green Tea Macaron filled with Strawberry Swiss Buttercream.

    In the last matcha macaron recipe I wrote, I included the addition of a few drops of Americolor's Avocado gel color to give the shells the typical vibrant green color one comes to expect in their macarons. This time, I left out the Avo green gel color and let the natural colors of the matcha come through. As you can see, the result is a more muted and mossy green. As for the strawberry buttercream, the pink color derives solely from the real strawberries used in the recipe. I quite admire this natural colour combo and believe you can take great pride in letting your guests know that this macaron is naturally colored and flavoured from raw ingredients. It also tastes absolutely delicious - a winning combo! I'm proud to have this new recipe in my recipe box and I hope you will be too.

    Happy Baking!
    XOXO, Mimi

    Stack of matcha strawberry macarons on a counter with some loose green tea powder.

    Recipe

    Yield: 12

    REAL Strawberry Swiss Buttercream

    REAL Strawberry Swiss Buttercream

    Matcha macarons filled with strawberry cream that is naturally colored and flavored. The shells are extra flavorful with green tea powder.

    Prep Time 2 hours
    Cook Time 14 minutes
    Rest Time 30 minutes
    Total Time 2 hours 44 minutes

    Ingredients

    Matcha Green Tea Macaron Shell

    • 65 grams almond flour
    • 65 grams icing sugar
    • 1 tablespoon matcha green tea powder
    • 45 grams castor sugar
    • 50 grams egg whites, aged, room temperature
    • ⅛ tsp. cream of tartar

    Fresh Strawberry Puree

    • 350 grams fresh organic strawberries
    • 6 teaspoon granulated sugar

    Swiss Meringue Buttercream

    • 65 grams egg whites
    • 130 grams granulated sugar
    • 195 grams room temperature butter
    • ¼ teaspoon salt
    • 1-1 ½ teaspoon strawberry extract (optional)

    Instructions

    Basic Macaron Shell

    1. Set aged egg whites out at room temperature.
    2. Pulse almond flour and icing sugar together in a food processor to further break down any large pieces of almond flour.
    3. Sift dry ingredients: almond flour, icing sugar and matcha powder. Discard big pieces of almond that can't be sifted.
    4. If you are new to making macarons, please read the instructions to my BEST MACARON RECIPE before attempting to follow the rest of the instructions since it is condensed for the advanced macaron baker.
    5. With the balloon whisk attached, whip the room temperature egg whites on low-medium speed.
    6. Add cream of tartar when it becomes foamy.
    7. Turn up the speed to medium.
    8. Once the whisk starts to leave tracks in the egg whites, add sugar a little at a time.
    9. Turn the speed up to medium-high and whip until firm peaks, stop mixer and add gel food color if desired. Continue whipping on medium-high until stiff peaks.
    10. Fold the dry mix and meringue together until the batter becomes a "lava" or honey-like consistency.
    11. Transfer batter into a piping bag fitted with a round piping tip.
    12. On parchment paper or silicone mats, pipe out round shaped macarons. 
    13. Rap the tray hard on the counter to remove any excess air bubbles. Use a toothpick to pop any remaining bubbles. 
    14. Wait until the shells become completely dry before baking. 
    15. Bake at 325F for 12-14 minutes. Every oven is different, you may need to adjust your own temperature settings. Please read How to Use Your Home Oven Properly for Baking Macarons if you are unsure.
    16. Macarons are done when the foot doesn't push back and the tops don't move when you wiggle it. 
    17. Once baked, let cool completely before removing from the baking mat/parchment paper.

    Fresh Strawberry Puree

    1. Wash strawberry and remove stem and a bit of the surrounding white flesh with a paring knife. Dry it with paper towels. 
    2. Place the strawberries and sugar in a small pot, boil on LOW heat for approx 30 minutes. 
    3. It will start to break down by itself. Occasionally, stir the mixture so the sugars and juices come together. 
    4. Using a heat proof spatula, occasionally press down on the fruit very gently to help break it down. If it is still hard, just let it break down by itself until its soft enough to push down on it with the spatula. 
    5. It will reduce into a very thick, chunky compote that is not runny. Take off heat after appr. 30 min. (Watch accompanying video to see the proper consistency. You may need to keep it on the heat some more if it is still runny.)
    6. Pour the compote into a food processor or blender and blend for a minute or two until the fruit is all broken down. 
    7. Pour through a sieve into a heat proof cup. The mixture is thick so use a spoon to push it through. If the consistency is correct, you should have about 3 tablespoons of puree. Set puree aside. 

    Swiss Buttercream

    1. Cut up butter and let it come to room temperature as you measure out other ingredients. 
    2. Add sugar and egg whites into a heat proof mixing bowl. Stainless steel is light and safe.
    3. Place over a pot of boiling water. 
    4. Whisk the whites & sugar mix over the boiling water.
    5. Pay attention to whisking the mixture when it starts getting hot, you don’t want to cook the eggs.
    6. Whisk the mixture until the temperature reaches 160F. This temperature is generally accepted to be able to kill salmonella in eggs.
    7. Pour the mixture into the Kitchenaid mixer and whisk on low with the balloon whisk, then turn it up to medium.
    8. Once the mixture is thick and glossy, and the bottom of the bowl is cool to the touch, stop mixer. Change the whisk attachment to the paddle attachment.
    9. Add butter a little bit at a time while beating with the paddle attachment on medium speed.
    10. The mixture might look curdled or separated for a while but keep mixing. It will all come together.
    11. Add strawberry puree a tea-spoonful at a time to a max of 3 tablespoons. Beat until incorporated. 
    12. Add strawberry extract if desired and incorporate. 

    Notes

    1. Castor sugar is also known as extra fine granulated sugar or berry sugar. Granulated sugar can be used by castor sugar is preferable.

    Recommended Products

    As an Amazon Associate and member of other affiliate programs, I earn from qualifying purchases.

    • Round Piping Tip #10
      Round Piping Tip #10
    • Ateco Disposable Piping Bags, 12-Inch, Pack of 100
      Ateco Disposable Piping Bags, 12-Inch, Pack of 100
    • USA Pan Rimless Baking Sheet for Better Airflow to Macaron Shells
      USA Pan Rimless Baking Sheet for Better Airflow to Macaron Shells
    • Regular Sized Silpat  Non-Stick Silicone Baking Mat
      Regular Sized Silpat Non-Stick Silicone Baking Mat
    • McCormick Gourmet All Natural Cream Of Tartar, 2.62 oz
      McCormick Gourmet All Natural Cream Of Tartar, 2.62 oz
    • C&h Powdered Sugar 4 Lbs (1)
      C&h Powdered Sugar 4 Lbs (1)
    • India Tree Superfine Caster Baking Sugar, 1 lb. bag
      India Tree Superfine Caster Baking Sugar, 1 lb. bag
    • C&H Pure Cane, Granulated White Sugar, 10 lb
      C&H Pure Cane, Granulated White Sugar, 10 lb
    • Anthony's Almond Flour Blanched, 2lb, Batch Tested Gluten Free, Non GMO, Vegan, Keto Friendly
      Anthony's Almond Flour Blanched, 2lb, Batch Tested Gluten Free, Non GMO, Vegan, Keto Friendly
    • Food Processor for Almond Flour
      Food Processor for Almond Flour
    • Jade Leaf Organic Matcha Green Tea Powder - Authentic Japanese Origin - Culinary Grade - Premium 2nd Harvest [3.53oz]
      Jade Leaf Organic Matcha Green Tea Powder - Authentic Japanese Origin - Culinary Grade - Premium 2nd Harvest [3.53oz]

    Nutrition Information

    Yield

    12

    Serving Size

    1 grams

    Amount Per Serving Calories 248Total Fat 16gSaturated Fat 9gTrans Fat 1gUnsaturated Fat 6gCholesterol 35mgSodium 170mgCarbohydrates 26gFiber 1gSugar 24gProtein 3g

    This information is provided as a courtesy and is an estimate only. This information comes from online calculators. Although indulgewithmimi.com attempts to provide accurate nutritional information, these figures are only estimates.

    Did you make this recipe? Share your results with me 🙂

    Please leave a comment on the blog or share a photo on Instagram

    © Mimi
    Cuisine: french / Category: Macarons
    Close up of rows of strawberry matcha macarons.

    [pt_view id="764f142lrm"]

    Summer Activities Part 2: Alta Lake in Whistler & Nairn Falls Hike in Pemberton

    Jul 23, 2017 · Leave a Comment

    This is Part 2 of summer activities in and around Vancouver that I shared with Deborah Moore this morning on AM1470.

    Continuing on with Part 1 of summer activities in Vancouver where I talked about the different places to stand up paddle board in and around Vancouver, the last one on the list was Alta Lake. It's 1.5 hours away from downtown Vancouver and 12 min. away from Whistler Village.

    It's coincidentally the first place where we had our first SUP experience a few years ago. We rented the boards from Backroads Whistler and quickly fell in love with the sport to where we eventually bought our own boards that season. Although we've returned to Whistler many times after that, we never had an opportunity to bring our boards with us until two weeks ago. We had originally planned to take our first camping (tbh, "vanping") trip together. We really wanted to take advantage of the wonderful summer weather and be in nature but due to the forest fires in the interior, the only road to the campsite where we booked was blocked. We quickly re-routed our trip to Whistler because of the allure of using our boards on Alta Lake. It's a relatively calm body of water for SUP and the water on the beach edge is shallow for wading and swimming.

    On another day, hubby "surprised" me with a hike in Nairn Falls. Okay, so it's not like he had champagne and roses prepared for me there, nothing of that sort (but it would be nice right? ...hubby, if you're reading this lol). On a whim, we decided to go on a hike instead of heading out on the water again so I suggested we do a hike at Brandy Wine - a beautiful trail with a nice view of a waterfall that we've done before. Hubby started looking up places to hike around Whistler and he told me to get into the car and he'd surprise me with the location. Fine with me, I like surprises 🙂

    We drove about half and hour to arrive at a park called Nairn Falls Park. As soon as I arrived at the entrance , I started to take photos. It was truly beautiful. We were up high looking down at the most beautiful seafoam green water that was gushing down the river. I took some time to capture this perfect scene - vibrant green water, snow capped mountain and evergreen trees. What more could you ask for? Really! While I was greedily snapping away, hubby said, '"C'mon, keep moving. I promise you. It gets better." It does? Really? He must know something I don't.

    We kept walking along the trail which is compact earth and rocks. It's not too hard or steep. I even saw young children walk by themselves while holding onto the hands of even younger siblings, and more impressively, a mother with a baby on her back. You'll still need the proper footwear though. We only had on running shoes and could navigate the trail with no problems. It was only when we veered off the main trail and tried to climb down the sides of the mountain in the makeshift paths down towards the water's edge did we encounter some slippery situations, literally. Well worth it though, here is the view once you get down.

    We sat on the rocks cooling off with the mist from the gushing waters that was so clear and so green. What a dream it was! It was very spa-like, except it was real and we got to experience it for free. It really reminded me to be cognizant in my daily life to preserve the limited natural resources we have on this planet. After a brief rest and a fast and furious photo shoot, we headed back on the trail. I had no idea what I was walking towards. Was there supposed to be more on this trail?


    We kept walking along the trail and after a total of about 40 minutes (approx. 1.5 hours round trip), we reached a viewing platform where we could view the most beautiful waterfall. What sets this waterfall apart is how it has created a perfect puzzle-like appearance in the big rocks in it's path. Just so spectacular! I was in awe. No wonder why hubby said he chose this hike for me. He said he knew I would want to take pictures for my blog and that I did. I hope you enjoyed them and if you get a chance next time you're in the Whistler area, make a visit!

    And if you don't have a chance to head up to Whistler, here is the last summer activity that you can do on a rainy day in Vancouver. Read Part 3 of my talk with Deborah Moore here.

    XOXO,

    Mimi


    [srp post_limit='5' post_random='yes' category_include= 131 widget_title = 'Other Vancouver Life Moments']

    Summer Activities in Vancouver Part 1: Stand Up Paddle Boarding

    Jul 21, 2017 · Leave a Comment

    Here's a little more info on the summer activities I shared with Deborah Moore this morning on AM1470

    It's the Season to be on the Water

    Near the end of each spring, we eagerly follow the weather forecast to see when it would be sunny and warm enough for us to bring our beloved paddle boards out onto the water. That day for us came in mid-May this year with temperatures in the mid 20s (C). And it kept climbing throughout the rest of the season resulting in an early June heatwave with temperatures reaching 30C. Okay, so you may probably chuckle at these numbers if you're from a hot climate but these are definitely the numbers that make all of us Vancouverites rejoicing the start of our comparatively short summer season. It rains here almost 7-8 months of the year and even in the summer there are sporadic stretches of rain here and there too. So you can imagine my excitement to dust off our paddleboards - unused since last summer - for the summer season ahead.

    What is Stand Up Paddle Boarding (aka SUP)?

    If you've been near waterways where people do water sports in the last few years, I'm sure you've most likely seen people paddleboarding. You'll see people standing upright on what resembles a surfboard navigated by the movements of just one paddle. It's kind of like a cross between surfing and canoeing while standing upright.

    It's so much fun to be out of the water enjoying the view while doing something physical but without having to get your hair wet 🙂 Unlike a canoe or kayak, you have the flexibility to stand up, sit down or even lay down on your board to suntan. And should you fall off, it's relatively easy to climb back onto your board as opposed to recovering a capsized kayak alone.

    What to Bring for Paddleboarding?

    If you're renting your boards (I'll tell you where you can do so below), it will usually come with a SUP, a paddle, a life jacket and a leash for connecting you to your board so it won't drift away in case you fall off. Here are a few things you can bring along with you to make your time more enjoyable:

    • sunglasses
    • sunscreen
    • swimsuit - You can wear it underneath a T-shirt and shorts if desired. Your bottom will get a bit wet if you decide to sit on the board and from launching the board on the shore.
    • water shoes or flipflops
    • frozen Gatorade or Water - it gets hot on the water since there is little shade, you'll need it to cool down
    • granola bar if you get hungry
    • a water-resistant bag which you can wear on your back or secure it onto the board.
    • towel
    • change of clothes if needed
    • Aquapac - It's a waterproof case to hold your phone so you can take awesome pics of yourself on the water.

    Where Can I Paddle?

    Deep Cove in North Vancouver

    In Vancouver, we like to bring our boards to our favorite spot which is Deep Cove in North Vancouver. The waters at the cove are generally calm during times when there aren't a lot of speedboats on the water as well so it makes for an amazing experience as you trek along the coastline of the cove giving you a nice view of the beautiful waterfront homes on the shore and eventually reaching small islands like Grey Rocks.

    Because of it's natural beauty and ideal water conditions, Deep Cove is one of the busiest places to rent kayaks, surf skis and paddleboards (or SUPs) so you must do it early. In the summer season, there is no such thing as walk-in rentals. The best time to book would be at least 1 or 2 days in advance, especially if you want to be out there on the weekends. Here is the Deep Cove Kayak website link.

    Reaching the beautiful Grey Rocks Island with our paddleboards.

    Beautiful little enclave on your approach to Grey Rocks Island and the view of waterfront homes while paddleboarding at Deep Cove.


    Cate's Park in North Vancouver

    If you do show up at Deep Cove and find that all the boards have been rented already, you can make a 5-minute drive to Cate's Park where they'll usually have more boards available. The area is not as pretty as Deep Cove and the beach where you launch is a bit rocky but worth the trip if you're in the area and have your heart set on doing some stand up paddleboarding. If you paddle long enough (one hour), you can even make your way to Deep Cove on your board but don't forget you have to paddle back 🙂

    Rocky Point in Port Moody

    For those in the Tri-cities area, Rocky Point in Mundy Park is another great place where you can rent. The view isn't as nice as the one you get at Deep Cove since the shorelines are lined with industrial plants but the wonderful thing that sets this place apart is the opportunity to see sea lions, lots of them, resting on the floating log piles. It's a wonderful sight.

    Jericho Beach in the West End

    Jericho Beach is known as a great launching area for surfers so you guessed it - the water will be choppy! Unlike the relatively calmer warmers of Deep Cove, expect to ride a few waves when you're out there. Here's the link to the Windsure where you can rent SUPs, skimboards or windsurfing boards.

    Granville Island

    Paddleboarding around Granville Island offers you a magnificent view of Vancouver's urban glass jungle and one of Vancouver's nost iconic landmarks - Science World, which was originally built for Expo 86. You'll face a lot of competition for the narrow waterways from the other kayaks, boats and yachts in this area so keep that in mind. The water quality there is also known to be less than desirable. Here are two places where you can rent from: Ecomarine & Vancouver Water Adventures

    Alta Lake in Whistler

    Alta Lake in Whistler is another favorite of ours. It's a 5 minute drive from Whistler Village so it makes a perfect daytime activity while you're up there in the summer season. There is a convenient dock for you to launch your board and the water by the beach is shallow and calm for swimming. Rentals can be made here.

    I hope you get a chance to try out paddle boarding this summer. One of my girlfriends always noted her desire to go out on the water with me one day. We finally made it happen this year and she's been hooked ever since. I think she's well on her way to getting her own board soon because she has quickly fallen in love with it, and I think you will too!

    Click here to read the PART 2 of the summer activities I shared with Deborah Moore this morning.

    XOXO,

    Mimi


    [srp post_limit='5' post_random='yes' category_include= 131 widget_title = 'Other Vancouver Life Moments']

    Losing my "Dessert Weight"

    Jul 3, 2017 · 2 Comments

    My "Dessert Weight"

    It's July 3rd today and I want to share a little bit of my one-month weight loss journey that I started in the beginning of June. I tried to lose my "dessert weight" - basically the weight I think I've gained from eating desserts, and the weight from overeating stemming from the fear of being hungry later. It's extra weight that comes from unhealthy lifestyle habits so I was simply trying to lose those extra few pounds and nothing more since maintaining a healthy weight for my height and being satisfied at meal time is very important to me.

    My Goal

    My weight loss goal was to lose one pound per week at a total of seven pounds. It's nothing dramatic but I chose this goal because I wanted to lose it gradually and not have the process become so painful that it would make me fall off the wagon. I knew that developing sustainable lifestyle habits would help me more than reaching a weight loss goal only to gain it back afterwards when the actions taken to get there can't be repeated on an ongoing basis.

    So far, it's been four weeks and I've lost five pounds. Here's what I did to lose my little "dessert weight".(Please note, I'm not a dietitian or trainer. These tips happened to be effective for me and my body type.)

    1. Cutting Desserts

    GASP! Oh I know.... how could I do that? That just goes against everything my blog and I stand for 🙂 Well, I'm not saying that I cut out all of it! I just happened to eat it at least 3 to 4 times a week. It was so easy since I'd buy a cake here and there plus there were days when I "had" to taste test my own desserts for the blog. See what I do for you all? Lol. I cut down my dessert intake down to 1 to 2 times a week. Sometimes I'd share it or if it was ice cream at home, I'd only take a few teaspoons full and stop. I was still able to find it satisfying since I was able to have a taste of it. In the past I was just mindlessly eating more than I needed just to "finish it".

    2. Cutting Carbs

    Instead of eating rice and noodles. During meal times at home, we'd pair a protein with quinoa or a salad. For salad dressing, I would use a tablespoon of peanut butter. I would also add some of the foods I liked to make it more enticing - strawberries, mandarins, dried cranberries to name just a few. I also cut down on eating out unless it was something I really wanted to splurge on - calories-wise. Of course, if I was eating with others, I would always partake in the food fun. If my dining companions wanted to eat something sinfully delicious, I would not kill the mood by saying no. For me, eating out with others should a fun and engaging activity where we can share a similar experience together. A splurge here and there is totally okay! Like this one I enjoyed with @maggiemei & @cici.w:

    Mont Blanc Boxed Toast at Dazzling Cafe in Richmond. There are four more blocks of toasts inside!

    3. Increase the Exercise

    I regularly exercised 1 to 2 times a week but obviously it wasn't offsetting enough of the calories I ate each day. So i increased it to every other day. Most of it consisted of thirty minutes on a stationary bike at home in front of the TV. Although, logistically, it was the easiest way to fit in physical activity, I actually preferred one to two hour walks in the city and paddle boarding, both of which I did once a week. "Fun" exercise is the best. It feels like I'm not exercising at all.

    Btw. I actually hate exercising. I'm not one of those people who get a "high" after exercising. Those people are crazy 🙂 Which leads to my next point: I realized that exercise can only burn off so many calories, which is not a lot. Since my usual exercises were not high impact or for a long period of time, I wasn't burning a whole ton, maybe just about 150 to 200 calories each session, therefore, some restraint was needed to not snack out of boredom. I loved chocolates and when I read on the packaging that one piece was 80 calories, it was enough for me to put it down. It was easier for me not to eat it than it was for me to work it off.

    4. Eating a smaller breakfast.

    This is a shocker. My whole life I've been told to eat a big breakfast which was what I did until I started calorie counting (with My Fitness Pal) and realized I added 3-400 calories to my diet each day during a time when I wasn't even hungry. I seriously struggled to finish my breakfast most mornings. It usually consisted of a piece of fruit, half an avocado and a handful of nuts or an egg. For a drink, I would drink lemon water with grated ginger. After reading some more articles that supported eating a smaller breakfast, I decided to give it a try. Breakfast time became less of a chore and I literally felt the same as if I had eaten a bigger one. Some days I'd swap the lemon for honey or add an extra egg to my meal, providing more satiety if I was required to have a later lunch.

    5. Conscious Eating

    Paying attention to what I ate as described above and how much of it was a huge mind set shift. I used to overeat out of fear that I'd be hungry later so over time it was hard to gauge when I was actually full. I had to train myself to recognize when I've had enough food. The first few days of my diet, I did deliberately lower my portions to cut the calories and yes, it was hard! I did feel hungry afterwards but after about 3 days, my body seemed to adjust to the new smaller portions and I was able to get by with less to feel full. I now try to consciously eat slower so I can have time to develop that "full" feeling. I also eat till I'm just full, not stuffed. And to alleviate the fear of being hungry, I tell myself that I can always eat a snack later. Sometimes I do. Sometimes I don't. And if I do, its usually a glass of milk (UHT which I absolutely love) or a large piece of fruit that I actually enjoy so it becomes a "treat"- usually fruits like Dragon Fruit or watermelon.

    And there you have it. I'm still about two pounds away from my goal and I noticed that losing weight is not linear for me. The first week, I quickly lost three pounds and my weight was stagnant for two weeks until last week when I lost another two. I'm happy I developed some new habits that I can use each and every day without feeling unnecessarily restricted. I'll make sure to keep you posted and please let me know if you have any tips or suggestions.

    Now let's just enjoy our desserts 🙂

    XOXO,

    Mimi

    [srp post_limit='5' post_random='yes' category_include= 131 widget_title = 'Other Vancouver Life Moments']

    If You Give a Mouse a Cookie Macarons & My Canada 150 Story

    Jul 1, 2017 · 4 Comments

    Mouse macarons on a counter with lavender, lemons and other ingredients.

    Canada 150

    On Canada's 150th birthday today, I'd like to pay a little tribute to this country which I'm lucky to call my home. (Read about my Canada150 Afternoon Tea experience here.)  I know you're probably thinking why I didn't post an accompanying photo of a maple leaf or other well-known images symbolic to the country. I'm sure for many of my Canadian-born friends and even my own husband, being Canadian is a part of them that is as natural as life itself. For me, when I look back on my life, there was a time when I wasn't a Canadian. Looking back on the beginning of my life here in Canada, I somehow remember this little mouse. I'll tell you why.

    Are We in Canada Yet?

    My family and I immigrated from Hong Kong after I finished kindergarten. I didn't know how to read or write much in Chinese and probably only knew a few words in English. I remember when we passed through customs, we had these immigration forms that we had to fill out and sign our names on. I asked Dad, how should I sign it? In English? (I was yet to have an English name.) Dad told me, "Oh, it's just a formality, you can sign it whichever way you like. In fact, you can even put a turtle on it if you want." And that's what I did. I drew a turtle on the signature line like any other a 6 year old would do. Dad laughed and I was none the wiser. In retrospect, that was probably an extra blank form Dad gave me to occupy my time since I was probably one annoying child to ride on the plane with. I remember asking him incessantly when we would finally be in Canada like children often do on long car or plane rides. And sometimes I'd overhear my family saying that we were going to Vancouver. I would protest and say, "but, I thought we were going to Canada!?" I don't know how many times Dad had to remind me that Vancouver is a city in Canada. I must not have understood the concept between cities and countries then. Okay, I was definitely not the brightest little one lol.

    Learning English

    When we started school, I didn't know much in English so I often had no idea what my teachers and classmates were talking about. I spent a lot of time watching and observing what everyone else did, that was the only way for me to make some sense of the world around me. We lived in a remote region of the province so there were no dedicated group classes for ESL students. Instead, my sister and I were often pulled out of our regular classes and taught English by a specially appointed teacher in the school library. We would learn English by reading children's books and one of them that I will always remember is, "If You Give a Mouse a Cookie." It's about the adventures of one child who tries to give a mouse a cookie only to find that he could not be satisfied until a series of other requests were met. I really loved reading that book with my teacher. She was a wonderful patient woman along with all our other teachers and the principal.

    Even with all the support and special attention, I was still unable to keep up with my classmates so after grade 2, my teachers told my parents that it would be best to keep me behind to repeat the grade. I don't remember much else from that time except that I loved books and I would read a lot on my own time. I took out a lot of books from the library and read all the English words in them, often times not understanding what I was reading. They were just words that I didn't know but gradually, with the help of structured lessons, playing with my Canadian friends and just constant reading, they did start to make sense. At the end of grade 2, my teachers gave me a test to see if I could go back into the actual grade I should be in the next year had I not failed, which was grade 4. I actually ended up with a Grade 5 competency level and was allowed to skip two grades.

    Looking back, I really appreciated the special attention we received at school since we were able to learn English that much faster. It was also a blessing to be surrounded by so many kind Canadian friends who only spoke English. That also contributed to how quickly we were able to learn and assimilate into Canadian life. I am so grateful for all the wonderful and welcoming Canadian people who were a part of our lives in our formative years in Canada. After university, I decided to stay and work in Canada even though many of my friends were moving back to Asia to pursue their careers. I knew I really loved Canada and wanted to stay and build a life here. It's a real privilege to live in a country where we have the right to vote, speak freely and have the confidence to pursue our wildest dreams. I don't take that for granted.

    Canadian Life

    To all my fellow Canadian friends, if you ever find yourself becoming impatient with someone who doesn't speak English, I hope you'll be reminded that just because someone doesn't speak English today, that doesn't necessarily mean they won't tomorrow. They may be trying their hardest and every time they encounter someone who converses patiently and kindly with them, their confidence will grow, along with their love for their newly adopted country. And for all my fellow immigrant friends, I commend you for taking a big leap of faith for leaving behind everything you know to start a new life in a new country, one that is presumably offering you a better life than the one you left behind, so it's important to put your best foot forward and embrace your newly adopted country and it's culture. Canadian society is one of the most multi-cultural and tolerant in the world but it's a two-way street. Along with contributing our own special ethnic diversity into the mix, we also have to learn (and use) one of the two official languages (English and French) and to respect local customs. In doing so, you'll open up doors to a new life with many great Canadians who are waiting to make a new friend just like you. So don't give up, keep learning and keep reading. In my case, I learnt that if you give a mouse a cookie... you take one step closer towards becoming a Canadian.

    Happy Canada Day!

    XOXO,

    Mimi

    Recipe

    Macaron Recipe for Mimi's "If You Give a Mouse a Cookie" Template

    Ingredients

    Supplies

    • Kitchenaid stand mixer or handheld mixer and mixing bowl
    • food processor (if making own almond flour)
    • spatula
    • heavy duty baking pan
    • silicone SILPAT mat or parchment paper
    • gel food colours in brown, pink & blue
    • fine piping tip (ex. Wilton 4)
    • medium piping tip (ex. Wilton 10)
    • piping bag
    • white confetti sprinkles
    • black sprinkles
    • edible pen
    • tweezers

    Brown Macaron Batter

    • 85 grams almond flour
    • 85 grams icing sugar/confectioner's sugar
    • 65 grams egg whites
    • 58 grams granulated sugar
    • ¼ teaspoon cream of tartar
    • 1 drop brown gel color (Warm Brown by Americolor)

    Pink Macaron Batter

    • 65 grams almond flour
    • 65 grams icing sugar/confectioner's sugar
    • 50 grams egg whites
    • 45 grams granulated sugar
    • ⅛ teaspoon cream of tartar
    • ½ drop pink gel color (Deep Pink by Americolor)

    Blue Macaron Batter

    • 65 grams almond flour
    • 65 grams icing sugar/confectioner's sugar
    • 50 grams egg whites
    • 45 grams granulated sugar
    • ⅛ teaspoon cream of tartar
    • ½ drop blue macaron batter ( Turquoise by Americolor)

    Instructions

    Basic Macaron Shell

    1. Set aged egg whites out at room temperature.
    2. Pulse almond flour and icing sugar together in a food processor to further break down any large pieces of almond flour.
    3. Sift dry ingredients: almond flour, icing sugar. Discard big pieces of almond that can't be sifted.
    4. If you are new to making macarons, please read the instructions to my BEST MACARON RECIPE before attempting to follow the rest of the instructions since it is condensed for the advanced macaron baker.
    5. With the balloon whisk attached, whip the room temperature egg whites on low-medium speed.
    6. Add cream of tartar when it becomes foamy.
    7. Turn up the speed to medium.
    8. Once the whisk starts to leave tracks in the egg whites, add sugar a little at a time.
    9. Turn the speed up to medium-high and whip until firm peaks, stop mixer and add gel food color if desired. Continue whipping on medium-high until stiff peaks.
    10. Fold the dry mix and meringue together until the batter becomes a "lava" or honey-like consistency.
    11. Transfer batter into a piping bag fitted with a round piping tip.
    12. On parchment paper or silicone mats, pipe out round shaped macarons. 
    13. Rap the tray hard on the counter to remove any excess air bubbles. Use a toothpick to pop any remaining bubbles. 
    14. Wait until the shells become completely dry before baking. 
    15. Bake at 325F for 12-14 minutes. Every oven is different, you may need to adjust your own temperature settings. Please read How to Use Your Home Oven Properly for Baking Macarons if you are unsure.
    16. Macarons are done when the foot doesn't push back and the tops don't move when you wiggle it. 
    17. Once baked, let cool completely before removing from the baking mat/parchment paper.

    Nutrition Information

    Serving Size

    1 grams

    Amount Per Serving Unsaturated Fat 0g

    Did you make this recipe? Share your results with me 🙂

    Please leave a comment on the blog or share a photo on Instagram

    © Mimi
    Close up of the chocolate chip cookies made with black sprinkles.

    Mouse & Milk Jug Macaron Template

    Available for download for Newsletter Subscribers. Just sign up for the newsletter and wait for the double opt-in confirmation email. Confirm your subscription and you'll be sent the password to the member's only area.

    [pt_view id="fadd1270n6"]

    Rainbow Unicorn on Cupcake Macaron & How I Prepare Multiple Colored Batters (Template)

    Jun 18, 2017 · 4 Comments

    unicorn macarons on a plate with flowers.

    Unicorn macarons are definitely good but unicorns with rainbow horns hanging onto a cupcake topped with cotton candy are GREAT! Ever since I created Tri-color Unicorn Macarons over the holidays, I've been thinking of new ways to incorporate this magical creature into my creations. Another project I did was the Double Unicorn Macarons which was a collaboration with Christina's Cupcakes |(see it here)  . Today's project is unicorns hanging onto one of the most photogenic treats out there - sweet pink cupcakes! I think it has everything I ever wanted in Macaron Art.

    How to Prepare Multiple Batter Colors

    You'll need to prepare three sets of batters using my Best French Macaron Recipe. Pay attention to the ingredients for the pink batter, you'll need a little bit more of it. For macaron art, I like to prepare different sets of batter separately instead of dividing them up into small amounts and folding in the color. I think there is too much room for mistakes that way. Over folding is a big concern since you're adding colour to the finished meringue and not during the whipping process. I prefer to prepare different batters the longer and more reliable way. After all, it's macaron art. It requires patience to realize the vision. Plus, you will realize very quickly that there will be much more tears in the kitchen when you've spent lots of precious time piping your little works of art only to find that they don't bake properly.

    I always have everything weighed out and ready to go. As soon as I have added the gel colour and finish whipping up a batch of meringue to stiff peaks, I will start folding it along with the almond flour. During this folding time, I already have another batch of meringue mixing in the Kitchenaid Mixer. It helps to work pretty quickly so the folded batter doesn't have to wait too long and dry out. To further prevent this, I transfer the batter into the piping bag. And of course, it helps to have a stand mixer and several Kitchenaid bowls at your disposal.

    So that's how I do it and that's one of the ways I found to keep me sane while making macaron art  🙂

    My Preferred Method 

    1. have everything weighed out and ready to be used.
    2. Whip egg whites and add cream of tartar and sugar at the appropriate stages. After adding gel colour to the meringue and it has reached stiff peaks, stop the Kitchenaid stand mixer, take out the bowl and start whipping another bowl of aged egg whites.
    3. Start folding the meringue with the almound flour.
    4. All the while, pay  attention to the second batch of meringue that is currently being whipped. Continue to add cream of tartar and granulated sugar as per recipe instructions.
    5. Go back to your folding whenever you can. Once you've folded to the honey or lava stage, transfer the batter into a piping bag to prevent it from drying out.
    6. The second batch of meringue should be ready to be used now. Continue steps 2 to 5 until you've created all the colors you need.

    A Simpler Method

    A simpler method to creating multiple colored macaron batters is to make one big batch of meringue and then split it up amongst bowls filled with equally weighted almond flour. Please read my brand new tutorial on How to Create Multiple Colored Macaron Batters.

    close up of unicorn macarons.

    Adding Cotton Candy

    The cotton candy is optional. I added it because I had it on hand from my afternoon experience at Trump Hotels and thought it was a great opportunity to experiment with it. It's so fluffy and make the design really Pop! However, please note it needs to be added on immediately before consumption since they deflate within half an hour.

    Video & Template

    I've included a video to show you the steps in piping this character. Pipe each part according to the steps shown since you'll need to wait until certain parts dry up before adding more batter to it.

    As for the template, make sure you print out BOTH of the unicorn cupcake templates. It's an assymetrical design so that's the way to make both the top and bottom shell match when they're assembled. This situation actually arose with one of the readers who used my Over the Rainbow Macarons, the clouds weren't matching up after baking because they had missed reading the instructions to print out BOTH templates.

    Giveaway

    Lastly,  I'm going to be drawing a winner in four days for my latest Giveaway. There's still time to enter. Get the instructions here.

    Good luck!

    XOXO,
    Mimi

    Piping Step By Step

    piping cupcake shape from macaron batter.
    1,) Pipe the cupcake base with the brown batter with a medium tip, Wilton 10 is used here. Pipe all the bases before moving onto the next step 2.) Pipe the cupcake top with the pink batter with a medium tip, Wilton 10 is used here
    adding sprinkles onto macaron batter.
    3.) Before the pink batter dries up, gently add the confetti sprinkles on top with tweezers. Do this for each macaron before moving onto the next step. 4.) Pipe the ridges on the cupcake base with a fine tip, Wilton 4 is used here.
    piping the head of the kitty onto macaron design.
    5.) Pipe the unicorn head with a medium tip, Wilton 10 is used here. Do all the heads at once. 6.) Pipe the unicorn horn and ears with a fine tip, Wilton 4 is used here 7.) Once the pink top has developed a "skin", add two little feet with a fine tip.
    piping heads onto kitty face on macaron batter.
    8.) Once the heads have developed a skin, use a fine tip to add three hearts onto the unicorn head. 9.) Add white sprinkles onto the hearts with a tweezer 10.) Bake the macarons according to the instructions in my Best Macaron Recipe 11.) Once the macarons have finished baking and have cooled off, use a fine tip edible pen to draw in the eyes and eyelashes 12.) Use edible pens to color a rainbow pattern on the horn.
    Adding cotton candy onto the macaron.
    Optional: Roll up cotton candy into a small ball. Use edible glue to glue the balls onto the edge of the pink cupcake topper. COTTON CANDY MUST BE ADDED IMMEDIATELY BEFORE CONSUMPTION.
    Cupcake macarons on a plate.

    Unicorn on Cupcake Macaron Templates

    Sign up for the newsletter, wait for the confirmation email, confirm your subscription and you will be sent the password to exclusive templates for subscribers only.

    cupcake macaron template.
    Unicorn macaron template.
    unicorn macaron template.

    unicorn macarons on a plate.
    Side details on macarons.

    Recipe

    Yield: 18 Macarons

    Unicorn on Cupcake Macarons

    Unicorn on Cupcake Macarons

    Cute Unicorn on Cupcake macarons using multi-colored batters.

    Prep Time 1 hour 30 minutes
    Cook Time 15 minutes
    Rest Time 30 minutes
    Total Time 2 hours 15 minutes

    Ingredients

    Supplies

    • Kitchenaid stand mixer or handheld mixer and a mixing bowl
    • food processor (if making own almond flour)
    • spatula
    • heavy duty baking pan
    • silicone SILPAT mat or parchment paper
    • gel food colours
    • fine piping tip (ex. Wilton 4)
    • medium piping tip (ex. Wilton 10)
    • piping bag
    • rainbow confetti sprinkles
    • edible pen
    • tweezers

    White Macaron Batter

    • 65 grams almond flour
    • 65 grams icing sugar/confectioner's sugar
    • 50 grams egg whites, aged
    • 45 grams castor sugar*
    • ⅛ teaspoon cream of tartar

    Pink Macaron Batter

    • 85 grams almond flour
    • 85 grams icing sugar/confectioner's sugar
    • 65 grams egg whites, aged
    • 58 grams castor sugar
    • ¼ grams cream of tartar
    • 1 drop pink gel colour (Deep Pink by Americolor)

    Brown Macaron Batter

    • 65 grams almond flour
    • 65 grams icing sugar/confectioner's sugar
    • 50 grams egg whites, aged
    • 45 grams castor sugar
    • ⅛ grams cream of tartar
    • 1 drop brown gel colour (Warm Brown by Americolor)

    Small Batch Edible Glue

    • 20 grams icing sugar
    • 1 ½ tsp. of meringue powder
    • water in a spritzer bottle

    Instructions

    Basic Macaron Shell

    1. Set aged egg whites out at room temperature.
    2. Pulse almond flour and icing sugar together in a food processor to further break down any large pieces of almond flour.
    3. Sift dry ingredients: almond flour, icing sugar. Discard big pieces of almond that can't be sifted.
    4. If you are new to baking macarons, please read the instructions to my BEST MACARON RECIPE before attempting to follow the rest of the instructions since it is condensed for the advanced macaron baker.
    5. With the balloon whisk attached, whip the room temperature egg whites on low-medium speed.
    6. Add cream of tartar when it becomes foamy.
    7. Turn up the speed to medium.
    8. Once the whisk starts to leave tracks in the egg whites, add sugar a little at a time.
    9. Turn the speed up to medium-high and whip until firm peaks, stop mixer and
      add gel food color if desired. Continue whipping on medium-high until
      stiff peaks.
    10. Fold the dry mix and meringue together until the batter becomes a "lava" or honey-like consistency.
    11. Transfer batter into a piping bag fitted with a round piping tip.
    12. On parchment paper or silicone mats, pipe out round shaped macarons. 
    13. Rap the tray hard on the counter to remove any excess air bubbles. Use a toothpick to pop any remaining bubbles. 
    14. Wait until the shells become completely dry before baking. 
    15. Bake at 325F for 12-14 minutes. Every oven is different, you may need to
      adjust your own temperature settings. Please read How to Use Your Home
      Oven Properly for Baking Macarons if you are unsure.
    16. Macarons are done when the foot doesn't push back and the tops don't move when you wiggle it. 
    17. Once baked, let cool completely before removing from the baking mat/parchment paper.


    Small Batch Royal Icing

    1. Combine the dry ingredients in a glass bowl.
    2. Spritz the water onto the dry ingredients a little at a time and then blend everything together until you reach a thick consistency. If it's too runny, add more sugar. A spritzer is great for controlling the amount of water you are adding at one time.

    Notes

    Castor sugar is also known as extra fine granulated sugar or berry
    sugar. Granulated sugar can be used by castor sugar is preferable.

    Nutrition Information

    Yield

    18

    Serving Size

    1 grams

    Amount Per Serving Calories 231Total Fat 6gSaturated Fat 0gTrans Fat 0gUnsaturated Fat 5gCholesterol 0mgSodium 16mgCarbohydrates 43gFiber 1gSugar 40gProtein 4g

    This information is provided as a courtesy and is an estimate only. This information comes from online calculators. Although indulgewithmimi.com attempts to provide accurate nutritional information, these figures are only estimates.

    Did you make this recipe? Share your results with me 🙂

    Please leave a comment on the blog or share a photo on Instagram

    © Mimi
    Cuisine: french / Category: Macarons

    [pt_view id="fadd1270n6"]

    The Ultimate Laduree Wedding Guide: Precious Wedding Favours, Wedding Gifts & Party Ideas

    Jun 15, 2017 · Leave a Comment

    Every bride hopes her wedding will make a beautiful impression on her guests on her big day and what's more beautiful than delicious Laduree treats wrapped in the most elegant packaging? The pretty pastel boxes beautify any wedding table setting and they also make wonderful keepsakes for your guests. This is truly one wedding favor which guests will treasure and keep. Each time they see them on their dresser drawer or mantle they will surely be reminded of your special day.

    Here are a selection of items which would make great wedding favours, wedding gifts or bridal party goodies. With the exception of the macarons (due to their fragility), all of these items can be ordered directly from the store for shipping anywhere in Canada.

    Note: 2017 pricing is shown and is subject to change

    Tel:  (604) 336-3030
    Address: 1141 Robson St, Vancouver, BC V6E 1B5
    E: [email protected]


    Macaron Wedding or Party Favours

    An obvious choice for wedding or party favours are Laduree's world-famous macarons. They are flown in from France twice a week and at least 9 permanent flavours are available at any given time: chocolate, pistachio, salted caramel, vanilla, rose petal, orange blossom, coffee, lemon and liquorice. Special seasonal flavours are also offered depending on availability.

    To hold these favours, Laduree also offers their popular collectors boxes in smaller versions which fit from one, two, three or four macarons - just so adorable! Durable and sturdy, your guests can reuse them as jewelry or trinket boxes. There are both wedding and baby shower themed boxes and of course, the signature Prestige box with the iconic Laduree logo and gold details. And for those who prefer to let the macarons take centre stage, soft disposable boxes are offered for a lower price.

    Macaron Favours in a Classic Prestige Collector Box  (minimum order of 20 pc.)

    1 macaron in a collector box (by special order, available in green or floral)
    2 macarons in a Prestige collector box $12 (available in green, grey or pink)

    Macaron Favours in a Heart Collector Box  (minimum order of 20 pc.)

    2 macarons in a Heart collector box $15
    4 macarons in a Heart collector box $22

    Macaron Favours in a Baby Shower Collector Box  (minimum order of 20 pc.)

    4 macarons in a collector box $20

    Macaron Favours in a Soft Box (minimum order of 30 pc.)

    1 macaron in a soft box $5
    2 macarons in a soft box $8.50
    3 macarons in a soft box $11


    Clockwise from top left: Heart Collection Box, Prestige Collection Soft Box & Baby Collection, Prestige Collection Soft Box, Heart Collection.

    Wedding Heart Collectors Box. Photo courtesy of Laduree Canada

    Photo courtesy of Laduree Canada


    Sugared Almonds

    These gorgeous sugared almonds are coated in delightful pastel shades which match their respective box colors. They have a hard outer shell so they are great on hot summer wedding days. A good alternative to macarons or chocolates if you're concerned about them melting in the heat. They look stunning stacked as a whole set but are also sold separately for those who prefer to choose a certain size. Available in soft pink, ivory and mint green.

    Sugared Almonds in Triangular Soft Box

    52 grams, 18-20 almonds $15

    Sugared Almonds in Circular Collectors Box

    52 grams, 18-20 almonds $18
    112 grams, 30-32 almonds $26
    145 grams 40-42 almonds $40


    Ice Creams

    A luxurious dessert idea at the reception, these adorable ice creams in a domed to-go cup is adorned with a macaron shell. Flavours include: pistachio, raspberry, lemon, chocolate, strawberry, rose, vanilla, coffee, caramel. The rose and pistachio flavours are so unique and simply divine. Please note that to-go versions may have limited flavours available depending on the day, allow ample time for ordering.


    Chocolates

    These Laduree chocolates can be devoured over several sittings since they come individually wrapped in boxes of 14 , 28 or 42. Available in dark or milk chocolate and presented in a pink or green box.

    Box of 14 chocolates $12
    Box of 28 chocolates $18.90
    Box of 42 chocolates $26


    Luxurious Candies

    This set of luxurious candies comes in an individually packaged trio which can be given separately. Two different flavour sets are available: mimosa, rose and violet OR cherry blossom, hibiscus and poppy.

    Set of 3 $45


    Laduree Teas

    Laduree teas make for a great thank-you gift for bridal party members and other organizers. A good alternative for those with don't have a sweet tooth and great for travelling since they won't melt and can be easily kept in a suitcase. Presented in a durable classic collectors box, it will be a reminder of your affection every time it's taken. Flavours include: cheri, almond, caramel, earl grey, eugenie, jardin bleu royal, josephine, lapsang souchong, marie-antoinette, mathilde, melange laduree, mille et une nuits, othello, roi soleil, rose, vanilla, violet, darjeeling and senchayamato.

    125 grams loose tea $32
    45 grams tea bags $21


    Macarons in Classic Gift Boxes

    These regular sized collectors boxes hold six macarons and up. It's another thoughtful gift idea for your bridal party. There's always a special limited edition theme in store which makes these boxes highly collectible, such a great way to remember a special moment in time.

    Macarons in a classical Napoleon Collectors Box 

    6 macarons in a Napoleon Collectors Box $26 (available in pink, purple, green or black)
    12 macarons in a Napoleon Collectors Box $50 (available only in green)

    Macarons in a classical Arabesque & Pamipille Collectors Box

    6 macarons in a Arabesque Collectors Box $30
    8 macarons in a Arabesque Collectors Box $32
    8 macarons in a Pampille Collectors Box $32

    Macarons in Prestige Collectors Box 

    24 macarons in a Prestige Collectors Box $85
    30 macarons in a Prestige Collectors Box $105
    40 macarons in a Prestige Collectors Box $135
    54 30 macarons in a Prestige Collectors Box $180


    Napoleon Gift Boxes. Photo courtesy of Laduree Canada

    Arabesque & Pamipille Collectors Box

    Prestige Collectors Box

    The limited edition Mazurka gift box holds 14 macarons.


    Surprise Macarons Inside Chocolates

    These very unique chocolates comes in four specially selected flavours: dark chocolate violet, dark chocolate pistachio, milk chocolate rose and milk chocolate raspberry . Each chocolate is filled with a flavoured cream and a macaron shell!

    Box of 4 chocolates $21


    Laduree Hampers

    And for wedding guests looking for a bridal or wedding gift, how about this beautiful hamper which you can personally build yourself by selecting a minimum of four items. Just imagine how delighted the happy couple would be when they treat themselves to these luxurious Laduree goodies after a long wedding planning season. The large and beautiful hamper boxes are sold exclusively as a gift set, making it all the more special.

    Choose a minimum of four items and add $60 for the box.


    Laduree Treasure Chest

    Perhaps the most ultimate gift of luxury from Laduree is this enormous treasure chest containing 200 macarons on five golden trays. It's a gift that will surely be prominently displayed and shown off with appreciation. On the other hand, don't  wait to be gifted, make this a stunning piece on your sweets table and impress your guests.

    Treasure chest containing 200 macarons: $900


    Bridal Party Ideas

    Bridal parties are always a wonderful excuse for ladies to get together and do something feminine and girly together, and with tea parties being at the top of the list, here are some ideas for you to put together your own little elegant soiree:

    Tea Cakes

    These tea cakes are packaged and ready for you to take away if you're planning on throwing a shower at home. They come in loaves or individually wrapped by slice.

    Macaron Trays

    When you're planning a party, you already have a lot on your plate like decorating and taking care of the guest lists. The last thing you want to worry about is baking macarons too. Let Laduree take the stress away with one of their many macaron trays and reception gift boxes. The macarons are laid flat for a beautiful presentation.

    Macarons per piece $3.15
    Macarons on a Golden Tray 24 Macarons $80
    Macarons on a Golden Tray 54 Macarons $180
    Reception Gift Box 40 Macarons $142
    Reception Gift Box 55 Macarons $195


    Photo courtesy of Laduree Canada

    Signature Mini-Macaron Pyramids

    Laduree's signature macaron towers evoke the Parisian glamour and elegance that Marie Antoinette would approve of. These beautiful pyramids are offered in a variety of sizes, and are made with a base and cone decorated with an ivory royal icing. Allow at least one day for the chefs to assemble it. It is such a beautiful piece for any dessert table or as a centre piece at the wedding reception.

    Mini Pyramids, around 20 macarons $125
    ½ Size, around 40 macarons $195
    Size 1, around 90 macarons $450
    Size 2, around 130 macarons (by special order)
    Size 3, around 150  macarons (by special order)


    Macaron Tower. Photo courtesy of Laduree Canada

    Private Parties at Laduree

    Lastly, if you're throwing a shower or party, why not let Laduree do the work by providing a beautiful space for you to host your party, and a team of professionally trained staff to serve your guests delicious sweet treats and savouries. You can choose from a variety of items on their menu with no additional costs. Only a minimum spend needs to be met, $1000 on weekdays and $1500 on weekends.

    Photo courtesy of Laduree Canada

    Laduree tea salon and gift shop on Robson Street which is equipped to serve alcoholic beverages too.

    Laduree tea salon and gift shop in Holt Renfrew department store which overlooks the shoe department.


    Disclosure: This is a sponsored post, all opinions are my own.

    [pt_view id="d749ae79dr"]
    [pt_view id="342f946uh1"]

    Afternoon Tea at Trump International Hotel Vancouver

    Jun 10, 2017 · Leave a Comment

    Afternoon tea set served on a unique Hexagonal display.

    All that Glitters is... Gold?

    Trump International Hotel Vancouver just introduced their afternoon tea service for the first time on June 9th and I wanted to try it out right away. So after attending a fun one-year anniversary party at Mister Ice Cream in Yaletown, we headed down to the Trump Hotel to experience the new tea service in their champagne lounge.

    Golden doors leading into MOTT33 from the Champagne Lounge.

    The champagne lounge has it's own grand entrance separate from the hotel and a side door which leads into MOTT33, an elegant dining establishment with an international presence, serving "luxury Chinese" food. The space is chic and elegant, filled with plush seafoam green booths, low white marble tables and high ceilings with a skylight showing off the 69 other floors above. Basically, it's what you think a hotel bearing the opulent Trump brand name should be. However, unlike the gilded Trump Towers of 80's excess in New York of recent Apprentice fame, it features sleeker and more modern details of a newly built hotel from this era.

    But of course, it's Trump, there needs to be some gold right? Yes, you'll see a more muted and modern rendition of it on the opulent doors and large block partitions inside the room. And I swear, I even found some gold in my tea too. On several occasions when I poured the black "Immortal Tea" I ordered into my tea cup, I could see little glistening gold flakes floating inside. I had to confirm this with my tea partner, Roanna, but after peering curiously into my cup, all she could tell me was that I was still just an ordinary girl with a regular cup of tea in my hand. Oh well...even if it's non-existent, I guess life is never dull when we believe we can see sparkles wherever we go 🙂

    The Tea Set

    Unique hexagon display for the tea service.

    The tea set was served on a unique hexagon display that we were told was specially crafted for the tea service. It reminded me of the chic tea sets offered in luxury hotels in Asia. Out of all the tea sets I've had in the city this, along with the one at Fairmont Pacific Rim, is the most cosmopolitan. Nestled on the stylish non-traditional display were delicate savoury pieces which had influences from the different regions of the world: matcha scones, cucumber & dill sandwiches, spicy duck crepe and a 'Salmon a la Bombay' Slider to name a few. Another note of worth is that everything including the sweets are made in-house.

    I quite enjoyed the food and loved the ambiance and service. It's easy to feel completely at ease sitting on their plush booth seats while basking in the abundant natural light that pours through the skylight while listening to live music playing in the background. I would definitely recommend it for those who appreciate attentive service and a modern take on afternoon tea served in a chic setting.

    Until our next tea date.

    XOXO,

    Mimi

    The champagne lounge at Trump Hotel Vancouver.

    Afternoon Tea Menu at Trump Hotel Vancouver. Click to zoom.

    Tea selections available.

    Left: complimentary iced teas and sugar crystal sticks. Right: Mini Match Scone and Regular Size Plain Raisin Scone.

    Spreads for the scones include: clotted cream, "homemade" lemonade raspberry jam and passion fruit curd.

    Savouries include: Salmon a la Bombay Slider, Spicy Duck Crepe, Rolled Egg Sandwich and Cucumber & Dill finger sandwich.

    Cotton candy and cream cheese cake pop.

    Sweets include: White chocolate & Raspberry Mousse with Pistachio nuts, Matcha & Strawberry Rolled Cake, Raspberry Rose Water & Lychee Paris Brest, Hazlenut Chocolate Cake and shortbread cookie.


    ❤ OTHER NOTES:

    Notable Points:
    - Brand new, newly-built property

    - Unique specially created display case

    - The newest afternoon tea offering in Vancouver

    - Complimentary iced tea

    - 5-star service and ambiance

    Ambience: Sleek and chic lounge with plush booths, textured walls and marble tables.

    Scones: The matcha scone, served warm, was excessively crumbly which did not allow the proper application of the toppings; the clotted cream was a bit rubbery so it made it even harder to spread (the plain raisin scone did not have this problem.) There were three toppings to choose from which was appreciated since most sets only offer two. There was clotted cream, "homemade" lemonade raspberry jam and passion fruit curd (it was listed as lemon curd on the menu but I believe it is passion fruit by the taste. I could be wrong...).  The passion fruit curd was tart and mouthwatering, a nice and unique offering.

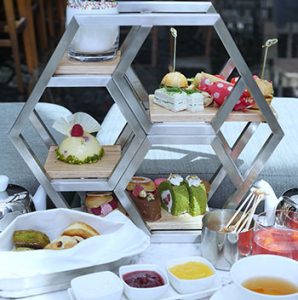
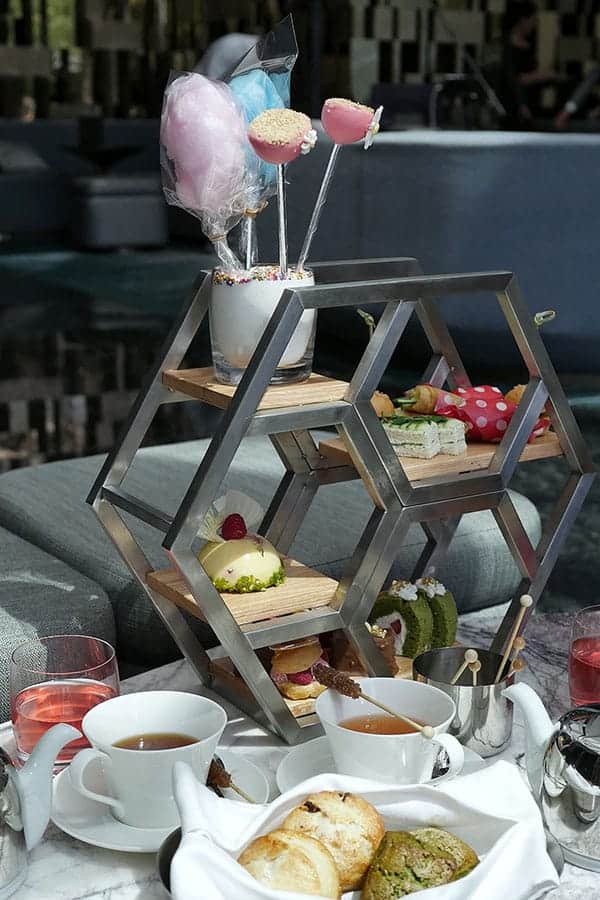
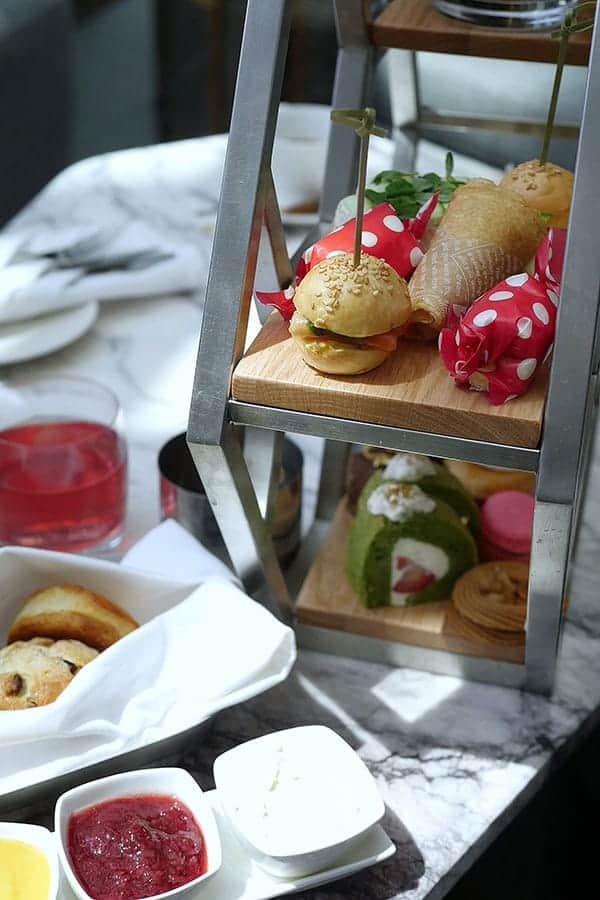
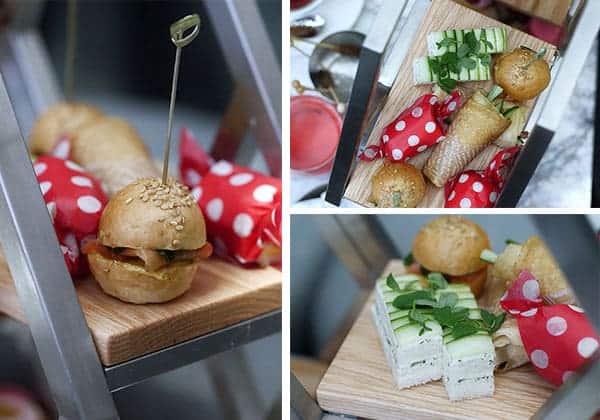
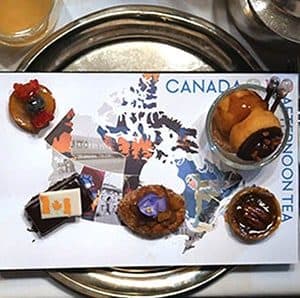
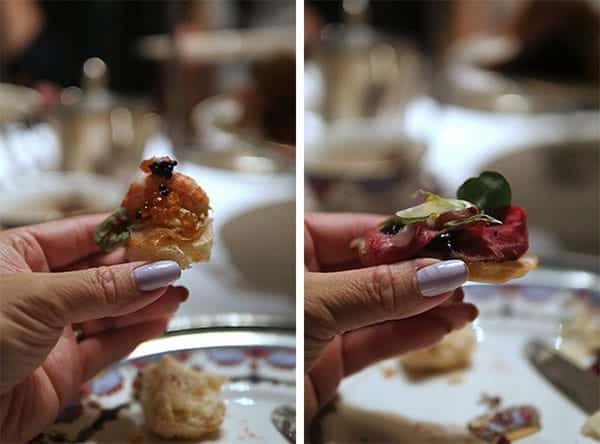
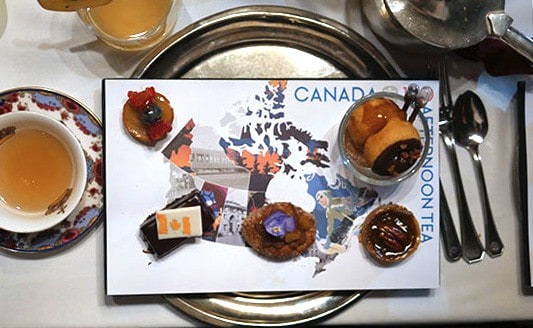
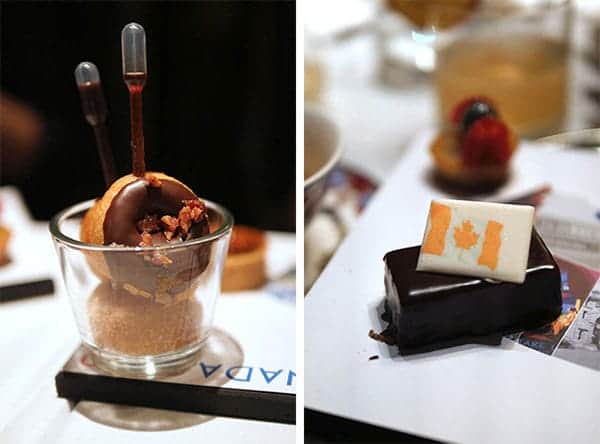
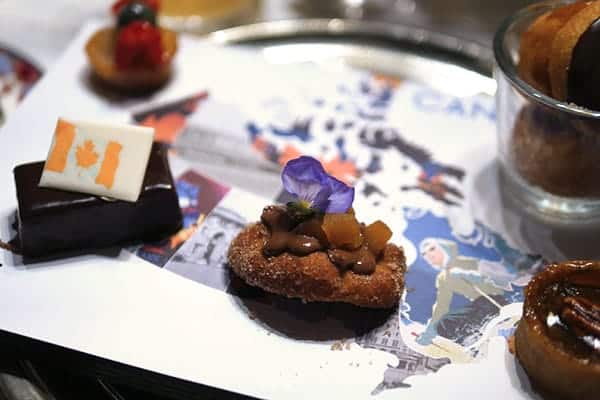
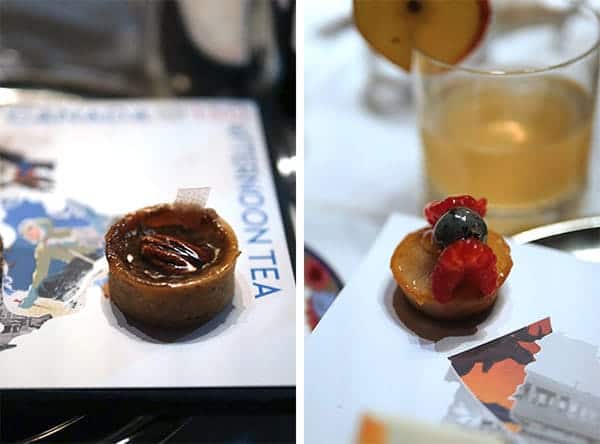
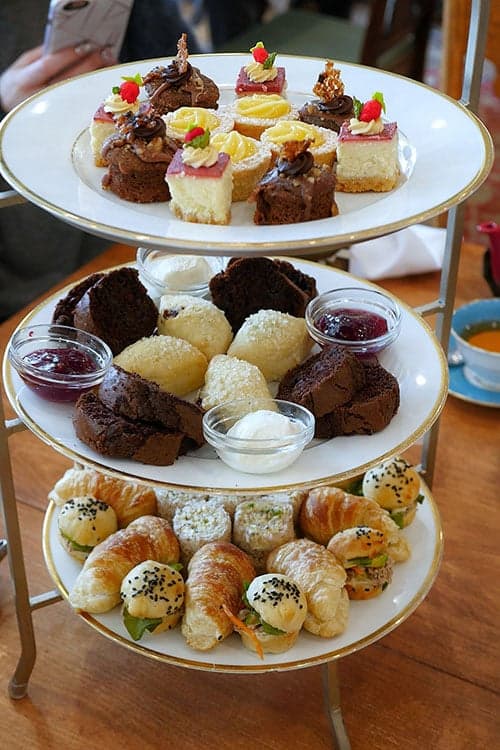
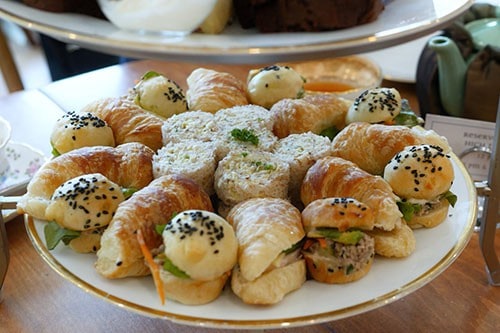
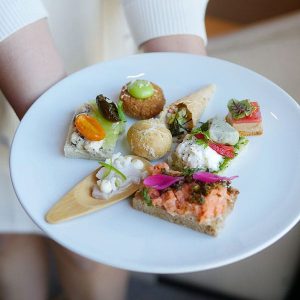
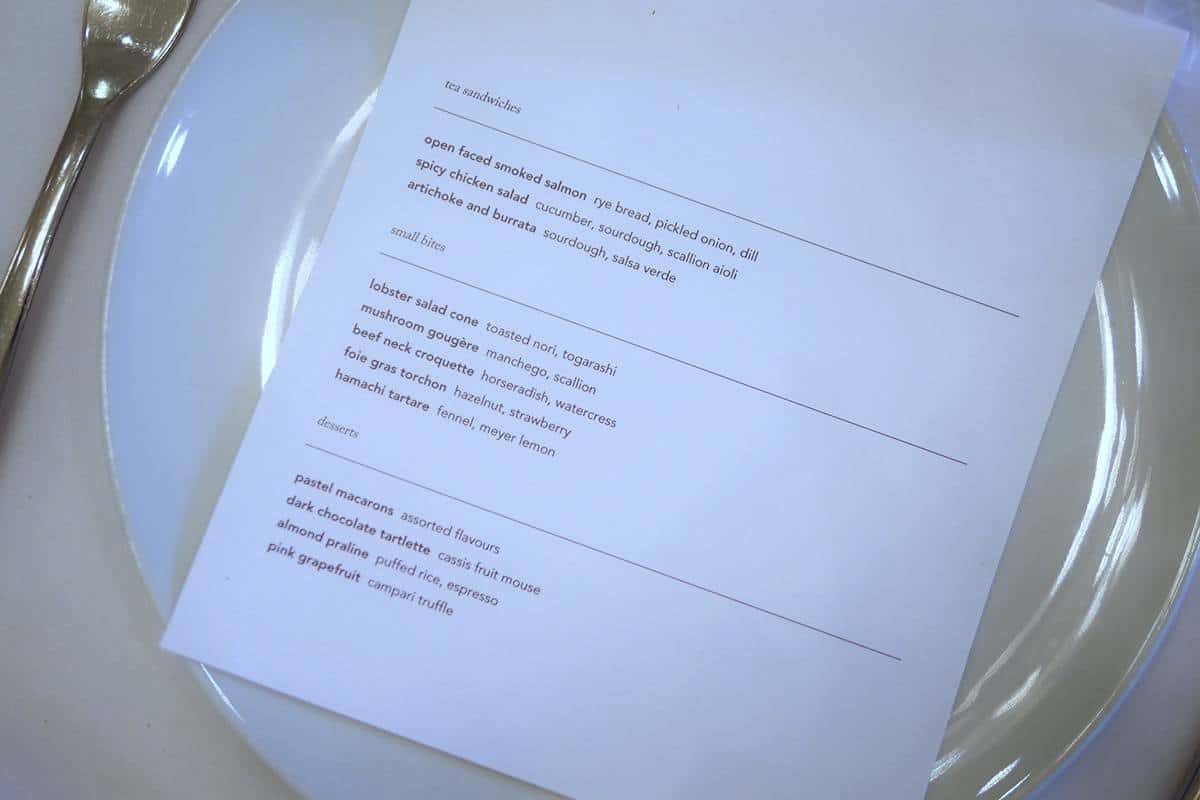
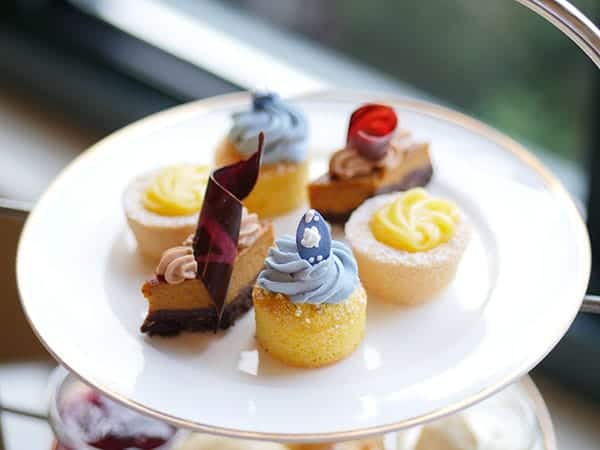
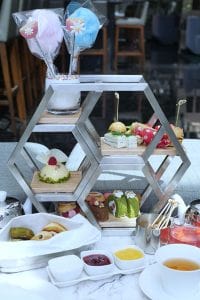
    Savoury: A very thoughtful selection of four savouries inspired by the different regions of the world. All of them were fresh and flavourful, and were small in comparison to the larger sized desserts.  The salmon a la bombay slider stood out for it's distinctive curry flavour and interesting flavour pairing with the smoked salmon.

    Sweets: The seven sweets were a mixed bunch ranging from average to excellent. The matcha swiss roll didn't have much of matcha flavour and the cake wasn't too fluffy. Actually, both the matcha scone and matcha had a very muted matcha flavour, I'm not certain if this was a deliberate attempt to tailor it for local tastes. The macaron was filled with a raspberry cream and wasn't too hollow. The items that really stood out were the hazelnut chocolate cake, raspberry rose and lychee Paris brest, and cheese cake pop. The chocolate cake had an appealing texture with crispy layers; the brest was filled with a tart raspberry buttercream and the exotic sweet taste of lychees - a winning combo; and the cheese cake pop, the breakout hit, had a very crispy white chocolate shell with a soft rich cream cheese mousse on the inside. The cotton candy, not listed on the menu, was a whimsical bonus. I appreciated that all the desserts were all of a good size.

    Tea: A small collection of teas: 11 black, 3 red/rooibos, 6 green, 1 herbal. The "Immortal Tea" I chose was very strong and near bitter when I had my first sip. I'm not sure if it was steeped  with water that was too hot or for too long (the tea pot also did not easily facilitate the tea to be pulled out of the pot). It had a woodsy fragrance and was astringent. It was much more approachable with some sugar and the cream which I requested later. On the other hand, the Bains de Rose, a TWG Branded Tea, is a light colored and light bodied tea that had a pleasant rose fragrance. I really enjoyed this one.

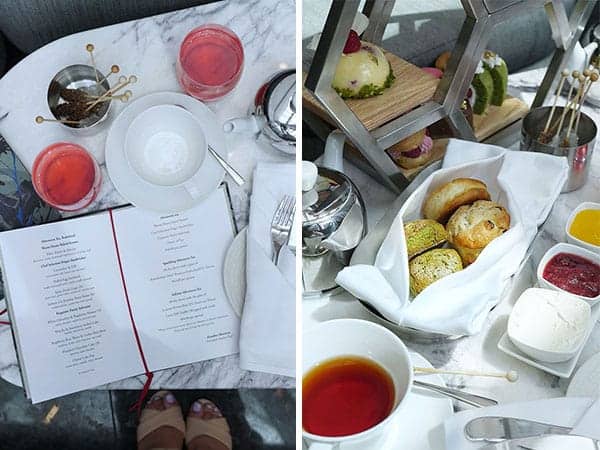
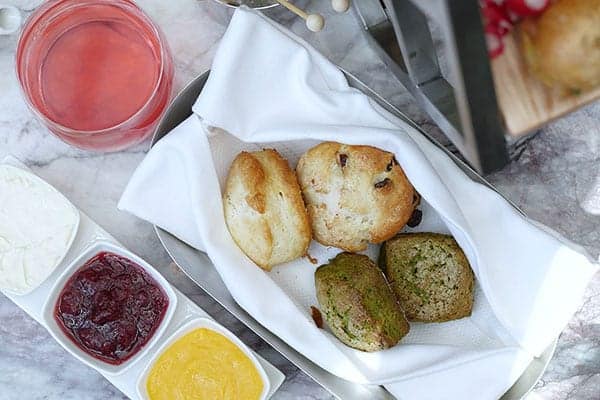
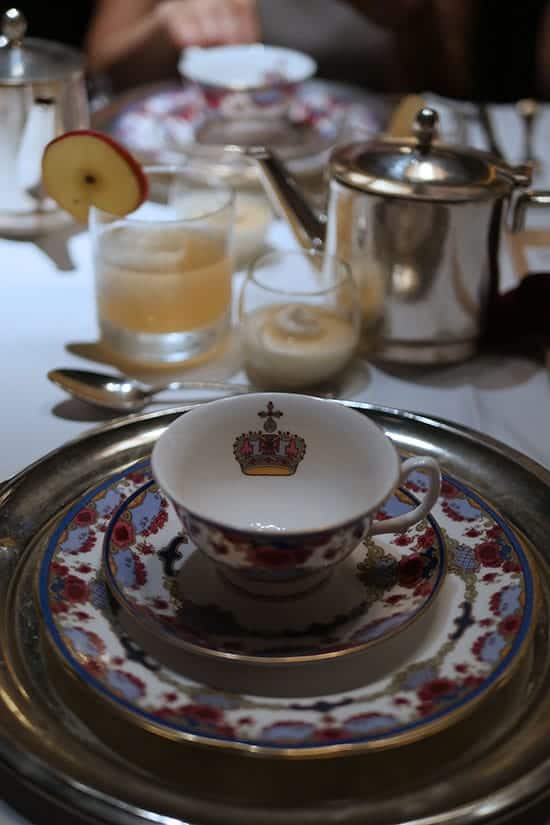
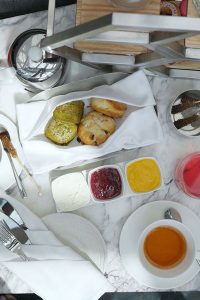
    Tea Ware: The unique hexagaon display was custom-built specially for the hotel's tea service. The rest of the teaware were white and modern.
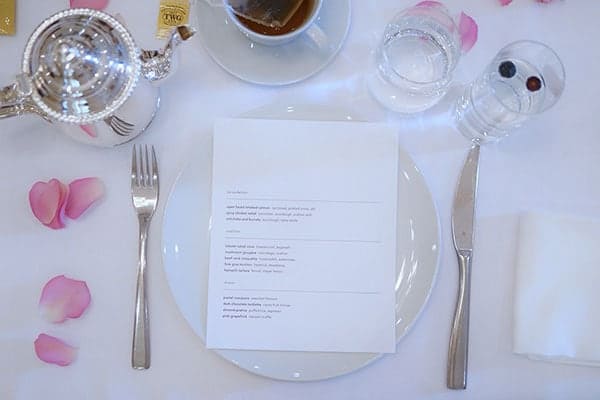
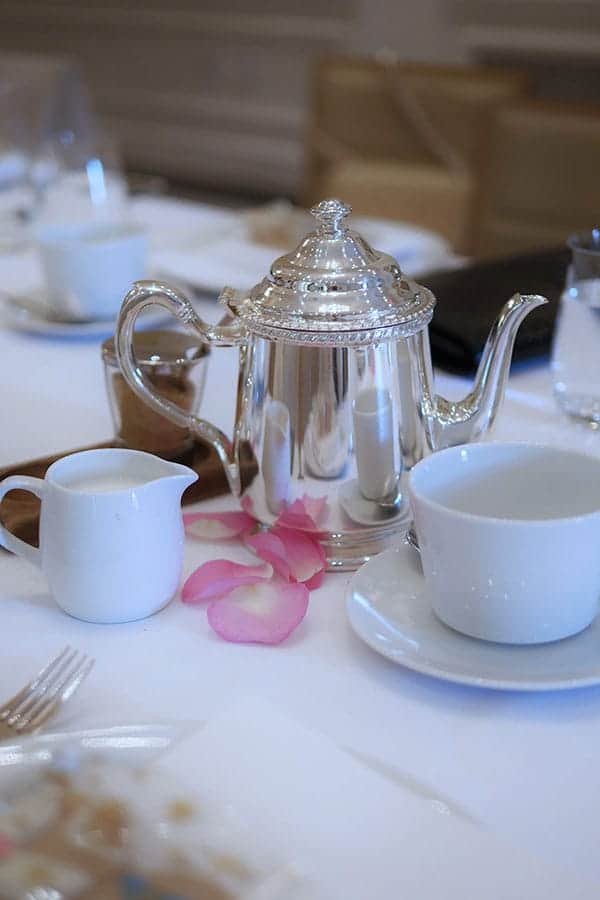
    Alcoholic Beverages: Similar to Laduree, Fairmont Pacific Rim, Notch 8, alcoholic beverages can be ordered with the tea set from the bar. Special additions can be made to the tea set by adding Prosecco for $63/set or champagne and Louis XIII truffles wrapped with gold for $88/set.

    Service: Fully staffed and professional. We were always checked on. The manager also stopped by and took some time to explain some of the notable points of the tea service and the champagne lounge itself.

    Other notes:

    ♥ Tea Set $48/per person
    (includes one pot of tea)

    1 mini scone, 1 regular size scone, 4 savouries, 6 sweets, complimentary iced tea

    Add Prosecco for $63/set

    Add champagne and Louis XIII truffles wrapped with gold for $88/set

    ♥ Reserve online: Champagne Lounge

    ♥ Parking: Metered street parking along the side streets but not outside the front entrance on Georgia. $6/hour. Closest skytrain station is Burrad and Vancouver City Centre. There are also Car2Go parking lots available on Alberni street if you're taking a Car2Go.

    ♥ Address: 1161 WEST GEORGIA STREET, VANCOUVER , BRITISH COLUMBIA V6E 0C6

    ♥ TEL: 866.800.0295

    [pt_view id="d749ae79dr"]
    [pt_view id="342f946uh1"]

    Strawberry Basil Macarons made with Real Strawberries (Template)

    Jun 8, 2017 · 14 Comments

    A stack of strawberry basil macarons with green and pink shells in front of a cup of strawberries.

    Flavorful strawberry basil filling for macarons made with real strawberries and herbs! Free strawberry shaped macaron template provided.

    Stack of strawberry basil macarons on a counter.
    [feast_advanced_jump_to]

    How to Extract Flavor From Strawberries

    On the road of recipe development, there are those recipes which feels somewhat effortless and taste great the very first or second try, and then there are those which make you want to pull your hair out and abandon the project altogether. This recipe definitely belonged to the latter. I was initially hoping to release this recipe last month but I had to make this recipe over five times to get it just right. Yes, I am seriously picky with my fillings. There are so many different types of fillings that you can use for cakes and cupcakes but macarons have their own special needs. Their fillings can't be too soft or high in moisture so it created some of the challenges which I'll discuss below.

    One of the challenges in this recipe was adding fruit flavours into a swiss meringue buttercream using real fruits. The acids found in fruit juices do not mix particularly well with fats and if you've added too much, the mixture will become a curdled mess that is hard to fix. It's easier to add such a juice to an American buttercream with it's sturdier profile but I find the American versions just taste horrid as macaron fillings since it's already sickeningly sweet, and coupled with a sweet macaron shell... oh my! It's no wonder why some people claim they don't like macarons.

    There's also the issue with moisture too, we can't have too much of it. So what can we do? To obtain real strawberry flavouring without the unnecessary liquids, the strawberries and sugar are simmered together on low heat to make a strawberry compote. LOW heat is key here, we want the fruit to break down slowly and the moisture to evaporate as much as possible, leaving us a very concentrated, flavourful and thick compote which we then puree. Don't forget to watch the video below to see how thick the consistency should be when we take the strawberries off the heat.

    A strawberry basil macaron that's bit into, showing a full fluffy shell.

    Extracting Flavor From Basil for the Filling

    Another challenge was the addition of the basil. Which way would be best? I tried mincing basil leaves and beating it into the buttercream at the end but then little chunks of it would make its presence felt after a few bites. I didn't like that. To counter this, I decided to cook the basil with the strawberry compote from the beginning as suggested by Preservatory author, Lee Murphy, whom I had the pleasure of meeting and cooking with at her charming farm, Vista D'oro. If anyone knows about making jams or compotes, it's definitely Ms. Murphy. Read about what we cooked here. And for those who don't like basil, you can definitely leave it out of this recipe.

    Overhead shot of strawberry macarons with tea ware and stationary.


    Tip for Potent Strawberry Flavor

    You'll notice also that the addition of a strawberry extract is optional. You might wonder why we're using it after we took so much time to create a nice real strawberry puree for the flavouring. The extract's role is to help lend emphasis to the strawberry flavour in the top notes while the real strawberry puree provides that lingering full bodied strawberry flavour. I used the Strawberry flavour from L'orann Oils from their Naturals collection which means that the flavours are derived naturally from the fruit, it is not an artificial flavouring. It actually taste almost identical to the compote so it's a great way to add more flavour without having to add more strawberry puree into the buttercream, lowering the chances of it becoming unstable and/or too soft to use as a macaron filling. Of course, for those who don't want to add more flavour, you can definitely leave it out. It's just something that adds a little more oomph to the taste since some audiences may be more akin to and prefer macarons that have a more potent flavour, think kids and people who prefer eating intensely flavoured foods.

    Strawberry macarons on a mini cake.

    Free Strawberry Macaron Templates

    Strawberry macaron template.
    Strawberry macaron template.
    Strawberry macarons with stationary.

    Recipe

    Yield: 24 macarons

    Strawberry Basil Macaron Filling

    Strawberry shaped macarons on 3 different plates.
    Prep Time 1 hour 30 minutes
    Cook Time 14 minutes
    Rest Time 30 minutes
    Total Time 2 hours 14 minutes

    Ingredients

    Basic Macaron Shell

    • 240 grams almond flour
    • 240 grams icing sugar
    • 185 grams egg whites, aged, room temperature
    • 165 grams castor sugar (Note 1)
    • ½ tsp. cream of tartar

    For Strawberry Basil Puree

    • 350 grams fresh organic strawberries
    • 6 teaspoon granulated sugar
    • 50 basil leaves

    For Swiss Meringue Buttercream

    • 65 grams egg whites
    • 130 grams granulated sugar
    • 195 grams butter
    • ¼ teaspoon salt
    • 1 - 1 ½ teaspoon strawberry extract (optional)

    Instructions

    Basic Macaron Shell

    1. Set aged egg whites out at room temperature.
    2. Pulse almond flour and icing sugar together in a food processor to further break down any large pieces of almond flour.
    3. Sift dry ingredients: almond flour, icing sugar. Discard big pieces of almond that can't be sifted.
    4. If you are new to macaron making, please read the instructions to my BEST MACARON RECIPE before attempting to follow the rest of the instructions since it is condensed for the advanced macaron baker.
    5. With the balloon whisk attached, whip the room temperature egg whites on low-medium speed.
    6. Add cream of tartar when it becomes foamy.
    7. Turn up the speed to medium.
    8. Once the whisk starts to leave tracks in the egg whites, add sugar a little at a time.
    9. Turn the speed up to medium-high and whip until firm peaks, stop mixer and add gel food color if desired. Continue whipping on medium-high until stiff peaks.
    10. Fold the dry mix and meringue together until the batter becomes a "lava" or honey-like consistency.
    11. Transfer batter into a piping bag fitted with a round piping tip.
    12. On parchment paper or silicone mats, pipe out round shaped macarons. 
    13. Rap the tray hard on the counter to remove any excess air bubbles. Use a toothpick to pop any remaining bubbles. 
    14. Wait until the shells become completely dry before baking. 
    15. Bake at 325F for 12-14 minutes. Every oven is different, you may need to adjust your own temperature settings. Please read How to Use Your Home Oven Properly for Baking Macarons if you are unsure.
    16. Macarons are done when the foot doesn't push back and the tops don't move when you wiggle it. 
    17. Once baked, let cool completely before removing from the baking mat/parchment paper.

    For the Strawberry Basil Puree

    1. Wash and dry basil with a paper towel. Chop into small pieces. 
    2. Wash strawberry and remove stem and a bit of the surrounding white flesh with a paring knife. Dry it with paper towels. 
    3. Place the basil, strawberries and sugar in a small pot, boil on LOW heat for approx 30 minutes. 
    4. It will start to break down by itself. Occasionally, stir the mixture so the sugars and juices come together. 
    5. Using a heat proof spatula, occasionally press down on the fruit very gently to help break it down. If it is still hard, just let it break down by itself until its soft enough to push down on it with the spatula. 
    6. It will reduce into a very thick, chunky compote that is not runny.  Take off heat after appr. 30 min.  (Watch accompanying video to see the proper consistency. You may need to keep it on the heat some more if it is still runny.)
    7. Pour the compote into a food processor or blender and blend for a minute or two until the fruit is all broken down. 
    8. Pour through a sieve into a heat proof cup. The mixture is thick so use a spoon to push it through. If the consistency is correct, you should have about 3 tablespoons of puree. Set puree aside. 

    For the Swiss Buttercream

    1. Cut up butter and let it come to room temperature as you measure out other ingredients. 
    2. Add sugar and egg whites into a heat proof mixing bowl. Stainless steel is light and safe.
    3. Place over a pot of boiling water. 
    4. Whisk the whites & sugar mix over the boiling water.
    5. Pay attention to whisking the mixture when it starts getting hot, you don’t want to cook the eggs.
    6. Whisk the mixture until the temperature reaches 160F. This temperature is generally accepted to be able to kill salmonella in eggs.
    7. Pour the mixture into the Kitchenaid mixer and whisk on low with the balloon whisk, then turn it up to medium.
    8. Once the mixture is thick and glossy, and the bottom of the bowl is cool to the touch, stop mixer. Change the whisk attachment to the paddle attachment.
    9. Add butter a little bit at a time while beating with the paddle attachment on medium speed.
    10. The mixture might look curdled or separated for a while but keep mixing. It will all come together.
    11. Add strawberry basil puree a tea-spoonful at a time to a max of 3 tablespoons. Beat until incorporated. 
    12. Add strawberry extract if desired and incorporate. 


    Assembly

    1. Pair two similar sized shells together.
    2. Pipe a dollop of strawberry basil filling onto one shell. Assemble with other shell.
    3. Place in an airtight container in the fridge and let it mature for 24 hours before eating. Enjoy!

    Notes

      1. Castor sugar is also known as extra fine granulated sugar or berry sugar. Granulated sugar can be used by castor sugar is preferable.

      2. I always use organic strawberries in my kitchen since it's part of the "Dirty Dozen" group of fruits which are highly recommended to buy organic. 

      3. Basil and strawberry extract is optional. You can leave it out if you do not like or have these ingredients. 

      4. There is a strawberry template for you to download along with a video to show you the proper consistency of the compote when you take it off the heat. 

    Nutrition Information

    Yield

    24

    Serving Size

    1 grams

    Amount Per Serving Calories 90Total Fat 7gSaturated Fat 4gTrans Fat 0gUnsaturated Fat 2gCholesterol 17mgSodium 81mgCarbohydrates 8gFiber 0gSugar 7gProtein 1g

    This information is provided as a courtesy and is an estimate only. This information comes from online calculators. Although indulgewithmimi.com attempts to provide accurate nutritional information, these figures are only estimates.

    Did you make this recipe? Share your results with me 🙂

    Please leave a comment on the blog or share a photo on Instagram

    © Mimi
    Cuisine: french / Category: Macarons

    [pt_view id="9c1c354a2v"]

    Canada 150 Celebration Tea at Fairmont Afternoon Tea

    May 29, 2017 · 2 Comments

    This is Part 3 of 3 of my recent Vancouver Adventures that I shared with Deborah Moore this morning on AM1470.

    To celebrate Canada's 150 birthday this year, Fairmont Hotels has just launched their new Canada150 Afternoon Tea Set. It's a tea set which pays homage to all the different provinces of Canada where Fairmont operates by incorporating each regions distinctive foods. For example, there's the Calgary Stampede corndog made with Wagyu Beef, Montreal smoked meat sandwich, the West Coast Club and Nainamo Bar to name just a few. You can have a cross-country culinary experience just having a relaxed afternoon in the hotel's cozy private dining room of their Notch8 restaurant. If you've read about my experience here for Halloween Tipsy tea, you'll find that the room has been transformed with relics from Fairmont's storied past in Canadian history. Built by Canadian Pacific Railway as one of the grand railway hotels that brought guests from coast-to-coast on luxurious train journeys, the hotel played an integral part in the early years of Canada's formation - a perfect place to celebrate Canada 150 this year.

    Canada 150 afternoon tea runs from May 1st to September 3rd, 2017 with daily sittings at 11am, 1pm and 3 pm. Adults $59, children's tea $29.50 (ages 12 and under). Reservations can be made at 604-622-1900 or online.

    A: 900 West Georgia Street , Vancouver , British Columbia, Canada , V6C 2W6
    T: 604-622-1900

    Until our next tea date!

    XOXO,

    Mimi

    Getting settled in with a Maple Leaf Cocktail. It's a take on classic whisky sour with Canadian influences - bourbon, maple syrup, lime and apple. For serving to the public, it will be presented in a glass maple leaf. One of the great things about having tea at the Fairmont is that you can order a variety of innovate cocktails and spirits with your tea set.

    These silver chargers are from the 1950's and the tea sets were made specially for the Fairmont.

    Starting with wildberry scones and oka scones accompanied by a delicious Saskatoon berry compote and birch syrup chantilly. The scones are always the highlight of tea at the Fairmont.

    Left: MAPLE FOIE GRAS TOURTIÈRE - Quebec City , QC. Right: STAMPEDE CORN DOG made with wagyu beef - Calgary, AB. I really enjoyed the corndog, the beef had a nice bouncy texture.

    Left: MINI WESTCOAST CLUB with dungeness crab, smoked salmon, side stripe prawns, smoked oyster, albacore tuna - Fairmont Hotel Vancouver, BC. Right: BISON CARPACCIO Saskatoon berry compote, buttered bannock - Fairmont Banff Springs, Banff , AB. Both were absolutely delicious.

    Time for desserts!

    Left: CANADIAN MINI DONUTS, chocolate dipped with bacon, cinnamon sugar, salted caramel with vanilla cream - Fairmont Royal York, Toronto, ON. Right: NANAIMO BAR, chocolate & coconut, vanilla cream - Fairmont Empress, Victoria, BC. You can never go wrong with a dish that has an injection syringe! And you get double the goodness here.

    BEAVER TAIL with nutella, caramelized apple - Fairmont Chateau Laurier, Ottawa, ON. Such a delicate piece! The cutest beaver tail I have ever seen.

    Left: BUTTER TART with caramelized pecan - Fairmont Le Chateau Montebello, Montebello, QC. Right: WILD BERRY TART, almond cake, foraged berries - Fairmont Chateau Lake Louise, Lake Louise, AB

    Disclosure: This was an invite event. All drinks and food were complimentary. All opinions are my own.

    [pt_view id="d749ae79dr"]
    [pt_view id="342f946uh1"]

    Making Jams with Lee Murphy at Vista D'oro Farms

    May 28, 2017 · Leave a Comment

    This is Part 2 of 3 of my recent Vancouver Adventures that I shared with Deborah Moore this morning on AM1470.

    Amazing hot weather in May at Vista D'orso farms and winery.

    "Hot Days are the Best for Making Jams - Not"

    This weekend, we experienced a very unexpected but welcomed heat wave in Vancouver. It was unusually hot for this time of year but after such a dismal start to the spring season, I was happy to embrace the hot weather, even if it meant making jams in a hot kitchen in high afternoon. To be honest, it actually wasn't that bad and I'm just being dramatic. Lee Murphy, the owner of  Vista D'oro, was the one who told us that "the hot day is perfect for making jams." Having never made jams before, I fell for her playful remark and asked, "Really?" She gave out a good-natured laugh to my naivety. "No, the kitchen is going to get hot!"

    Making Jams with Lee Murphy

    Duly noted and I was a willing participant. It's not often you get an opportunity to receive personal instructions to make some of the beautiful recipes you only see in cookbooks by the author herself. In our case, we were at Ms. Murphy's Vista D'oro Farms to learn how to make jams just like the ones in her new book, Preservatory, published by Appetite Random House. The book is loaded with over 80 recipes - 40 for preserves, organized by growing season, and more than 40 recipes for meals and desserts that incorporates the use of preserves. I especially liked the inspiring pictures taken from the farm evoking a charming farm lifestyle that a city girl like me sometimes dreams about.

    Vista D'oro Farms

    To make these wonderful preserves, the process starts at the very root for Lee, literally. She, along with husband and crew, grow the different fruits and grapes that goes into their jams, preserves and wines. It's a very beautiful piece of farmland which you can visit between Thursday to Sunday from 11am -5pm. They have a gift shop, wine tasting room and they also sell charcuterie boards for you to have your very own picnic under the cool shade of one of their many fruit trees. It's a fun little spot for the whole family or a romantic date away from the city.

    A: 346 208 St, Langley, BC V2Z 1T6
    T: (604) 514-3539

    I'm going to a tea event next. Join me here.

    XOXO,

    Mimi

    Lee made these delightful scones for us and of course, paired with several of her delicious jams. I really liked the pear and vanilla preserve.

    Lee's commercial kitchen where she conducted most of her initial recipe testing. The property now boasts a bigger and more sophisticated new facility for production of products sold to fine retailers.

    Ms. Murphy talking about her first book, Preservatory, published by Appetite Randomhouse.

    Lee started the day with preparing a large vat of sangria for us to drink later. There's a recipe for that in her book and she also incorporates the use of the wines which are are produced on the farm.

    First step in the jam making process is to add and mix up all the ingredients together. For our own special creation, my partner and I used blueberries, lavender sugar and lemon zest. It's quite a delicious combo.

    Mixing it on a low-med. heat until we hit the softball stage.

    The glass jars are sanitized by placing in a hot oven. Once the mixture has reached the desired consistency, the mixture is poured into the canning jar through a very convenient wide-mouthed funnel.

    The lids of the jars are sanitized by boiling in hot water. Using a tong to pull the lid out of the hot water, it is then placed on top of the jar to be closed and tightened by hand.

    Left: apple tree. Right: grape vines in the vineyard.

    The beautiful original barnyard where we tasted some of the vineyards wines.

    Delicious charcuterie board that pairs perfectly with the winery's wines or Lee's sangria. Similar boards can be purchased in their shop for $12 or $25 so you can enjoy your own picnic shaded under one of their many fruit trees.

    Disclosure: This was an event organized by the Food Bloggers of Canada and Appetite Random House.

    [srp post_limit='5' post_random='yes' category_include= 131 widget_title = 'Other Vancouver Socials']

    Laduree Vancouver's Hidden Gems

    May 27, 2017 · Leave a Comment

    This is Part 1 of 3 of my recent Vancouver Adventures that I shared with Deborah Moore this morning on AM1470.

    Ever since my first visit to Laduree, each time I re-visited, I became an even bigger fan of the amazing flown-in-from-France macarons, beautiful branded gifts and a to-die-for raspberry rose french toast. After spending a dreamy afternoon tea date at Laduree in Vancouver, I had the opportunity to return and try some of their hidden gems and learn a little more about the world of Laduree. Here are a few:

    Macaron Cocktails

    The Vancouver location on Robson street now serves macaron inspired cocktails, wines and champagne. It's such a wonderful addition to the afternoon tea experience which you usually only find at tea services in hotels.

    I had the chance to try the Macaron Citron and Isaphan, both of which are equally beautiful. The Macaron Citron is topped with a refreshing lemon macaron, it has a nice lemon flavour and contains tequila which gives it a harder edge going down. In contrast, the Isaphan is a sleek Grey Goose, Chambord, lychee and rose concoction that goes down smooth, starts sweet and finishes dry. It's a perfect tribute to the Isaphan macaron that is known for it's iconic pairing of lychee and rose together.

    Left: Macaron Citron is topped with a macaron au citron and contains Tequila, limoncello, lemon syrup, lemon-flavoured cream, lemon macaron $16. Right: Ispahan contains Grey Goose, Chambord, lychee liqueur, rose syrup. $17

    Ice Cream

    One thing I didn't know until recently is Laduree ice cream. Since it is getting hot, ice cream is definitely on the list for a friendly gathering. On one particularly hot day after Sunday Brunch and shopping on Robson street, a few girlfriends and I dropped in for a little ice cream party there. Yes, you can walk it and have a little treat anytime. Although some may think a visit to Laduree is usually reserved for special occasions, it's perfectly fine to walk-in anytime without reservations and the staff are more than helpful in finding a table for you.

    Lot's of work and preparation goes into making these ice creams, a pastry chef from France is flown in occasionally to make batches of these which makes it all the more special. Rose and pistachio were my favourites. The rose was very fragrant and the pistachio had a nutty aroma, both brought out the creaminess of the ice cream since they were naturally not sour. It's everything I want from my dessert - not too sweet and creamy.

    And if you're in a hurry for sit-down service or you'd like to bring the ice cream home to enjoy with your family, you can also take these ice creams to go. The to-go version also has a cute little macaron on top!

    The strawberry is true to taste with real strawberries so it is a bit tart. Vanilla is a classic fit for any age group while the raspberry is mouthwatering-ly tangy.

    Isaphan Sundae. It has a scoop each of rose and raspberry ice cream, chunks of lychee and raspberry topped with whipped cream and raspberry sauce. It is so delicious!

    The take-away version of the ice cream comes with a little macaron on top!

    Chocolates with a Surprise on the Inside!

    I love chocolates with hidden surprises on the inside and here is one that tops them all - a macaron surprise! Wow! Isn't that wonderful? Once you bite into the chocolate, there is an appealing contrast of textures between the soft flavoured creams and chewy macaron shell. It makes a wonderful gift for the macaron lover in your life, they will be delighted with this sweet little surprise.

    Laduree Canada 

    A: 1141 Robson St, Vancouver, BC V6E 1B5 (another location in Holt Renfrew as well.
    T: (604) 336-3030

    Disclosure: All the drinks and food were complimentary. All opinions are my own.

    [pt_view id="d749ae79dr"]
    [pt_view id="342f946uh1"]

    Afternoon Tea at The Secret Garden in Kerrisdale

    May 20, 2017 · Leave a Comment

     A Vancouver Tradition

    The Secret Garden Tea House is one of the first modern day pioneers of afternoon tea in Vancouver. Established in 1995, it is probably a place where many of you may have had your first afternoon tea experience. Since then, shinier contenders like TWG and Laduree have entered the market but The Secret Garden Tea Company is still going strong with a new and bigger location just a few steps away from their previous one in Kerrisdale.

    The New Location

    Going in on a Sunday at 12pm, the tea house was already fully packed and it remained so for the remainder of our two hour sitting. I was joined by several of my Instagram foodie friends. We all enjoyed visiting the new space since we haven't been to this location before. It's nice and bright with tons of natural light flooding through the floor to ceiling windows that spans the entire frontage of the tea house. They still have a small little gift shop for teas and other tea wares, and a counter displaying the various treats available for their take away tea sets.

    The Food

    This was my third visit to the Secret Garden and I don't recall the previous menus to be as uninspired as the one we had that day. Because there were four of us and we all had the same feeling, I knew it wasn't just me. There was a good amount of food, especially the savouries with multiples of the same item for each person (a bit repetitive) but most of them were bland and the scones cold, we just didn't like them enough to finish them. Being that the price of this set is relatively low, it still provides a good value for those who may want to try the iconic Secret Garden for the first time or those who want to have a regular tea set at a reasonable price in a comfortable and folksy setting.

    Until our next tea date.

    Xoxo,

    Mimi

    Secret Garden's new location in Kerrisdale.

    ❤ OTHER NOTES:

    Notable Points:
    - Brand new beautiful location in Kerrisdale

    - Whimsical mismatched tea sets. Great for pictures and conversation.

    - Lower price position

    - Easy and inexpensive parking in the West Side

    Ambience: They have a beautiful new location that has the same folksy charm as before but with a newer and shinier packaging. It's still pretty cramped as the space is utilized to the max. One thing I really like is the amount of natural sunlight that pours into the space through the floor to ceiling windows that span the entire frontage of the tea house.

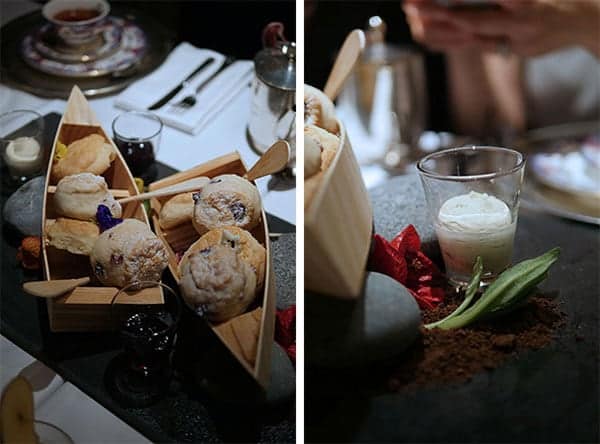
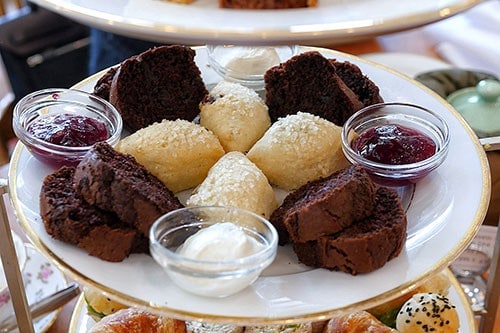
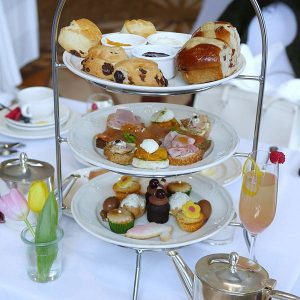
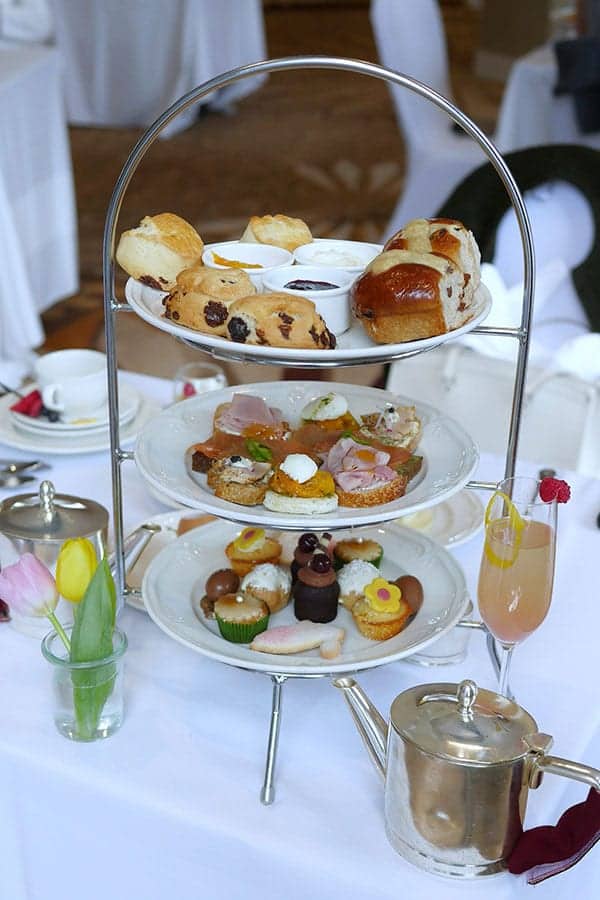
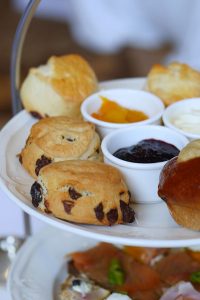
    Scones: they were cold and not very crumbly. The cream was also not very rich and a bit runny. There was one small sized scone and two chocolate loaves on the second tier.

    Savoury: There were two petit roasted chicken croissants, four egg salad pinwheel sandwiches and one Tuna on Housemade Sesame Potato Bread for each of us. Points for the sheer amount of savouries they provided per person but we all found them repetitive and mostly bland so we didn't end up finishing them. If you're looking for quantity, this will be a good option. However, Neverland's tea set has the same price positioning but it does offer a lot more in terms of quality and quantity.

    Sweets: there were three different items: Tangy Mini Lemon Curd Tart, Strawberry Jam Cheesecake and the Triple Chocolate Potato Cake with Fleur de Sel Ganache. The lemon tart was tangy and refreshing. I've had this item on several occasions in the past and it has always tasted great. The cheesecake was abnormally small and along with the potato cake, not very memorable.

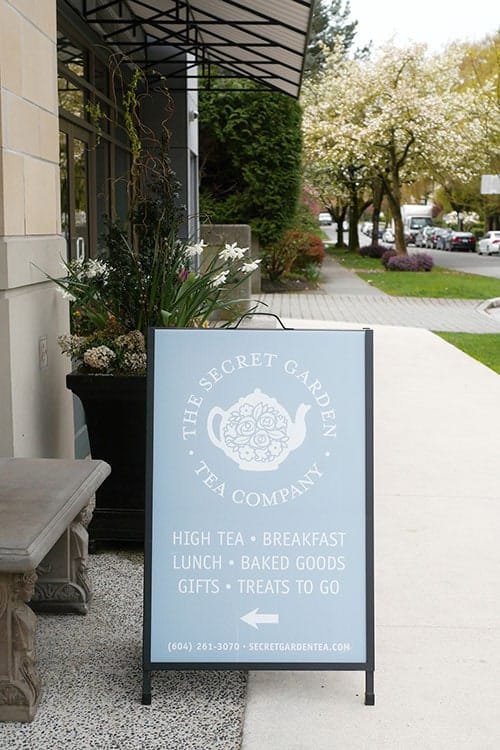
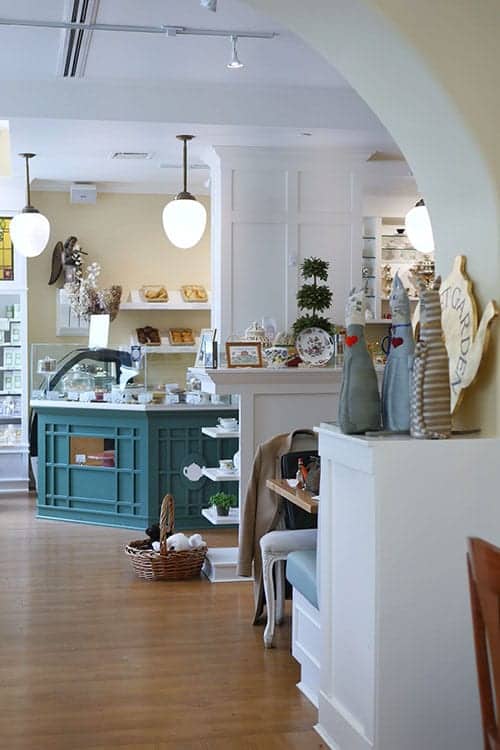
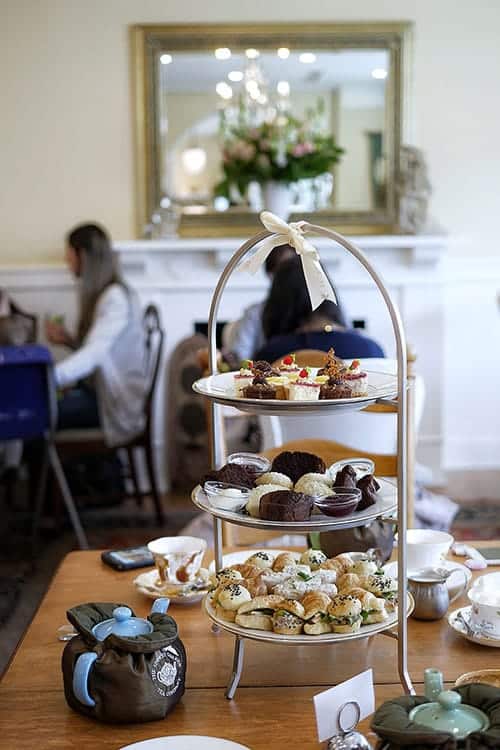
    Tea: Bearing the name, Secret Garden Tea Company, they do have a respectable medium sized collection of teas which can also be purchased for drinking at home. 14 black teas  (five different types for Earl Grey Tea alone), 3 green, 3 decafs, 4 herbal and 3 rooiboos.
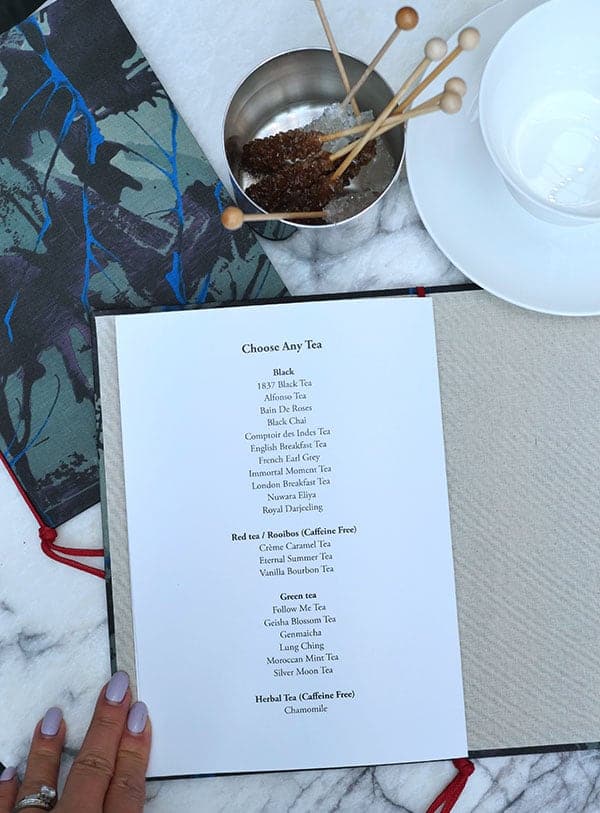
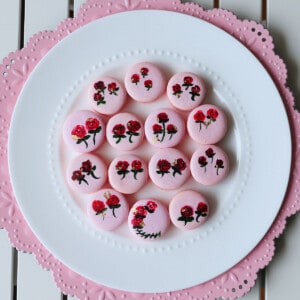
    Tea Ware: Whimsical mismatched vintage tea sets that are great for photos and conversation. Something usually found only in independent tea salons like Neverland and Adonia. Branded tea cozies were used to keep the pots warm.

    Service: Fully staffed and friendly in that folksy sort of way that's a great fit for the brand and neighborhood. Although the servers were busy with a full house, we were checked on occasionally and didn't feel neglected in any way.

    Other notes:

    ♥ Tea Set $32/per person
    (includes one pot of tea)

    Gluten-free Tea Set $37/per person (not prepared in a gluten-free environment).

    No cocktail or champagne service like at Notch8 or Laduree

    Children's Tea  $22

    ♥

    • At least 48 hours in advance for weekday reservations
    • At least 1 week in advance for weekend reservations

    ♥ Parking: Ample inexpensive metered street parking around the tea house.

    ♥ Address: 2138 WEST 40TH, VANCOUVER BC

    ♥ TEL 604.261.3070

    [pt_view id="d749ae79dr"]
    [pt_view id="342f946uh1"]

    Savoury Macarons - Rose Cream & Duck Apricot Pâté

    May 18, 2017 · Leave a Comment

    Handpainted macarons filled with duck pate on a plate.

    Savory duck pate macarons filled with rose cream is a unique flavor pairing that's perfect for cheese and charcuterie boards or as appetizers. Savory profile also helps cut down the sweetness in macarons.

    Macarons hand painted with roses filled with rose cream and duck pate on a plate.
    [feast_advanced_jump_to]

    Ever since I tried Pierre Herme's foie gras macaron during tea time at the Ritz in Hong Kong, I have wanted to make savory macarons myself. With so many sweet filling out there, a savory macaron filling sandwiched by two sweet macaron shells accompanied with a sweet and fragrant rose cream, this is one unique macaron that will really excite the senses.

    Why You'll Love Savory Macarons

    • Savory flavor profile cuts down the sweetness of macaron shells.
    • Unique & unexpected flavor pairing.
    • Perfect for appetizers, parties, and special events.
    • Pairs amazingly with wine and champagne.
    • A great addition to any cheese or charcuterie board.

    What Is Pâté?

    Pâté is made from mixing together lean meat and fats with herbs, spices and wine into a paste or loaf. It's flavor profile is mostly savory and is usually served as a bread or cracker spread.

    Where Can I Buy Pâté?

    Ingredient shopping for this recipe brought me to one of my favourite places  - Granville Island. I purchased just under 200 grams of Apricot Duck Pâté from Oyama Sausage, located in the Granville Island Public Market, known for their large array of high quality pâtés and sausages. I decided on the duck apricot pâté since I had tried it before and found it to be very approachable with a subtle sweetness to it, allowing it to pair well with a sweet macaron shell and rose cream. You can use any type of pâté if you are unable to find something similar.

    Pâté can usually be bought fresh at gourmet grocery stores, specialty butcher's shops and shops specializing in cheese. Packaged pâté can also be found in wine shops, well-stocked grocery stores, usually in the deli area, and even online on Amazon.

    Aqua bus on Granville island water.
    Beautiful view of False Creek from Granville Island.
    Various flavored pates in the fridge.
    There are so many different types of pâtés at Oyama Sausage.
    package of pate wrapped with kraft paper.

    Tips for Success

    1. This cream along with the pâté can mature the macaron shells faster than other fillings so it can be eaten sooner.
    2. Unused pate can be wrapped tightly and kept in the freezer for up to 2 months.
    3. Butter can be brought to room temperature more quickly by cutting it up into small pieces and placing it in the oven with the light on.
    4. Always be careful when working with hot syrup. Keep a bowl of cold water around just in case.
    5. If you don't have a thermometer, you can test the syrup by putting a drop into ice cold water. It will firm up and you can make a small soft pliable ball with it, hence the name Soft Ball Stage. You'll also notice that the syrup bubbles up slowly unlike how vigorously it was bubbling up in the beginning.

    Finish with Hand Painting

    You may also recognize these macarons from my previous post - Hand Painted Macaron Tutorial - where I showed you how to paint roses onto macaron shells that can be used as wedding favors or as pretty edible art on a sweets table. Once you're done assembling the shells, you can try your hand at decorating them and bringing your macaron game up several notches!

    Rose cream macarons on a white plate with a lacey pink charger on the bottom.

    Step By Step

    Egg yolks in a bowl in the mixer.
    Place yolks in mixer with whisk attachment.
    Thermometer in a cup filled with sugar syrup.
    Place sugar and water in a very small sauce pan and boil on med heat.
    Egg yolks beating in a bowl.
    When the sugar syrup reaches 225F, start whipping the yolks.
    Egg yolks looking smooth in a bowl in a mixer.
    It will begin to look paler. Stop once it the outside of the bowl no longer feels hot.
    Adding butter into a counter mixer.
    Change to the paddle attachment. Then add butter a little at a time.
    Mixture is looking thicker with butter added.
    Keep beating until it all comes together and looks smooth and creamy. Add salt and rose extract and incorporate.
    Close up of hand painted roses on macarons with gold flakes.

    Recipe

    Yield: 24 macarons

    Savoury Macaron Filling - Rose Cream & Duck Pate

    Handpainted macarons filled with duck pate on a plate.

    Savory duck pate macarons filled with rose cream is a unique flavor pairing that's perfect for cheese and charcuterie boards or as appetizers. Savory profile also helps cut down the sweetness in macarons.

    Prep Time 1 hour 30 minutes
    Rest Time 30 minutes
    Total Time 2 hours

    Ingredients

    Basic Macaron Shells

    • 130 grams almond flour
    • 130 grams powdered sugar
    • 90 grams castor sugar (Note 1)
    • 100 grams egg whites, aged, room temperature
    • ¼ teaspoon cream of tartar
    • GEL color of your choice

    Rose Cream

    • 2 egg yolks
    • 65 grams granulated sugar
    • 3 ½ tablespoon water
    • ⅛ teaspoon salt
    • 155 grams butter, (room temperature)
    • ½ teaspoon rose extract
    • 150 grams pâté

    Instructions

    Basic Macaron Shell

    1. Set aged egg whites out at room temperature.
    2. Pulse almond flour and icing sugar together in a food processor to further break down any large pieces of almond flour.
    3. Sift dry ingredients: almond flour, icing sugar. Discard big pieces of almond that can't be sifted.
    4. If you are new to making macarons, please read the instructions to my BEST MACARON RECIPE before attempting to follow the rest of the instructions since it is condensed for the advanced macaron baker.
    5. With the balloon whisk attached, whip the room temperature egg whites on low-medium speed.
    6. Add cream of tartar when it becomes foamy.
    7. Turn up the speed to medium.
    8. Once the whisk starts to leave tracks in the egg whites, add sugar a little at a time.
    9. Turn the speed up to medium-high and whip until firm peaks, stop mixer and add gel food color if desired. Continue whipping on medium-high until stiff peaks.
    10. Fold the dry mix and meringue together until the batter becomes a "lava" or honey-like consistency.
    11. Transfer batter into a piping bag fitted with a round piping tip.
    12. On parchment paper or silicone mats, pipe out round shaped macarons. 
    13. Rap the tray hard on the counter to remove any excess air bubbles. Use a toothpick to pop any remaining bubbles. 
    14. Wait until the shells become completely dry before baking. 
    15. Bake at 325F for 12-14 minutes. Every oven is different, you may need to adjust your own temperature settings. Please read How to Use Your Home Oven Properly for Baking Macarons if you are unsure.
    16. Macarons are done when the foot doesn't push back and the tops don't move when you wiggle it. 
    17. Once baked, let cool completely before removing from the baking mat/parchment paper.


    Rose Cream Macaron Filling

    1. Place granulated sugar and water in a very small sauce pan. Heat on med-high heat.
    2. Once it reaches 225F, start beating the egg yolks in a stand mixer with the whisk attachment on med speed. It will begin to look lighter. 
    3. Once the sugar reaches soft ball stage (238F), take it off the heat. (You can do this a bit earlier since the syrup temperature will continue to rise.)
    4. Set the stand mixer to low speed and start pouring in the syrup from the side of the bowl. Be careful not to pour it onto the whisk since this will cause splashing and hot syrup is dangerous!
    5. Set the mixer on high speed and beat until the bowl is no longer hot when you feel it with your hands. 
    6. Change to the paddle attachment and add butter a little at a time and beat until it's smooth and creamy. 
    7. Add salt.
    8. Add rose extract and incorporate. 
    9. Place rose cream in a pastry bag and pipe a ring of cream around the outer edge of the macaron shell. 
    10. Add a dallop of pâté in the center with a small spoon. 
    11. Assemble the two macaron shells together. 
    12. Place in the fridge and let mature 12-24 hours before eating. Enjoy!

    Notes

    1. Castor sugar is also known as extra fine granulated sugar or berry sugar. Granulated sugar can be used by castor sugar is preferable.


    Recommended Products

    As an Amazon Associate and member of other affiliate programs, I earn from qualifying purchases.

    • Ateco Disposable Piping Bags, 12-Inch, Pack of 100
      Ateco Disposable Piping Bags, 12-Inch, Pack of 100
    • Gel Food Coloring AmeriColor Junior Kit, 8 Colors.75 Ounce Bottles
      Gel Food Coloring AmeriColor Junior Kit, 8 Colors.75 Ounce Bottles
    • Regular Sized Silpat  Non-Stick Silicone Baking Mat
      Regular Sized Silpat Non-Stick Silicone Baking Mat
    • Bob's Red Mill Super-Fine Gluten Free Almond Flour, 3 Pound
      Bob's Red Mill Super-Fine Gluten Free Almond Flour, 3 Pound

    Nutrition Information

    Yield

    24

    Serving Size

    1 grams

    Amount Per Serving Calories 151Total Fat 10gSaturated Fat 4gTrans Fat 0gUnsaturated Fat 5gCholesterol 45mgSodium 105mgCarbohydrates 13gFiber 1gSugar 12gProtein 3g

    This information is provided as a courtesy and is an estimate only. This information comes from online calculators. Although indulgewithmimi.com attempts to provide accurate nutritional information, these figures are only estimates.

    Did you make this recipe? Share your results with me 🙂

    Please leave a comment on the blog or share a photo on Instagram

    © Mimi
    Cuisine: french / Category: Macarons
    • How to Make Hand Painted Floral Macaron Favors
    • A stack of delicate pink lychee rose macarons with some rose buds on the side.
      Delicate Lychee Rose Macarons in a Heart Shape (Template)
    • Ispahan macaron cake with fresh raspberries on a little cake stand.
      "Ispahan" Inspired Macaron Cake with Fresh Lychees & Raspberries
    • Champagne panna cotta in mini cups adorned with berries dusted with sugar.
      New Years Sparkling Wine Panna Cotta - 2 in 1 Drink and Dessert

    Afternoon Tea at Hawksworth Restaurant

    May 8, 2017 · Leave a Comment

    Over the weekend, we threw a bridal shower for my bff at Hawksworth Restaurant in one of the restaurants beautiful private dining rooms - The York Room. We indulged in decadent afternoon treats from the restaurant's kitchen and macarons from Bel Cafe.

    Everything was fresh and the flavour pairings of the savouries were impressive. Some of my favourites were the lobster salad cone and foie fras torchon with hazelnut and strawberry. The focus of the set was on the savouries as the sweets selection was small and somewhat on the overly sweet side. And as for tea, there were a handful of TWG branded teas to choose from and it was served in a teabag-in-cup fashion.

    The afternoon tea service is only available for private functions and we were served in the York Room by three dedicated servers for our group of over 25 guests. They were always nearby for a drink refill or offer assistance when necessary. We all had a wonderful time chatting, eating and playing bridal party games. There was one particular game in which guests had to get up and go to different parts of the room depending on their answer. The private room really helped to give our big boisterous group a place to move about freely and giggle to our hearts content.

    Below are some photos from the day.

    Until our next tea date!

    Xoxo,

    Mimi


    Hawksworth Resaurant
    Website
    A: 801 West Georgia Street, Vancouver, BC V6C 1P7
    T: 604.673.7000

    The bigger of the two private rooms - The York Room.

    View of Vancouver Art Gallery.

    hawksworth-tea-menu

    The TWG branded tea was served in a teabag-in-cup fashion.

    All the savouries  spread out on three tiers.

    Lobster salad cone & Fois Gras Torchon with hazelnut and strawberry.

    The macarons were from Bel Cafe downstairs.

    Cheers!

    Ombre rossette cake by yours truly. Topper by a Spoonful of Melons.

    [pt_view id="d749ae79dr"]
    [pt_view id="342f946uh1"]

    Double Unicorn Macaron Collaboration with Christina's Cupcakes (Template)

    Apr 26, 2017 · 4 Comments


    Unicorn Collab with Christina's Cupcakes

    This unicorn portrait inside a big unicorn macaron is a collaboration between me and one of my favorite creators, Christina's cupcakes. I'm sure many of you already know of Christina's beautiful work with gumpaste roses and gold frames, and you'll recognize them in our collab. Let me tell you, they are just as beautiful and tidy in person as they are on screen. You need to check out her tutorials on YouTube if you're interested in making something similar.

    My contribution to the collab were these big unicorn macarons which I made with the batter on batter technique. Unicorn shaped macarons are all the rage now, I hope you get a chance to make them too. Here are two free templates to help you get started. One is the BIG unicorn you see in our collab, it makes maximum impact in photos and party tables. The other one is a small unicorn which is a bit more approachable and good for gift-giving and eating.

    I hope you enjoy the short video showing you the process and the templates. And remember to subscribe to my newsletter. It's a double opt-in process so once you confirm your subscription, I'll send you the password to the special templates that are only for subscribers.

    Wishing you the sweetest unicorn dreams.

    Xoxo,

    Mimi


    This is the gel colour I used for making the pink macaron shells and also I added a bit onto a plate and dabbed it with a skewer to paint on the eyes. Click on link to purchase. Disclosure: affiliate link.

    Always use Gel coloring to make macarons instead of liquid. I prefer Americolor, you get a bright vibrant color with just a few drops. It also resists fading during baking. Great little starter kit to blend your own colors.

    Follow my Best Macaron Recipe on how to make the light pink shells.


    DOWNLOAD  MEDIUM UNICORN MACARON TEMPLATE NOW:

    SMALL UNICORN MACARON TEMPLATE FOR NEWSLETTER SUBSCRIBERS:

    [srp post_limit='5' post_random='yes' category_include= 24 widget_title = 'More Macaron Art']

    Mother's Day Afternoon Tea Ideas in Vancouver

    Apr 24, 2017 · Leave a Comment

    This is my Top5 afternoon tea ideas for Mother's day that I will share with Deborah Moore this morning on AM1470. Mom's special day is right around the corner so don't wait until the last minute to plan something special for her! I decided to look into this a bit early this year so I can have some useful information to share with all of you before it's too late. Actually, to my surprise, for once, I am just a teeny bit ahead. A few of the establishments I contacted have yet to confirm their Mother's Day menu but they've provided some general details and I've included my last visits to all of these spots to give you a clearer picture.

    The first three on the list are unique because they offer a special menu made just for Mother's Day but I think you'll be happy with any one of them.

    XOXO,

    Mimi

    1. Fairmont Vancouver - "Tea at the Top"

    Mother's Day will be one of the best times to have tea at the Fairmont Vancouver because it's one of the only days that their "rooftop" on the 15th floor is open to the public. With live piano playing in the background, you'll also enjoy a nice view of Vancouver's Downtown core.

    Their Mother's Day menu hasn't been confirmed yet but I did attend their Easter "Tea at the Top" and it was $65/person. It was one of the biggest and best afternoon tea sets I've had to date. I would recommend this one for the novelty of the rooftop, and the food quality and selection. Read my last visit to the Fairmont Vancouver here.

    Pricing: TBD (their Easter "Tea at the Top" was $65/person)

    To reserve: 604-662-1900, email [email protected] and also on OpenTable.

    2. Secret Garden Tea Company

    Secret Garden is one of the original pioneers of afternoon tea in Vancouver and they now have a brand new location in Kerrisdale, just steps away from their original location. For those who have already been to tea at the Secret Garden, it's a good reason to make a revisit.

    A great thing about their menu selection is their option for Gluten-Free tea and their Take Away Tea. Wouldn't it be nice to take mom out for a picnic in the park and share a sweet basket of pre-made goodies? A really nice option for moms who don't like the fuss or for those who want to spend the day outdoors.

    Read my last experience of the Secret Garden Takeaway Tea here. (I have since re-visted the new space but have yet to make an individual post. I found the quality this time to be average but since it was priced on the lower end, at $35/set, I'd have to say it was a fair value.)

    Pricing: Mother's Day afternoon tea is $42/person. Gluten-Free tea $42. Children's tea $32. Take away tea $36

    To reserve:  By phone only (not online). Call (604) 261-3070 between 9am and 5pm. 2138 WEST 40TH, VANCOUVER BC

    Website link here.

    3. TWG Tea

    The new-ish TWG tea salon specializes in luxury tea selections and tea-infused foods. Located in the heart of downtown Vancouver, it's one of the more luxurious tea salons in the city.

    They have a huge variety of luxury teas at over 500 and some of the premium ones are rarely seen at other establishments in the city. TWG Tea is a great choice if mom is a tea connoisseur. Their menu is also very extensive as they offer a variety of different tea sets and main dishes. Despite being a global brand, the chef at each location has free reign to curate their own menu according to local tastes and ingredients - which are nothing short of luxurious and decadent, and at a price, of course. Overall, it's positioned at a higher price point than the rest of the others on this list but well worth it for the food quality and top-notch service. (Tea sets alone aren't as expensive as the Fairmont one above. Yet, its on the small side).

    For Mother's Day Weekend (Sat/Sun), they are serving only their Mother's Day Afternoon Tea Sets. They have seatings at 9:30am/11:30/1:30/3:30 & 5:30 so it's great for those who need to start later. The price and theme is to be determined but they did divulge that it will be in the $50 range and there's going to be lot's of PINK!

    I really like the use of luxurious ingredients in their tea-infused foods. Read my last two visits to TWG Tea: Sakura Tea at TWG, Afternoon Tea at TWG

    Pricing: TBD (staff said it should be in the $50 range)

    To reserve: Online thru open table. (604) 692-0071, 1070 West Georgia Street, Vancouver, British Columbia, V6E 2Y2, Website link here

    4. Laduree

    Laduree is one of my personal favorite for tea houses in Vancouver. The smart branding and flown-in-from-France macarons will really transport you to a sweet little Parisian world while you're there. It also has an extensive gift shop of Laduree products - candles, chocolates, tote bags etc. - so its a great way for you to let mom pick out her own gift. I think she'll be delighted! They have a brand new location inside Holt Renfrew, giving you a chance to shop afterwards in Pacific Centre Mall.

    Be the first to try their cocktail and champagne service starting on Mother's Day! They will be unveiling macaron inspired cocktails like the Isaphan - a concoction made with the signature ingredients of lychee and rose - talk about yum! It's sweet and finishes dry, the perfect combo.

    Laduree will be introducing cocktails, wine and champagne starting on Mother's Day.

    They will be offering their full menu on mom's day so there will be plenty to choose from, whether you have a big or small appetite. Their menu is more sweets focused and that's where they really excel. I would recommend going there if mom is into sweets. Read my last visit of Laduree here.

    To Reserve: (604) 336-3030, 1141 Robson St, Vancouver, BC V6E 1B5

    5. L'Opera Patisserie

    For those in the Richmond area, there is L'Opera Patisserie. They occupy a luxuriously decorated little space on No. 3 Road just a few steps away from Richmond Centre so you can bring mom shopping afterwards.

    Their macarons are also one of my favourites in the city. Remember to grab a box before you leave. That way mom can reminisce for the next few days as she enjoys them. Okay, who am I kidding, it won't last that long - get two boxes 🙂

    Read my last visit of  L'Opera here.

    Pricing: Their current Spring Tea set is $48/person

    To Reserve: (604) 270-2919, 153-5951 Minoru Blvd, Richmond, British Columbia, BC V6X 4B1

    Disclosure: I was not paid for recommending these selections or have any financial affiliations with any of the companies I recommended.

    Photo Diary: Botanist Dining at Fairmont Pacific Rim

    Apr 21, 2017 · Leave a Comment

    I was invited to attend the media preview of the new Botanist Dining Room, Cocktail Bar and Champagne Lounge at the Fairmont Pacific Rim in Coal Harbour on Wednesday. The spacious restaurant, designed by Ste Marie Design with branding by Glasfurd & Walker, is incredibly stunning with a distinct bar, open kitchen, two dining areas with abundant natural lighting, and a terrace.

    Inspired by the principals of botany, it's represented in both the design and the food via the incorporation of lush greenery in its design. And as evidenced in one of their sleek cocktails that is infused with mushrooms - via soaking in whisky for two hours.

    Botanist will officially open on April 22nd and the highly anticipated menu features ingredients sourced from their natural landscape and prepared with contemporary techniques - an ode to the botany of British Columbia and the Pacific Northwest.

    I'm looking forward to it. Until next time.

    Xoxo,

    Mimi


    Address: 1038 Canada Place ,Vancouver , British Columbia, Canada, V6C 0B9
    Tel: TEL + 1 604 695 5300
    Reservations: here


    [FinalTilesGallery id='46']

    Disclosure: This was an invite-event. Beverages and food were complimentary. All opinions are my own.

    [srp post_limit='5' post_random='yes' category_include= 131 widget_title = 'Other Vancouver Moments']

    Afternoon Tea at Fairmont Vancouver Rooftop (Notch8)

    Apr 20, 2017 · Leave a Comment

    Fairmont Vancouver's Easter Afternoon Tea on the Roof

    In the past I've heard about the "special" afternoon tea that's served way up high on Fairmont Vancouver's 15th floor and a few days ago I finally had a chance to experience it for myself. Why do I use the term "special"? Usually, the afternoon tea service at Fairmont Vancouver is served in the hotel's glamorous year and a half new restaurant, Notch8. For special occasions like Easter and the upcoming Mother's Day, the afternoon tea service is moved upstairs to the hotel's highest floor on the 15th level, overlooking some of Downtown Vancouver's other stately buildings.

    The View

    The dining room itself isn't as glamorous as the newly renovated Notch 8 downstairs but the pretty view coupled with the fact that it's one of the only times that the room is open to the public  (other uses are for wedding banquets and private functions), it's a nice little novelty in the world of afternoon tea in Vancouver.

    The 3-Tier Tray

    I was impressed with the use of the 3-tier tray serving tray. The "trend" nowadays in many restaurants is to place the desserts on the top tier for reasons unconfirmed (I'm guessing for aesthetics), this tray was properly laid out with scones on the top level, followed by savouries and lastly sweets on the bottom.

    (Scones are usually kept on the top tier and a traditional tray actually had a domed top to keep them hot. Guests are expected to eat the scones while they're hot, so start from the top of the tray down to the savouries and then end with the sweets.)

    The Food

    This is perhaps one of the largest tea sets I've had to date. Because there were two scones of regular size plus a hot cross bun, coupled with hearty sized savouries, I couldn't finish any of the desserts. Don't worry, I enjoyed them later on at home 🙂

    After indulging on just the savouries alone, I was pleasantly surprised to find that the quality and taste of the few items I had were markedly better than the last time I visited. I incorrectly thought the reason for the inconsistency was that the food came from another kitchen since the tea sets were served on the rooftop this time and not at Notch8.  I followed up with our server about this issue and she told us that the food was from the same kitchen but it was under the leadership of a new chef de cuisine. No wonder. I remember reading a few reviews from the past which didn't necessarily rate the food highly but did give praise for the other elements like service and ambiance. I think now is a great time to revisit or make your first visit if you've been thinking about it. The next time that afternoon tea will be served on the rooftop is for Mother's Day. What a treat it will be for mom!

    Until our next tea date.

    Xoxo,

    Mimi

    ❤ OTHER NOTES:

    Notable Points:
    - The rooftop is only open to the public during special occasions.
    - High quality and delicious food under the leadership of a new chef de cuisine
    - Fairmont Hotel is one of the most iconic and historic buildings in Vancouver.
    - Luxury hotel service
    - Proper layout of an afternoon tea tray

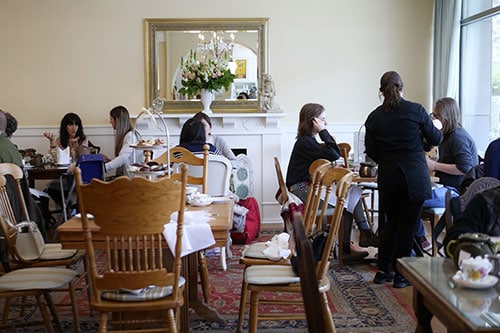
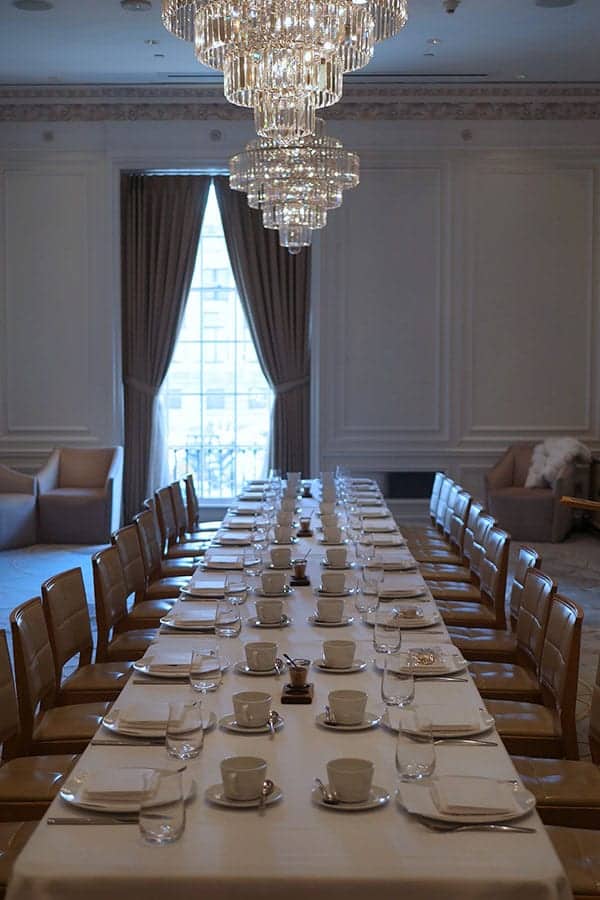
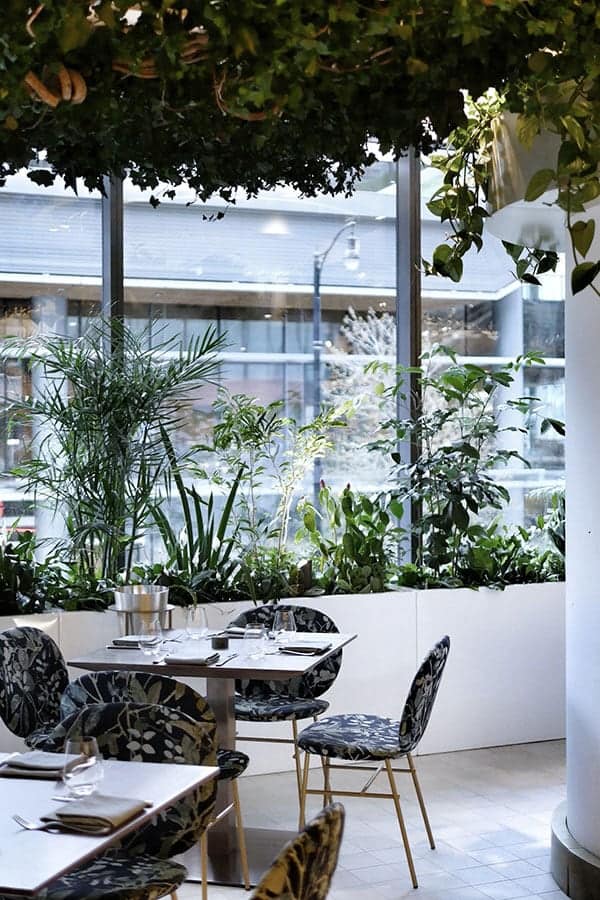
    Ambience: Elegant vibes with live piano music and covered chairs. The dining room on the rooftop isn't particularly glamourous but the view is worth the visit when they do open up this part of the hotel to the public. Don't miss it. Conversely, the newly renovated Notch8 restaurant downstairs  - where afternoon tea is usually held - is trendy and fashionable. Read my Notch8 Tipsy Tea experience here.

    Scones: Good. The bun and scones were of regular size and there were two type of scones to choose from, one chocolate and one regular. I felt so spoiled because the last tea sets I've had either did not have scones or they were very small and there was only one. The lavender clotted cream had a delicate lavender fragrance to it and was just delightful. I love clotted cream and I appreciated this different spin on it.

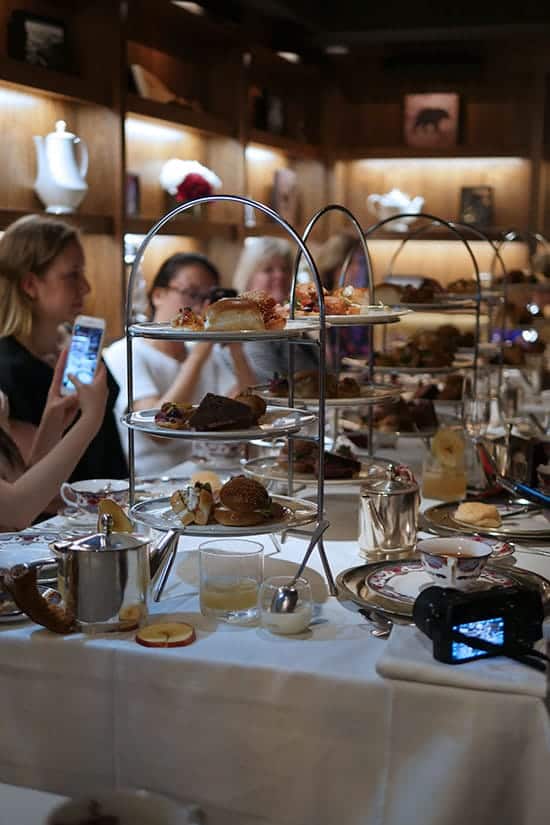
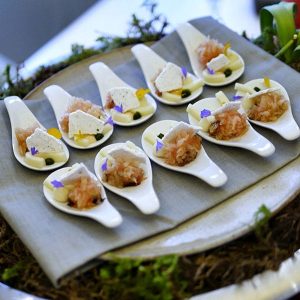
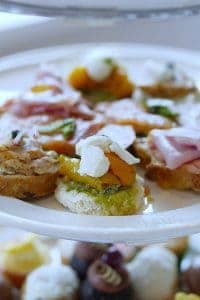
    Savoury: Very Good. A robust selection of four finger sandwiches on the second tier plus two "extra" pieces that were presented separately on another plate. These were the wagyu beef croquette and fois gras candied hazlenut mousse which was exquisitely presented in a real egg shell laid on top of moss. All the savouries were very fresh and flavourful. My favourites were the pesto chutney barrata cheese sandwich, smoked salmon sandwich and fois gras mousse.

    Sweets: There were quite a few -  7 actually! We were also presented with a citrus pot de creme to start our tea service.  All the desserts were above average to good. Nothing in particular out for me from from the sweets.

    Tea: A medium-sized collection, not as much as at TWG, but the black ones stand out for being unique blends of high quality. Types of tea available: 12 black, 1 white, 3 green and 5 herbal.

    I chose a delightful black tea blend from India called 1907 Centennial that I had with a lot of cream.

    "Limited edition commemorative brew...a blend of delightful Kenmare, rich Imperial Keemun, touches of malty Assam from Borengajuli estate, full-bodied Assam from Keyhung and a South Indian tea from Nonesuch estate plus a dash of Earl Grey...a taste of history!"

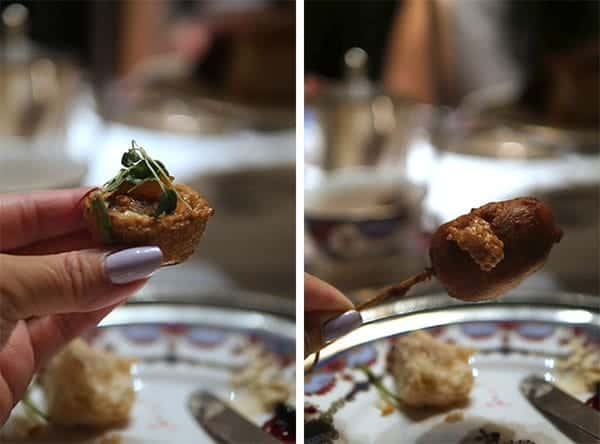
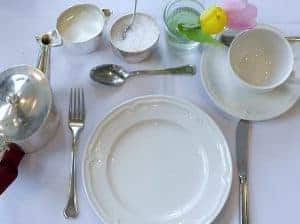
    Tea Ware: Traditional ivory porcelain tea ware with silver teapots. No use of tea warmers like at the Rose House.

    Service: Fully staffed, professional and well trained. We were checked on constantly and never felt unattended. Both our principal server and the attendant who brought out the trays took the time to chat with us about the food and the restaurant. Both had that certain ability to make friendly small talk while maintaining the utmost discretion and care, an attribute you usually find with service staff at top notch restaurants.

    Other notes:

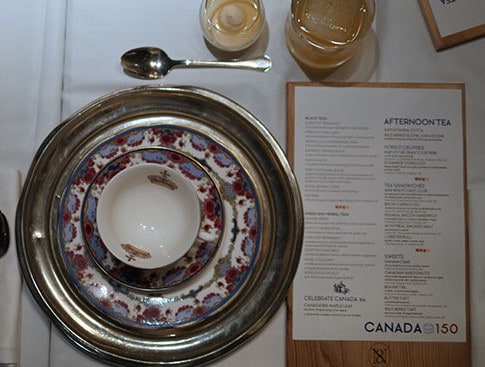
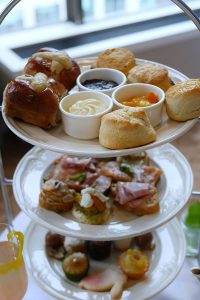
    ♥ "Tea at the Top" Tea Set $65/per person
    (includes one pot of tea)

    Add celebratory cocktail for $13

    Children's Tea for children 12 and under $32.50

    ♥ The website is a bit of a maze. Here's the direct link to the afternoon tea section which can be reserved online.

    ♥ Parking: No street parking directly outside the Hotel but available down the street on Hornby where there is also a pay parkade. There are over 20 parking spots reserved for Car2Go on the rooftop parkade at 777 Hornby which is right next to the hotel. Closest Skytrain station is Vancouver City Centre (on the Canada Line) which is 2 blocks away from the hotel.

    ♥ Address: 900 West Georgia Street, Vancouver, British Columbia, Canada, V6C 2W6

    ♥ TEL + 1 604 684 3131

    ♥ Contact: [email protected]

    [pt_view id="d749ae79dr"]
    [pt_view id="342f946uh1"]

    Beautiful Last Minute Easter Eggs

    Apr 15, 2017 · Leave a Comment

    Colorful Easter eggs in a small white bowl.

    A less-mess way to decorate Easter eggs using minimal tools and supplies. It's a fun and safe activity for the kids too!

    Gorgeous colorful hand painted Easter eggs in a small bowl.

    Last-Minute Easter Eggs

    Hey! You over there. Are you a fretting about decorating Easter Eggs at the last minute like me? If you're worried about dying eggs and making a big mess in your kitchen, here's a quick and easy way to up your Easter egg game and no one will be none the wiser. It's also a great sit-down activity for children, just get out your edible colouring, a brush, water and eggs and you're ready to go!

    Add the edible colours you plan on using onto a clean dish. Use some water to dilute the gel colouring to lighten it and to soften the consistency. However, to prevent streaks, don't use too much since the shell doesn't absorb liquid like paper does.
    Press down on the flatter side of the brush to create petals.
    Hold the brush vertically and use the pointed end of the brush to dab purple paint onto the egg surface for fine dots.
    Begin by drawing the "bud" foundation in the form of a heart shape.
    Use another color and add petals to the sides.
    Dab a bit of yellow in the center for the pistil.
    Add stems with green paint. (Made a boo boo but it's okay! Watercolor art tends to be more abstract so your mistakes aren't too obvious. The gel coloring doesn't wipe off easily so once you've put your brush mark down, its' set.)

    Recipe

    Gorgeous Last Minute Easter Eggs

    Colorful Easter eggs in a small white bowl.

    A less-mess way to decorate Easter eggs using minimal tools and supplies. It's a fun and safe activity for the kids too!

    Cook Time 8 minutes
    Total Time 8 minutes

    Ingredients

    Supplies

    • Hard boiled eggs
    • Edible gel food colouring
    • Paper towels
    • Fine paint brush
    • Egg carton or egg stand
    • Water

    Instructions

    1. Boil eggs for 8-12 minutes and let them cool off in ice cold water. (Tip: cooling eggs in cold water makes them easier to peel)
    2. Dry eggs with paper tower
    3. Place egg on it's side in the carton, allowing the surface to be exposed for painting. 
    4. Use fine tipped paint brush to paint gel colours onto egg. Use some water to dilute the gel colouring to lighten it and to soften the consistency. However, to prevent streaks, don't use too much since the shell doesn't absorb liquid like paper does. 
    5. Let eggs dry for a few hours before working on the other side. 

    Nutrition Information

    Serving Size

    1 grams

    Amount Per Serving Unsaturated Fat 0g

    Did you make this recipe? Share your results with me 🙂

    Please leave a comment on the blog or share a photo on Instagram

    © Mimi
    Cuisine: amercian / Category: Sweets
    • 5 Easter bunny macarons on a floral plate.
      Lavender Earl Grey Easter Bunny Macarons (Template)
    • 2 large speckled Easter egg macarons in a dish.
      How to Add Speckles to Easter Egg Macarons with Template
    • Carrot cupcakes on a cake stand topped with birthday toppers.
      Moist Carrot Cupcakes with Mascarpone Cream Frosting
    • Carrot cake roll on a wooden cutting board flanked by fondant carrots.
      Japanese Carrot Cake Roll with Stabilized Mascarpone Cream

    How to Make Hand Painted Floral Macaron Favors

    Apr 8, 2017 · 3 Comments

    Last weekend my dear blogger pal, Samantha, hosted a Food Bloggers of Canada meetup potluck at her lovely home and these hand painted macarons were my little contribution. I didn't have a specific theme in mind when I started and everything just kind of came together after I picked up some delicious duck and apricot pâté from Oyama on Granville Island. The idea was to make a savoury macaron - something I don't often encounter. Inside each of these pink beauties is a dab of duck apricot pate with a ring of rose buttercream around it. Hence, the eventual application of a rose motif finished with a bit of gold foil for good measure. Because, you know, gold is best on ... everything. 🙂

    I think these would be great for a spring or summer wedding theme. The hand painting is a little bit more work but does make a powerful impact. It definitely creates that "wow" factor moment for guests when they arrive at their table to find a piece of decadent edible art as part of the table setting. But you don't necessarily need to throw a wedding to enjoy these roses. An Instagram friend mentioned that these roses reminded her of Beauty and the Beast and I can see this as part of a pretty Belle themed tea party too.

    I hope you enjoy the tutorial.

    Xoxo,
    Mimi

    Put a drop of each gel color on a clean plate. Use a little at a time since it will dry up.
    Dip a fine paint brush into the light pink colour. Paint a few random strokes in a circular pattern leaving some white space in between strokes. This will form the rose "bud" foundation.
    Repeat previous step with the medium pink color while adding a few more strokes to the outer edge of the bud to create the "petals".
    Repeat previous step with the red color.
    Paint on the leaves and stem with the green gel colour.
    Once painting is completed, place macarons back into the refrigerator and let dry for 24 hours before adding gold foil and packaging.
    Add gold foil. Tweezers or wooden chopsticks work really well for transferring gold fold.

    Tips for Hand Painted Macarons

    1. Use gel colouring for best results. You can mix it with a bit of clear alcohol to lighten or thin it out a bit but I didn't use it here. But be careful not to make it too runny. Macarons do not like moisture!
    2. I am using the finest paint brush in the Wilton Paint Brush Set. Link below.
    3. To preserve your beautiful work, let the paint dry up before packaging. 24 hours is best.
    4. I like to assemble that macarons with filling and refrigerate it before I start painting. This will prevent it from melting in your hands.
    5. Lastly, work quickly! Macarons start melting and the gel paint dries up as well.

    Recipe

    Yield: 12

    Soft Pink Hand Painted Rose Macarons

    Soft Pink Hand Painted Rose Macarons

    Elegant hand painted floral macarons for a wedding, shower, birthday party or Mother's Day.

    Prep Time 1 hour
    Cook Time 15 minutes
    Rest Time 30 minutes
    Total Time 1 hour 45 minutes

    Ingredients

    Ingredients for Soft Pink Macaron Shells

    • 65 grams almond flour
    • 65 grams icing sugar
    • 50 grams egg whites, (aged for min. of 24 hours)
    • 45 grams castor (Note 1)
    • ⅛ teaspoon cream of tartar
    • 1 drop pink gel color, (I used Deep Pink by Americolor)

    Supplies for Painting Roses

    • Few drops of "Light" Pink Gel Colour, (I used Deep Pink by Americolor)
    • Few drops of "Dark" Pink Gel Color, (I used Mauve by Americolor)
    • Few drops of Red Gel Color, (I used Super Red by Americolor)
    • Few drops of Green Gel Color, (I used Leaf Green by Americolor)
    • Fine tip brush

    Instructions

    Basic Macaron Shells

    1. Set aged egg whites out at room temperature.
    2. Pulse almond flour and icing sugar together in a food processor to further break down any large pieces of almond flour.
    3. Sift dry ingredients: almond flour, icing sugar. Discard big pieces of almond that can't be sifted.
    4. If you are new to making macarons, please read the instructions to my BEST MACARON RECIPE before attempting to follow the rest of the instructions since it is condensed for the advanced macaron baker.
    5. With the balloon whisk attached, whip the room temperature egg whites on low-medium speed.
    6. Add cream of tartar when it becomes foamy.
    7. Turn up the speed to medium.
    8. Once the whisk starts to leave tracks in the egg whites, add sugar a little at a time.
    9. Turn the speed up to medium-high and whip until firm peaks, stop mixer and add gel food color if desired. Continue whipping on medium-high until stiff peaks.
    10. Fold the dry mix and meringue together until the batter becomes a "lava" or honey-like consistency.
    11. Transfer batter into a piping bag fitted with a round piping tip.
    12. On parchment paper or silicone mats, pipe out round shaped macarons. 
    13. Rap the tray hard on the counter to remove any excess air bubbles. Use a toothpick to pop any remaining bubbles. 
    14. Wait until the shells become completely dry before baking. 
    15. Bake at 325F for 12-14 minutes. Every oven is different, you may need to adjust your own temperature settings. Please read How to Use Your Home Oven Properly for Baking Macarons if you are unsure.
    16. Macarons are done when the foot doesn't push back and the tops don't move when you wiggle it. 
    17. Once baked, let cool completely before removing from the baking mat/parchment paper.
    18. Fill, assemble and chill the macarons before decorating.


    Hand Painted Shells

    1. Put a drop of each gel color on a clean plate. Use a little at a time since it will dry up.
    2. Dip a fine paint brush into the light pink colour. Paint a few random strokes in a circular pattern leaving some white space in between strokes. This will form the rose "bud" foundation.
    3. Repeat previous step with the medium pink color while adding a few more strokes to the outer edge of the bud to create the "petals".
    4. Repeat previous step with the red color.
    5. Paint on the leaves and stem with the green gel colour.
    6. Place macarons back into the refrigerator and let dry for 24 hours before adding gold foil and packaging.
    7. Add gold foil. Tweezers or wooden chopsticks work really well for transferring gold fold. 
    8. Don't forget to watch the video at the bottom of this post to see the video tutorial I made as well. 

    Notes

    1. Castor sugar is also known as extra fine granulated sugar or berry sugar. Granulated sugar can be used by castor sugar is preferable.

    Nutrition Information

    Yield

    12

    Serving Size

    1 grams

    Amount Per Serving Unsaturated Fat 0g

    Did you make this recipe? Share your results with me 🙂

    Please leave a comment on the blog or share a photo on Instagram

    © Mimi
    Cuisine: french / Category: Macarons

    Afternoon Tea at Laduree Vancouver

    Apr 4, 2017 · Leave a Comment


    First Laduree in Canada

    I used to just dream about having a Laduree in my city and had looked up various ways to order Laduree macarons in Canada. After some research I discovered that not only were there no Canadian locations whatseover, there also seemed to be no official shipping service to Canada either.

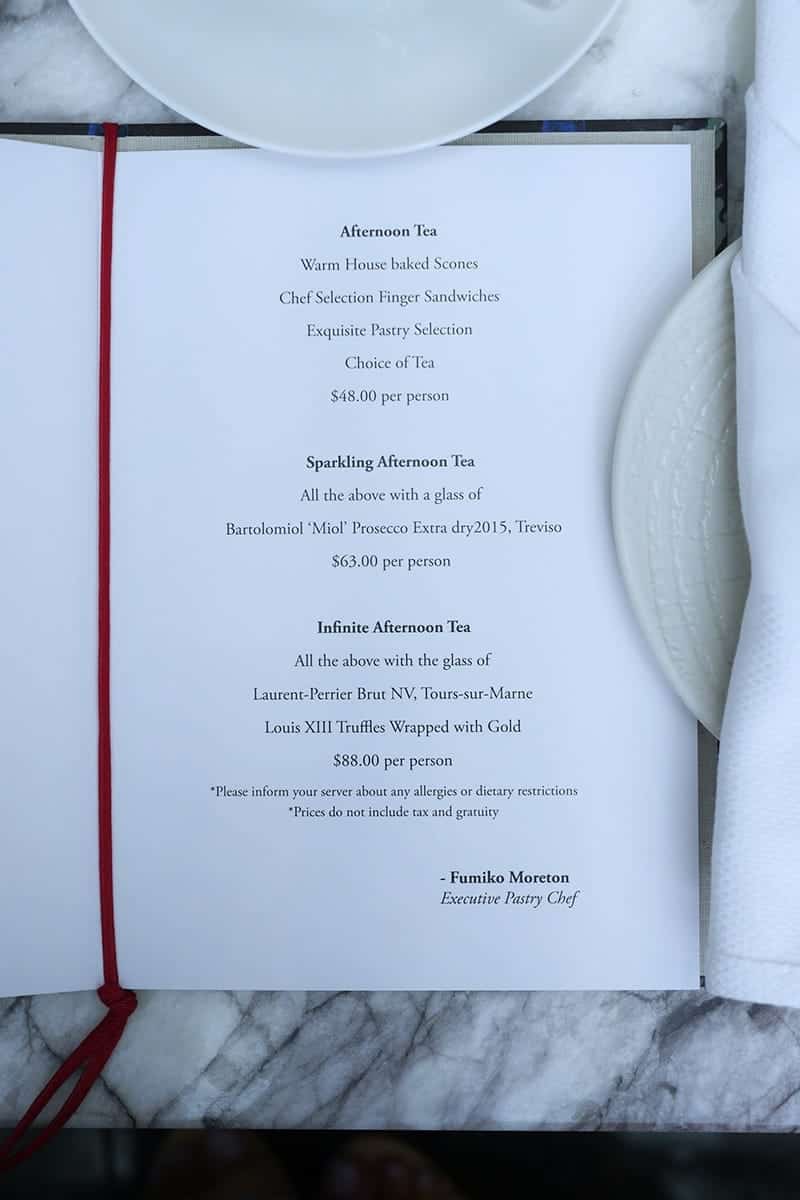
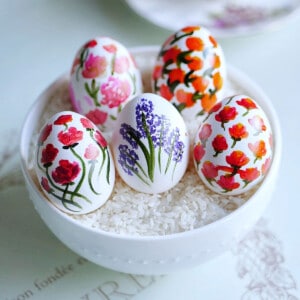
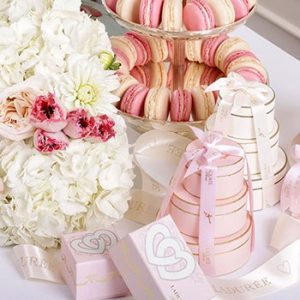
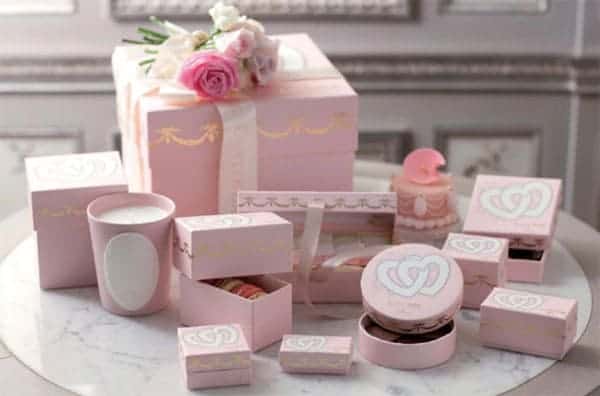
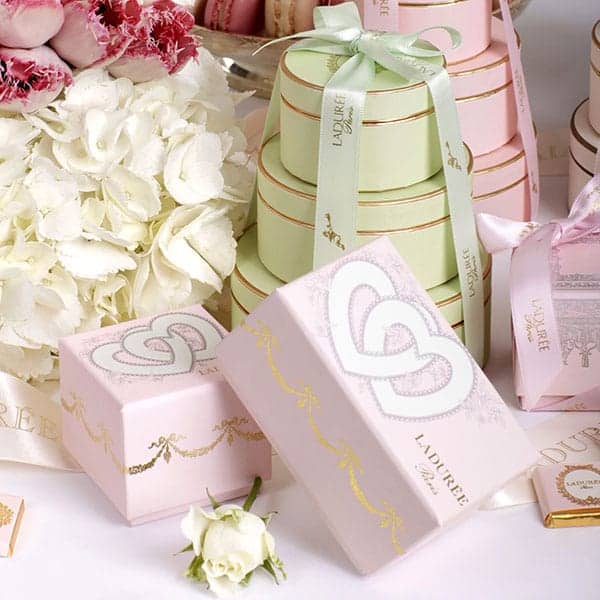
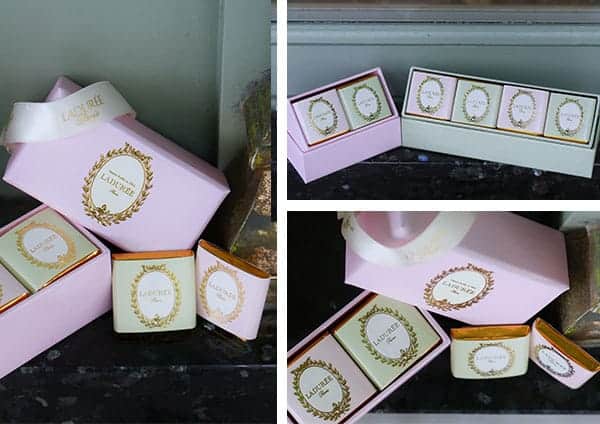
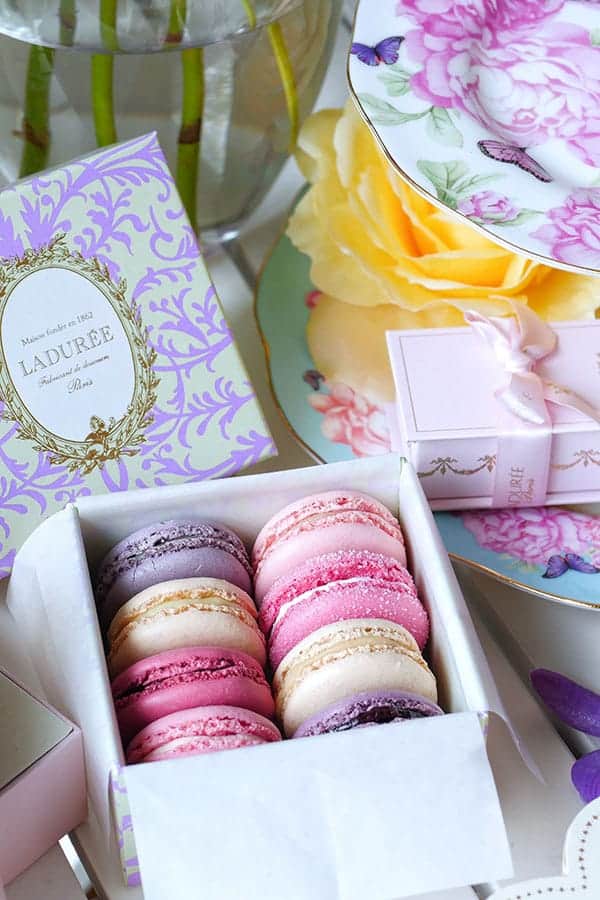
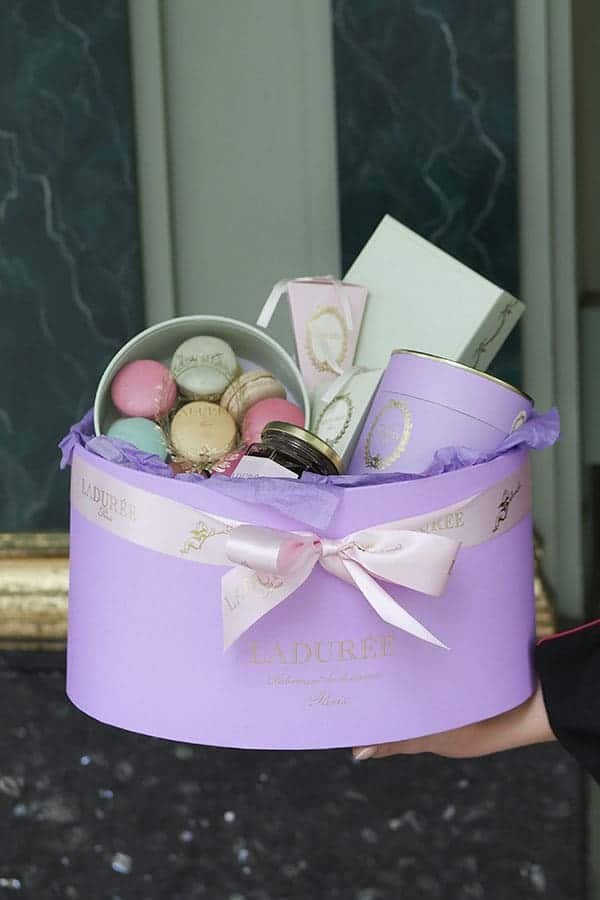
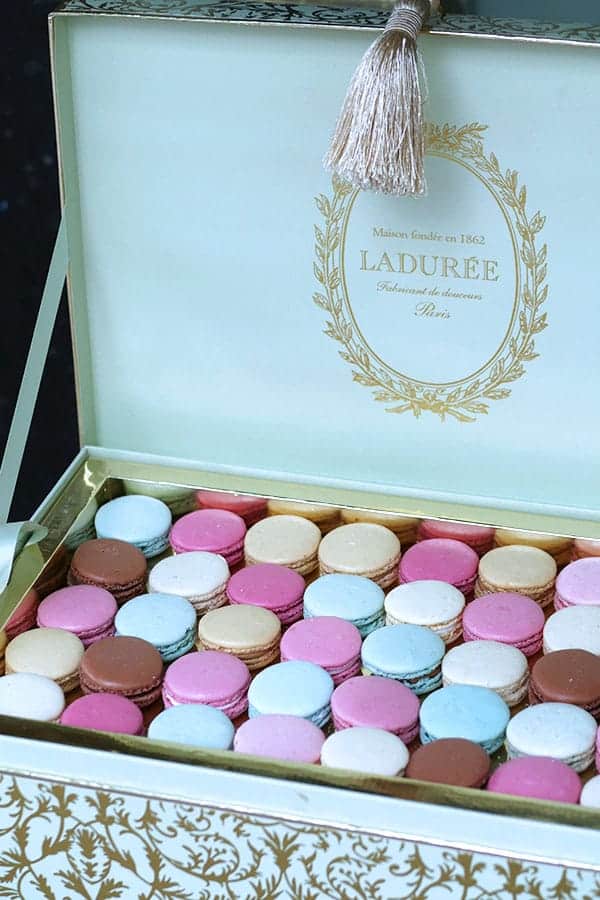
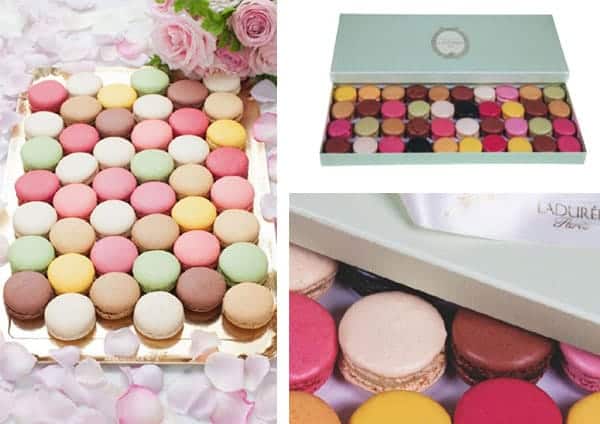
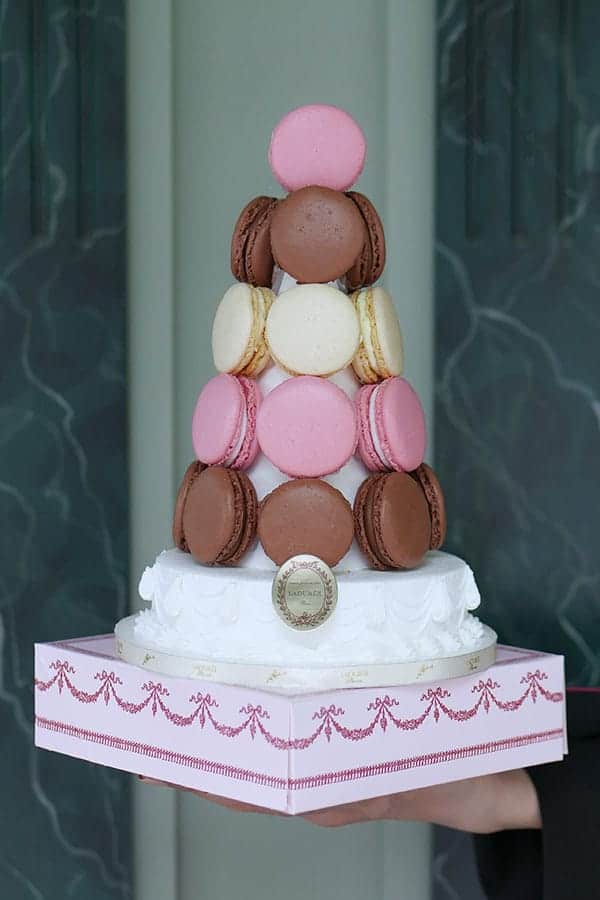
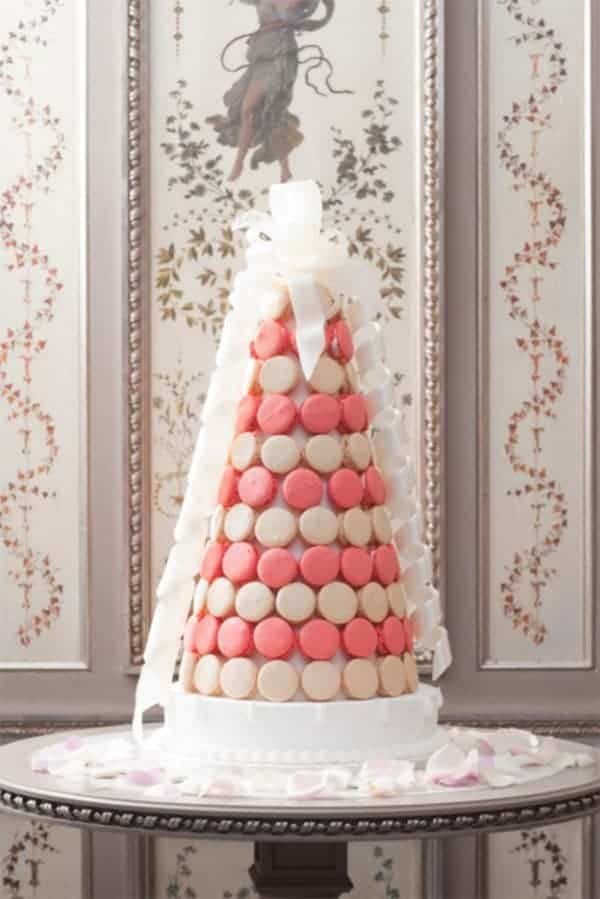
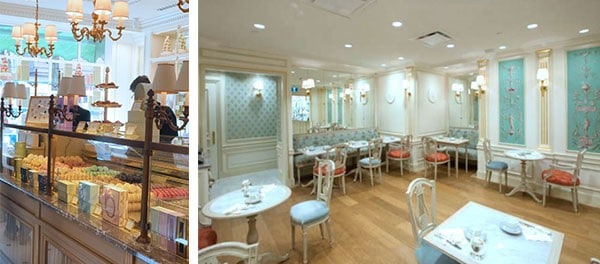
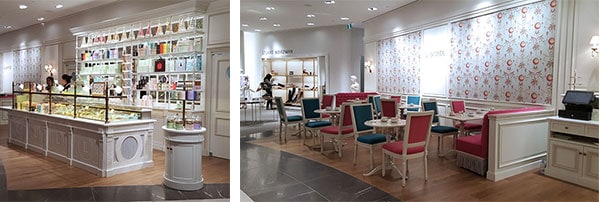
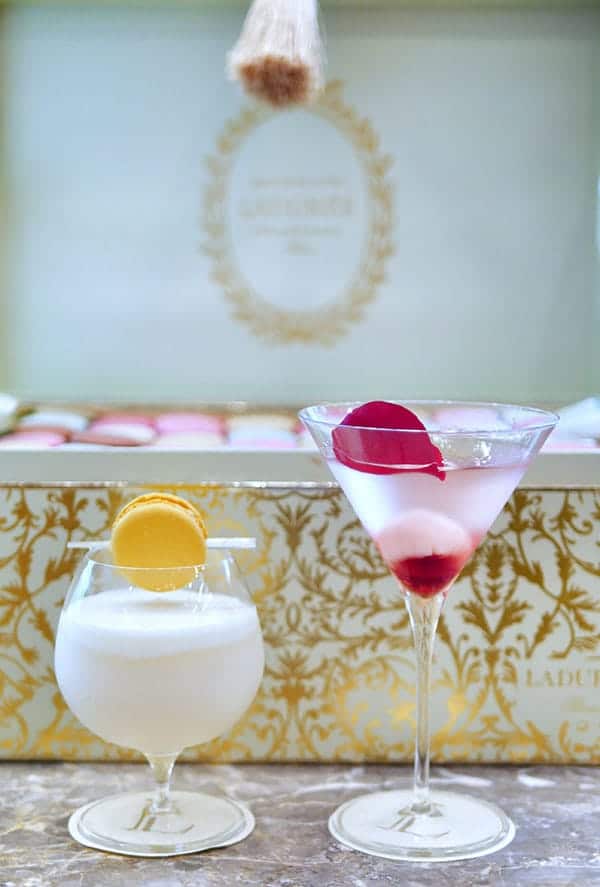
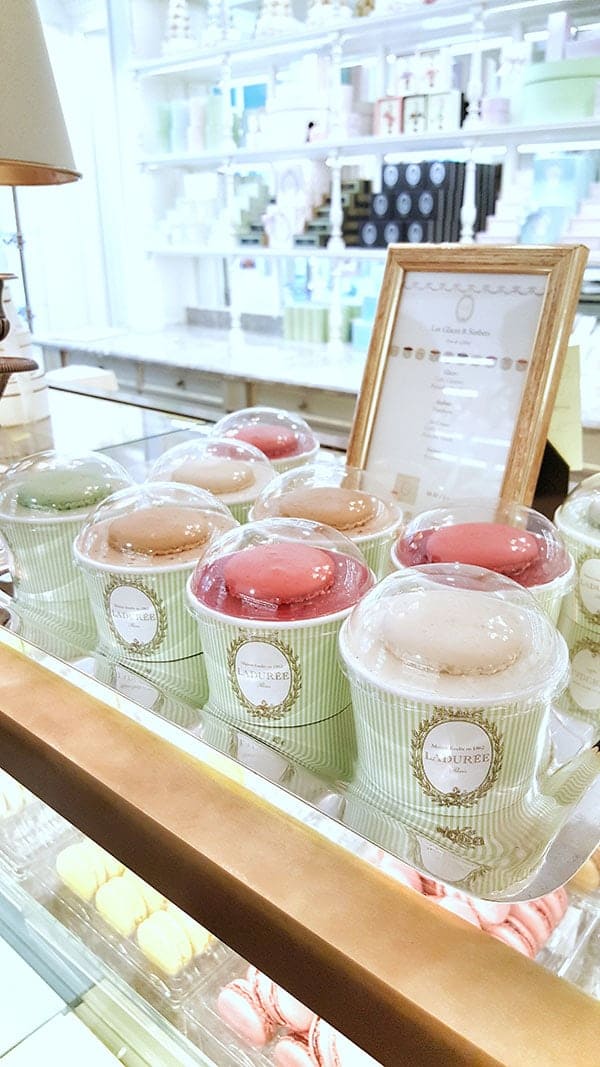
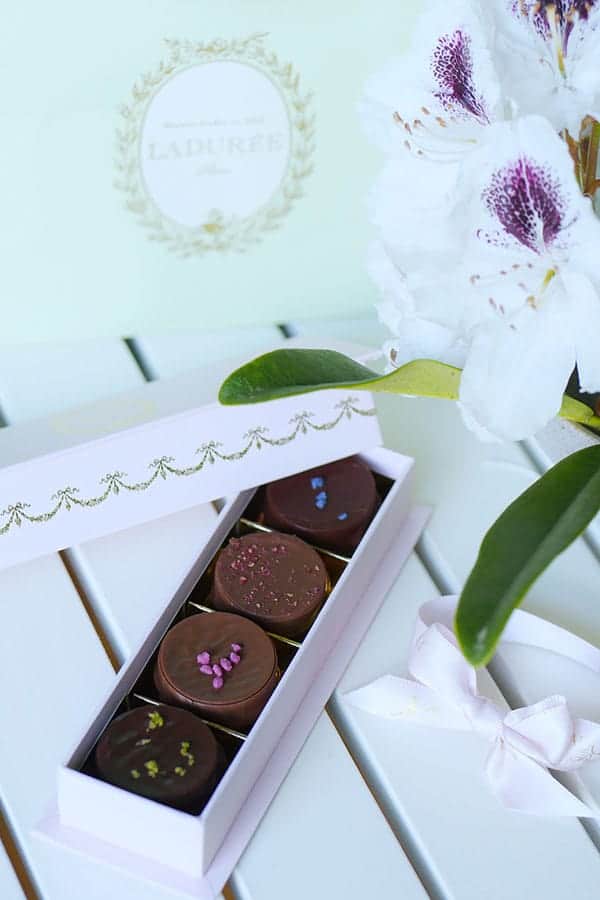
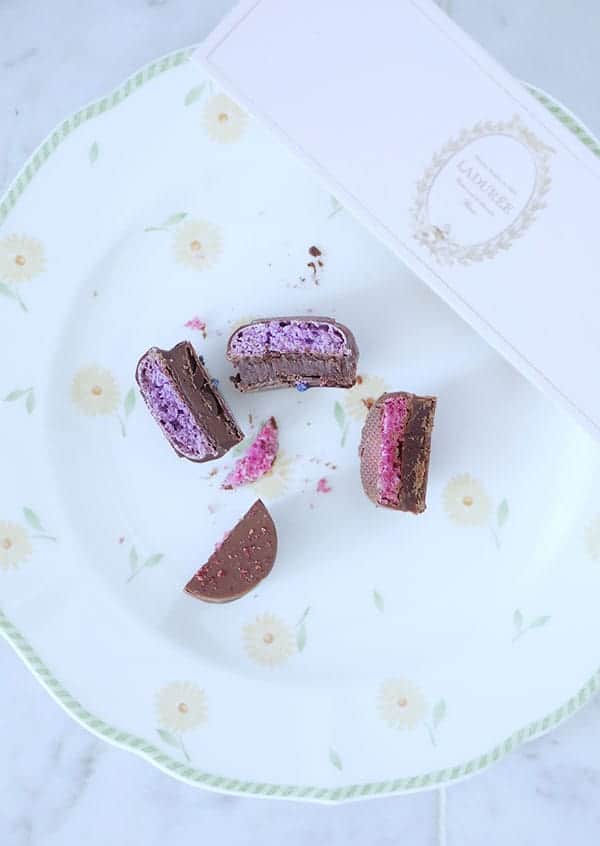
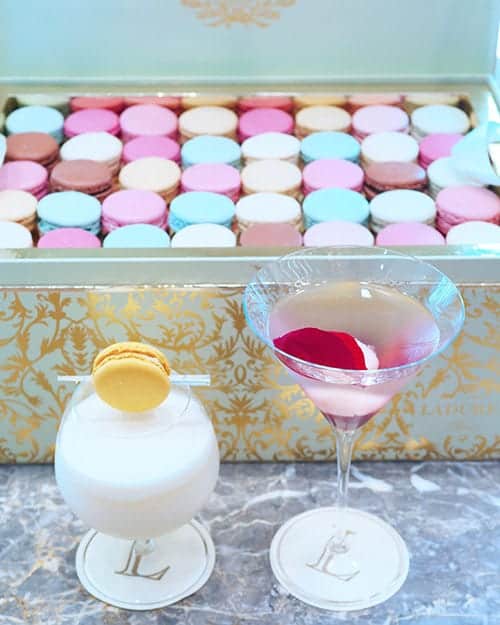
    Two years ago, I happened to be travelling to Hong Kong so I was excited to have an opportunity to finally taste Laduree macarons, even if it's not in it's birthplace, Paris. Blog post here. Then not long after, I heard the wonderful news that Laduree would be opening their first Canadian location and it would be right here in Vancouver!

    Laduree Vancouver officially opened its doors in March last year and just this month they opened their second Vancouver location rightfully situated in the luxury department store Holt Renfrew.

    What about the crowds?
    The first few weeks of Laduree's opening in Vancouver drew big crowds and line ups that were hours long. On our visit last month, a Sunday, we did not have to contend with the huge crowds. Arriving at 1 pm, we were one of the first groups in the salon. The room was slowly filled up to near full capacity midway into the day and the gift shop experienced a short burst of frenzied activity while we were there. The servers told us that the day before (a Saturday) was much busier so keep that in mind if you're trying to avoid the crowds.

    Delicious and Photogenic
    The most outstanding point of our tea experience was how all the food exceeded our expectations. Besides being incredibly photogenic, it also tasted delicious. All the sweets were incredibly flavorful and had the proper consistency and texture.

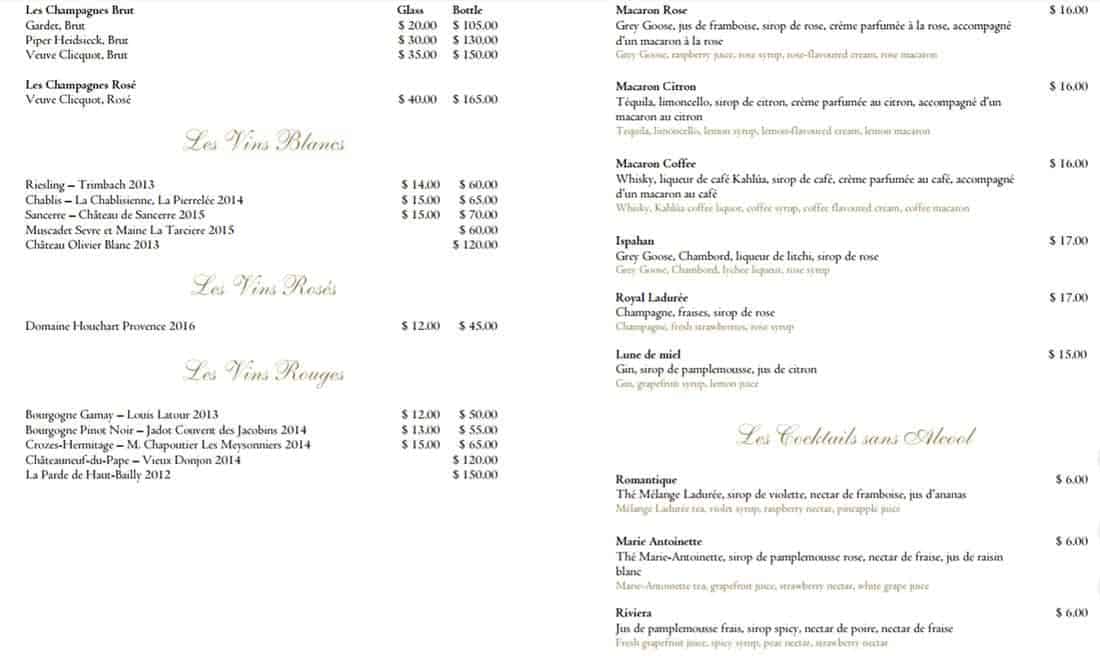
    What about the macarons?
    The macarons were also everything you'd imagine world famous Laduree macarons to be - a crispy egg shell like crust with a slightly chewy interior. It wasn't soggy or crispy - just right in the consistency department. The fillings were also loaded with flavour. And this is all after surviving a plane ride from France where they were originally made, flash frozened and shipped to all their locations around the globe. We were told by our server that the Vancouver location happens to receive two shipments a week. I think this is a great way to preserve a sense of consistency with their core product.

    The Menu
    The menu offers a respectable selection of sweets and a smaller list of savouries. There are lots of options for little sweet bites, making it easy for you to drop in for a quick pot of tea and a small treat. I know that is something I will not hesitate to do the next time I need a little break while on Robson street.

    I can't say enough how much I love everything that is Laduree and this experience made an even bigger fan of me. I will be revisiting again very soon.

    Until next time.

    XOXO,

    Mimi

    ❤ OTHER NOTES:

    Notable Points:
    - Parisian sweetness right in Vancouver!
    - Photogenic teaware
    - Mesmerizing gift shop
    - Laduree macarons!

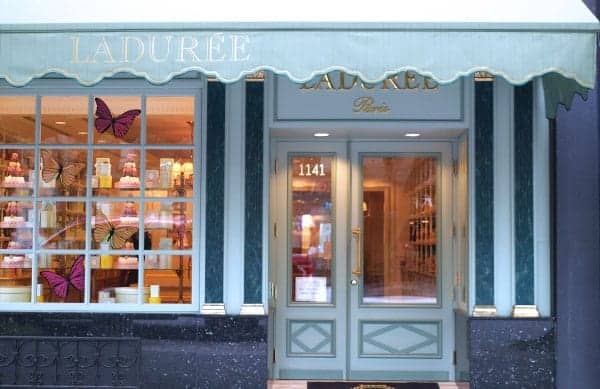
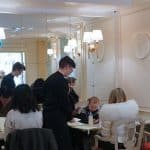
    Ambience: Dreamy Parisian tea salon that's colorful, elegant and feminine without being overly cute. Floral wall papered walls, white furnishings and photogenic marble tables. There is a brightly lit gift shop that is street facing. The approximately 20 seat tea salon is located at the back and in comparison, it is a bit underwhelming due to the absence of natural light since it is windowless.

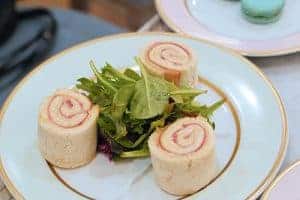
    Savoury: Good. A small savoury menu consisting mainly of croque monsieurs and french toast. Unlike the macarons, the savoury items are made in house and they were well-made, delicious and beautifully plated. The french toast was my favourite item. It had a nice bouncy texture and tasted like lychee. The raspberry sauce which comes on the side added a bit of tart and sweetness which tied everything together very well. It was so flavourful even on it's own that it was still enjoyable without the raspberry sauce. The tea sandwiches were quite small and meticulously wrapped in wax paper which turned out to be a good thing since the bread remained fresh. The smoked salmon and cucumber fillings were also nicely prepared.

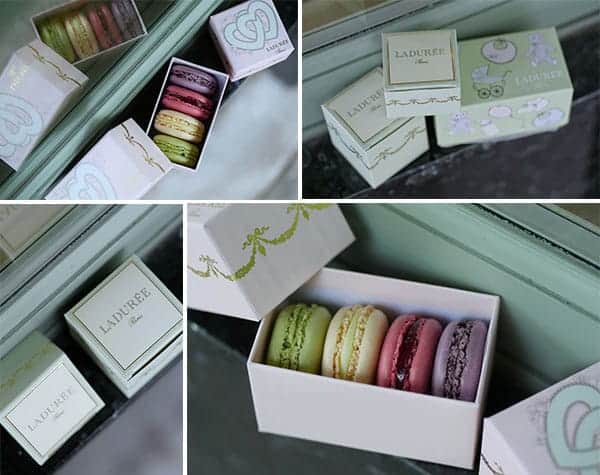
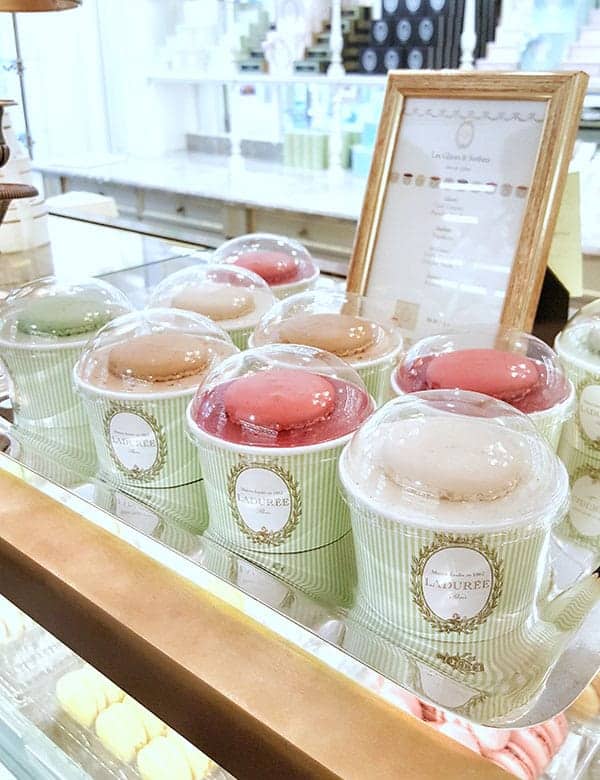
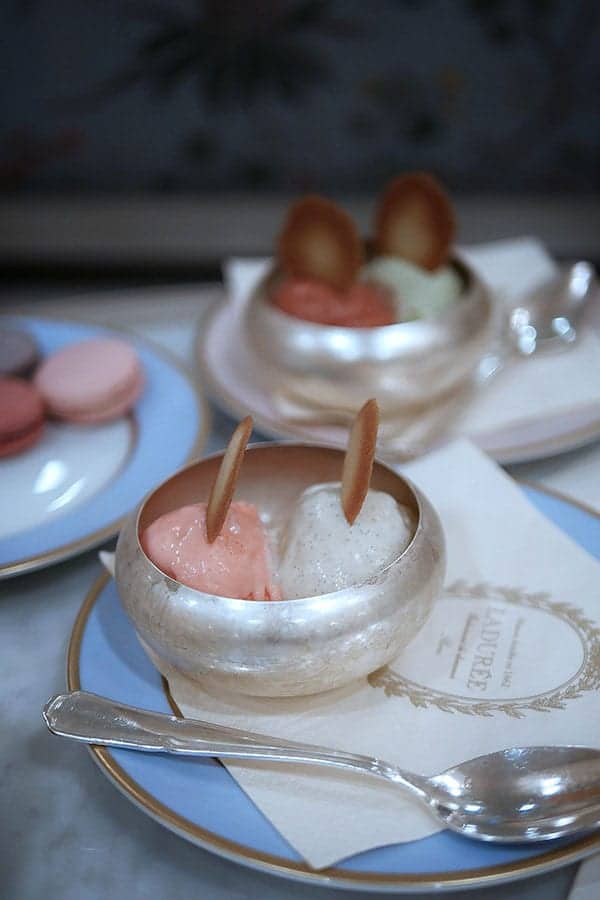
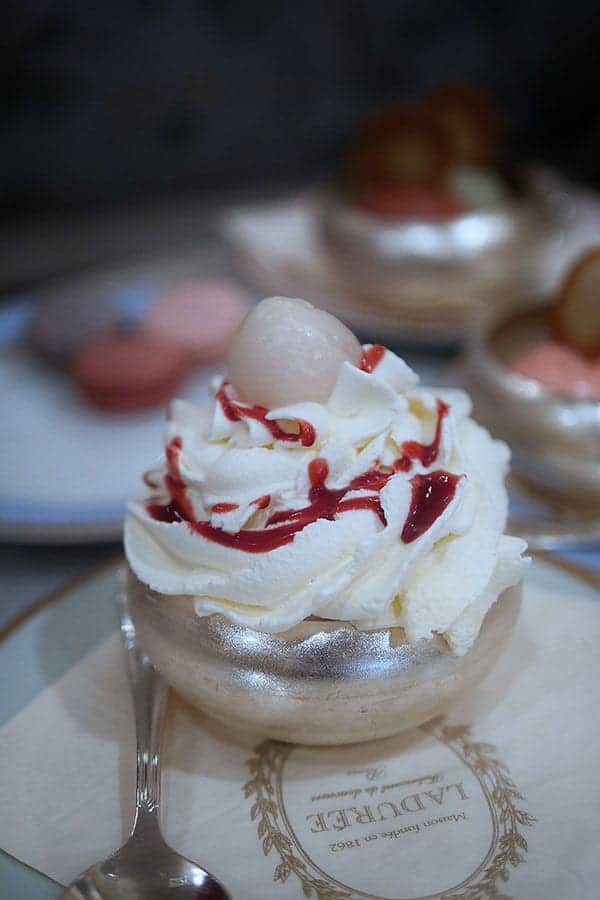
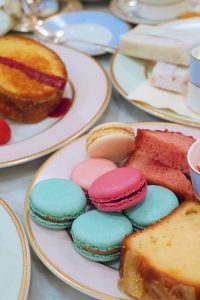
    Sweets: Excellent. We were really impressed with all the sweets. They were all equally flavourful and fragrant. The cakes all had appropriate textures to their respective type. The macarons were excellent. They had an egg shell like crust and a chewy interior. The shells seemed to be a bit better than the ones I had in HK. I think the humidity there is just not kind to macarons. If I had to compare Laduree macarons from the other bakeries in the city, I would say the shell reminds me most of the ones found at Faubourg. Just to be objective, if I had to pick one "problem" with their sweets, it would be that the flavours were on the one-dimensional side. It's strong and enticing but tasted artificial.

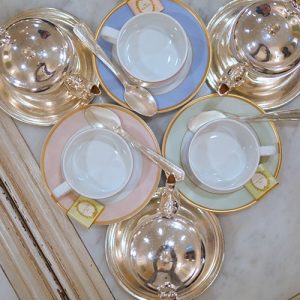
    Tea: A small collection. Teas are also available for sale as well (similar to TWG). I'm sure you're aware that their packaging is just to die for so they'll also look nice in a display case. I recommend the Marie Antoinette tea. I had the Jasmine one this time but didn't find it special enough to purchase.

    Tea Ware: Perfectly photogenic teaware! It is the most inspiring set of tea ware I've encountered at afternoon tea in Vancouver. Easily recognizable, these pastel colored tea sets are used in all their salons around the world. Your camera will just beg you to capture all this goodness.

    Service: Fully staffed, professional and well trained. We were checked on constantly and never felt unattended. We had one principal server along with other team members who would work together, serving or cleaning. They were all well-trained and professional but not so stuffy that they did not enjoy a few side conversations with each other when we were perusing the menu. Our main server was only two days into the job but I felt she was well trained enough to carry the day which seems to show how thorough their training must be. When the French Toast was brought out, there was a raspberry sauce pour which added a small theatrical touch.

    Location: 1141 Robson St, Vancouver, BC V6E 1B5

    Parking: Metered Street parking available right outside on Robson Street $6/hour. It is a 7 minute walk from the Burrad Street Skytrain Station.

    Other notes:

     ♥ Tea Set $45/per person
    (includes one pot of tea)

    ♥ Reservations can be made by calling the salon at (604) 336-3030, 1141 Robson St, Vancouver, BC V6E 1B5

    Scrumptious Salted Caramel Chocolate Macaron Recipe on the Radio

    Mar 27, 2017 · 6 Comments


    Here is the recipe for the scrumptious salted caramel chocolate macarons I shared on Fairchild Radio's Modern Deborah Show with Deborah Moore.

    Cantonese Macaron Recipe

    The segment was conducted mainly in Cantonese and some English because I can't always be expected to recall the right Chinese words when I need it. Luckily, Deborah, who is impressively articulate in both languages, was there to help translate where needed. I know many of her listeners enjoy being able to learn English from her show by the skillful way in which she sprinkles English words (with translations) into her speech but I think it's also a great way for others to learn Chinese as well! Deborah's show topics include a wide range of intriguing and easy to follow-along social interest topics like diet, travel, etiquette, music and more. See Deborah's Weekly Guest lists here

    On the Radio

    We usually record the show live so it's always a little exciting and nerve racking because you can't really "fix" your mistakes. I really don't know how Deborah does it five times a week! We use headsets to listen to our voices as we speak into a microphone and every now and then a technician in the sound room next to us will give a signal through the glass window to temporarily wrap things up for commercial breaks. Everything runs smoothly and it's just another day for these consummate professionals.

    Sound room where the technician controls the recording of the show.

    Looking into the room where we record.

    Scrumptious Salted Caramel Chocolate Macarons Recipe

    Now here is the recipe. It is actually a combination of two of my favourite macaron recipes. The Double Chocolate Macaron Recipe with Chocolate Ganache piped on the outside and and a dallop of Salted Caramel right in the center! YUM!

    Assembly Steps:

    • Make chocolate infused macaron shells
    • Make chocolate ganache, let it set in the fridge
    • Make salted caramel, let it set in the fridge
    • Once macarons have completely cooled, pipe a circle of chocolate ganache leaving the inside empty
    • Pipe the caramel filling in the center
    • Let it mature for 24 hours before eating.

    I hope you enjoy it and don't forget to sign up for the newsletter. I have some cool new macaron templates that I'll be sharing only with my newsletter subscribers. Thank you so much for listening and reading everyone. I am ever so grateful!

    XOXO,

    Mimi


    Chocolate Macarons
    Makes 12 Chocolate Macarons

    ♥  CHOCOLATE MACARON SHELL BATTER INGREDIENTS:
    - 65 grams almond flour
    - 65 grams icing sugar
    - 1 tablespoon of cocoa powder (sifted into the dry mix of almond and icing)
    - 45 grams castor sugar
    - 50 grams aged egg whites
    - ⅛ teaspoon cream of tartar

    ♥Follow instructions on my ORIGINAL Best French Macaron Tutorial ♥


    Basic Chocolate Ganache Recipe

    ♥ 100 grams of semi-sweet chocolate
    ♥ 100 grams of heavy cream
    ♥ 25 grams butter

    - chop up the chocolate and place in a heat safe bowl

    - heat up the heavy cream in a small sauce pan on low heat, watch it so that it doesn’t over boil

    - once it comes to a simmer, immediately pour it over the chopped dark chocolate

    - let it sit on the chocolate for 1 minute

    - blend vigorously with a spatula until fully incorporated

    - add the butter

    - place it in the fridge and let it cool off and firm up before piping (1-2 hours)

    SALTED CARAMEL RECIPE

    This delicious caramel recipe is adapted from Sally's Baking Addiction. Recipe is halved to make a small batch that can fill approximately 18 macarons. Remember to read my tips before starting.

    Ingredients:

    100 grams refined granulated sugar (not brown or powdered sugar)
    45 grams butter
    60 ml cream
    ½ - 1 teaspoon salt depending on your tastes
    vanilla extract or whiskey if desired

    Supplies:

    tall and thick pot
    heat proof spatula
    oven mitts

    Method:

      1. dry-method-caramel
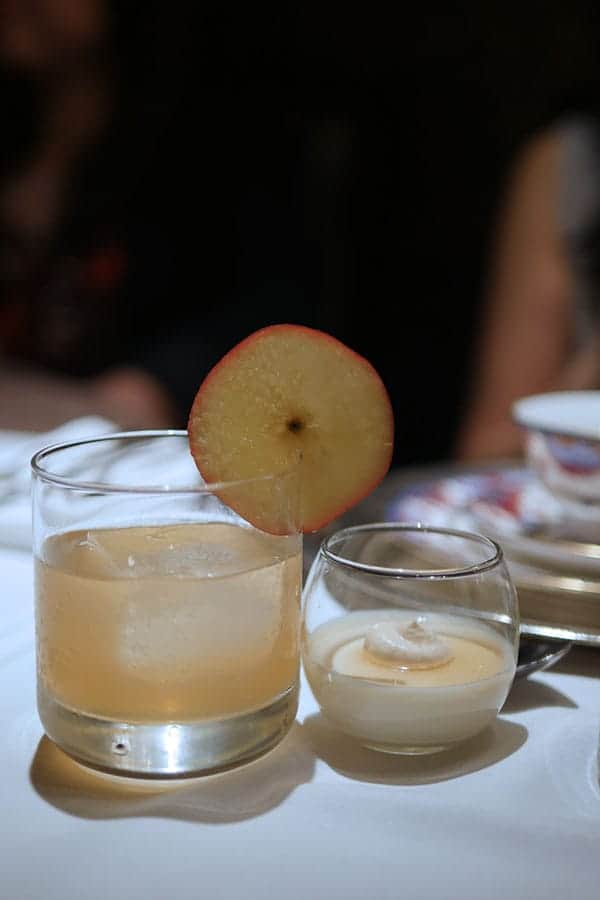
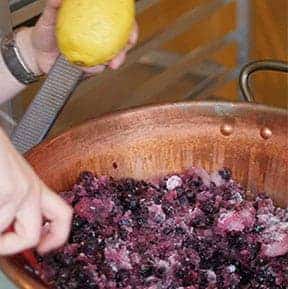
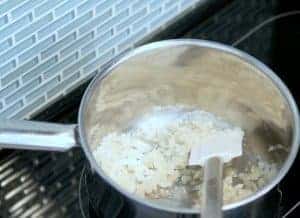
Use a small pan to heat up the cream. Once you see it steam, take it off the heat immediately and set it aside.
      2. Heat up the granulated sugar on medium heat in a tall pot. It will get clumpy but you don't have to stir it vigorously. The outer edges will develop more quickly, use a spatula to drag this darker sugar into the center and then tilt pan from side to side to move the mixture around. If sugar does form on the sides, have a wet brush on  hand to move over.
      3. Once the sugar is fully melted (it will be an amber colour, begin to smoke and foam a bit),  immediately add the butter. The mixture will start to sizzle and bubble up so be careful. Let it boil for 1 minute until everything is incorporated. Stir occasionally to break up the bubbles.
      4. salted-caramel
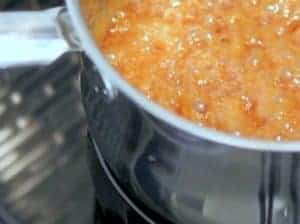
Nex, slowly pour in the cream. The mixture will bubble up again and this time it will be even higher. Let it boil for 1 minute. Stir occasionally to break up the bubbles.
      5. Remove from the pan from the heat, stir again and add salt (½ to 1 tsp.) according to your tastes.
      6. Add vanilla extract or whiskey if desired.
      7. Leave the caramel on the counter to cool down. The caramel will firm up once it starts cooling down.

    Tips for caramel success:

    • Always remember safety first. Caramel can be scorching hot! Have a bowl of ice water on hand in case there is splashing and use oven mitts to handle pots and while stirring.
    • Make sure pots are spotlessly clean before you start.
    • Use a large or tall pot in anticipation of mixture expansion. It will bubble up furiously and a thicker pot will help distribute the heat evenly. Do not use non-stick pans since high heat can damage them or cause them to release toxins. If using copper, make sure it is unlined copper.
    • Always use a medium (or even low-medium) heat to ensure you don't burn the sugar. Once it's burnt, there's no turning back.
    • When melting the sugar, vigorous stirring is not necessary since pushing the sugars together will re-crystalize it and cause it to form into clumps. Tilt pan from side to side to move the mixture around.
    • To avoid wide temperature fluctuations and make the cream easier to incorporate. Warm up the cream before you start making your caramel and slowly introduce it to the mixture by adding it in slowly. I like to heat the cream in a small pot with a handle and pour it in slowly. (The video shows me using a ramiken)
    • At each stage, do not let the mixture over boil, this can bring the caramel to a hard crack stage and it will harden up like hard candy making it unusable for filling macarons.

    Wrinkly Chocolate Macarons

    Question: Mimi, I have an extreme fear of making chocolate macarons because it tends to come out wrinkly on top regardless of how many times I’ve tried. I think it has something to do with chocolate because my other macarons come out nice. Do you have any tips or theories on that? Thank you!

    Answer: I have made them so many times trying to figure out why this question gets asked so often. I finally had a case recently which helped shed some light on why my particular batch was wrinkly. This may not be applicable to you but here goes.

    I have a dual oven, one on top and one on the bottom and I use it to bake shells from the same batch of batter. One of the ovens was running at 50F degrees lower than my usual baking temperature which caused my shells to be wrinkly. While baking with my usual baking temperature allowed it to baking properly with no hollows, wrinkles or beading. Since there were no additional problems, I can deduct that temperature is the culprit and not a case of a bad batter. Maybe you can try increasing your oven temperature too. I also suspect another reason may be due to the brand of cocoa powder you are using.

    I hope you enjoyed this tutorial. Please leave me a message and tell me your experience with making chocolate macarons.

    Xoxo

    Mimi

    [srp post_limit='5' post_random='yes' category_include= 25 widget_title = 'More Macaron How-To's']

    • « Go to Previous Page
    • Page 1
    • Interim pages omitted …
    • Page 5
    • Page 6
    • Page 7
    • Page 8
    • Page 9
    • Interim pages omitted …
    • Page 11
    • Go to Next Page »

    Primary Sidebar

    Mimi Macarons Head Shot

    Writer and photographer behind IndulgeWithMimi ♥ Join me for posts about Vancouver life, style, baking and my obsession: #MacaronArt ♥

    More about me →

    Fall Desserts

    • Mini pumpkin spice loaves on a cooling rack with spices and pumpkins in the background.
      15 Minute Pumpkin Spice Cake Loaf
    • A square slice of pumpkin Tres Leches cake rests on a plate with a small pumpkin and a small bowl of spice next to it.
      30 Minute Pumpkin Spice Tres Leches with Cake Mix
    • An pumpkin cake roll on a wooden tray with little pumpkins on top with cream.
      Asian-style Pumpkin Spice Cake Roll with Cream Cheese Filling
    • Close up on pumpkin cheesecake cups with real pumpkin in the back.
      No-Bake Pumpkin Cheesecake Cups

    MOST HELPFUL MACARON POSTS

    • Close up of two non-hollow macarons assembled with fillings.
      The Best French Macaron Recipe w/ Video & Template
    • Yummy Macaron Filling Ideas
    • Macarons with various problems like cracks, hollow, lopsided problems are shown.
      Macaron Troubleshooting Guide
    • Mandarin orange macarons on a plate.
      Correctly Using Your Home Oven for Baking Macarons

    MACARON TEMPLATES

    • A half birthday cake made from whipped cream and fresh strawberries topped with a cake topper that says "half".
      A Strawberries and Cream Half Birthday Cake for Bibi's 6-Month Birthday (Cake Topper Template)
    • How to Make a Cute Macaron Box for Your Character Macarons (Template)
    • Horse Carousel Macaron Cake (w/ Template)
    • Pink Bear Bridal Macarons Favors with Royal Sugar Roses (Bear Template)

    Footer

    ↑ back to top

    • Facebook
    • Instagram
    • Twitter
    • YouTube

    Info

    • about
    • contact
    • Privacy 

    recipe index

    • All Recipes
    • Macaron Recipes
    • Macaron Baking How To’s
    • Macaron Knowledge & Books
    • Cakes

    Newsletter

    • Subscribe for Templates
    • Subscriber's Login

    As an Amazon Associate I earn from qualifying purchases.

    Copyright © 2025 Indulge With Mimi